Recommended resources
The freely available resources this lesson will direct you to.
Hello, and welcome. This course is about making a small browser game step by step. In this first module, you will learn just enough JavaScript and p5.js to turn ideas into visible, playable things.
Today’s goal is practical: open the p5.js Web Editor, run its starter sketch, change it, and recognize where to look when something goes wrong. By the end, you will have a saved sketch with your own tiny game-like scene.
The p5.js Web Editor: your coding playground
p5.js is a JavaScript library designed for creative coding: making drawings, animations, and interactive projects in a web browser. A p5.js program is commonly called a sketch. The browser-based editor lets you write code on one side and immediately see the result on the other, so you do not need to install anything before starting.
Open editor.p5js.org in a browser. You can experiment without an account, but creating an account is worthwhile because it lets you save your projects and return to them later.
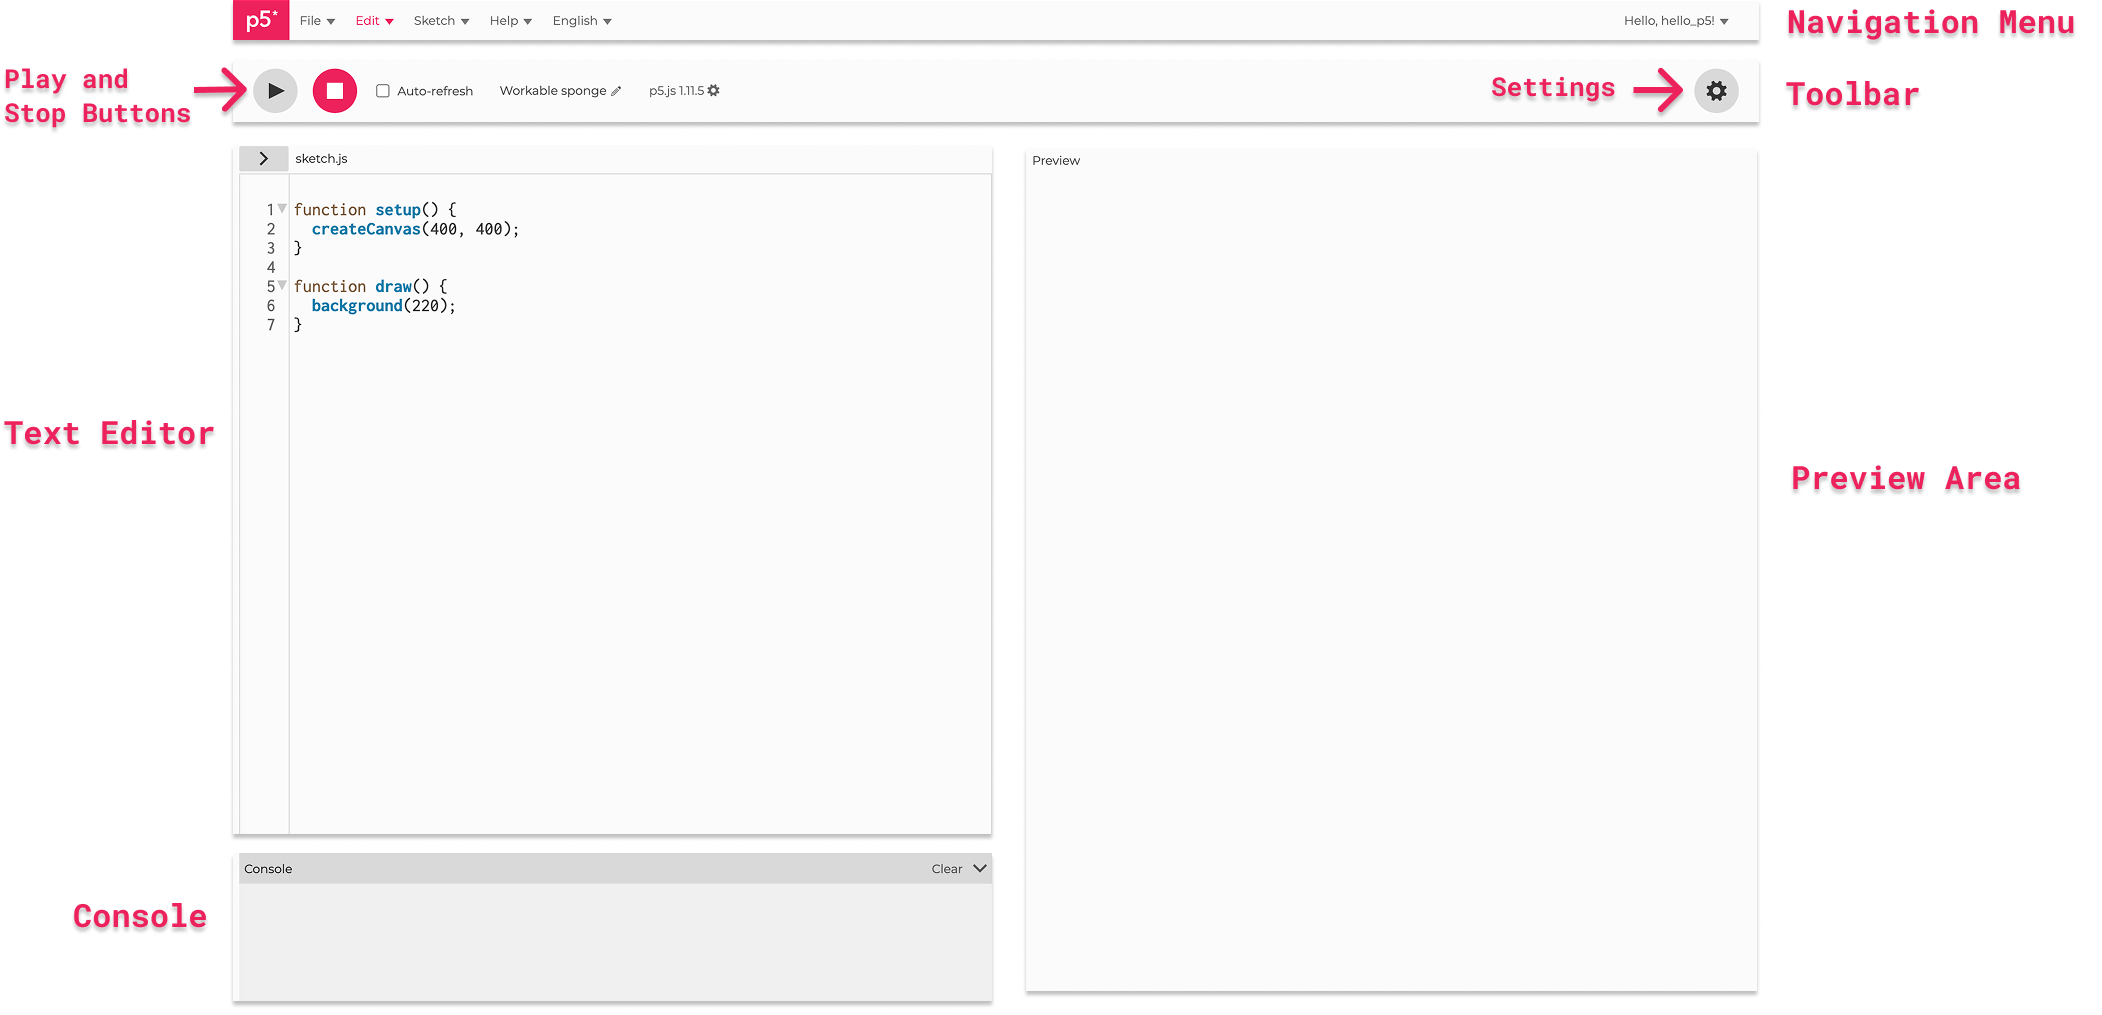
The exact appearance can change over time, but locate these parts:
| Part | What it is for |
|---|---|
| Text editor | Where you edit your JavaScript, usually in sketch.js. |
| Preview area | Where p5.js displays your canvas, drawing, or future game. |
| Play button | Runs or restarts the sketch. It is usually a triangle icon. |
| Stop button | Stops a running sketch. |
| Console | Displays error messages and other program output. |
| Auto-refresh | Optionally reruns the sketch when you edit code. |
Watch the first two short sections of How to Use to p5.js Web Editor (1.2) by The Coding Train for a quick visual orientation and the account-saving workflow.
How to Use to p5.js Web Editor (1.2)
In this short tour, The Coding Train opens the editor, changes the default background, runs the code, and explains why signing in matters for saving work.
Watch the editor tour to see the default sketch run and to notice how changing one number changes the preview. Then watch saving sketches if you need to create an account or sign in. The important habit is simple: give projects meaningful names and save after changes you want to keep.
Before changing anything, press Play once. A gray square should appear in the preview. You have now run a JavaScript program.
What the starter sketch is doing
A new p5.js project normally places the important code in a file called sketch.js. It commonly starts like this:
function setup() {
  createCanvas(400, 400);
}

function draw() {
  background(220);
}
Do not worry about writing this from memory yet. Read it as a small set of instructions:
function setup()contains instructions that run once, at the beginning.createCanvas(400, 400)creates a drawing area that is 400 pixels wide and 400 pixels tall.function draw()contains instructions that repeat while the sketch runs.background(220)paints the canvas gray each timedraw()runs.
The parentheses hold arguments: information given to a function. For createCanvas, those arguments are width and height. For background(220), the single number is a grayscale brightness: is black, is white, and values in between are shades of gray.
For now, treat the punctuation as part of the instruction:
- Parentheses
()hold a function’s inputs. - Curly brackets
{}mark the code belonging to a function. - Semicolons
;mark the end of an instruction. - Capital letters matter:
createCanvasis correct, whilecreatecanvasis a different name.
The official p5.js Get Started tutorial gives a concise explanation of this default sketch and of the canvas size controls.
Read the official p5.js tutorial to reinforce where projects are saved, which file to edit, and why setup() and draw() have different jobs.
Begin with “Step 1: Name and save a new p5.js project” to see the naming and saving process. Then read the “Default Code” section. In the explanation beginning how execution begins, focus on the distinction between code that runs once in setup() and code that repeats in draw(). Continue into “Step 2: Change the size of the canvas,” paying particular attention to the instruction that the canvas can be made 600 pixels wide and 400 pixels high, and that Play or Auto-refresh updates the preview.
One detail will matter throughout this course: instructions in draw() are repeated many times each second. That is what will eventually allow us to animate a player, move a rival, and update a score. At the moment, it simply means the background is continually redrawn.
Make your first modification
Start with one small, low-risk experiment. In your editor, find:
background(220);
Change it to:
background(35);
Press Play again if Auto-refresh is off. The gray canvas should now be much darker.
Now try a color. Replace that same line with:
background(35, 70, 140);
These three numbers are red, green, and blue light levels, usually abbreviated as RGB. Each is normally from to . In this example, the canvas has a deep blue background:
35controls red light.70controls green light.140controls blue light.
Small edits followed by immediate observation are a powerful way to learn programming. Change one thing, run it, observe the result, then keep it or change it back.
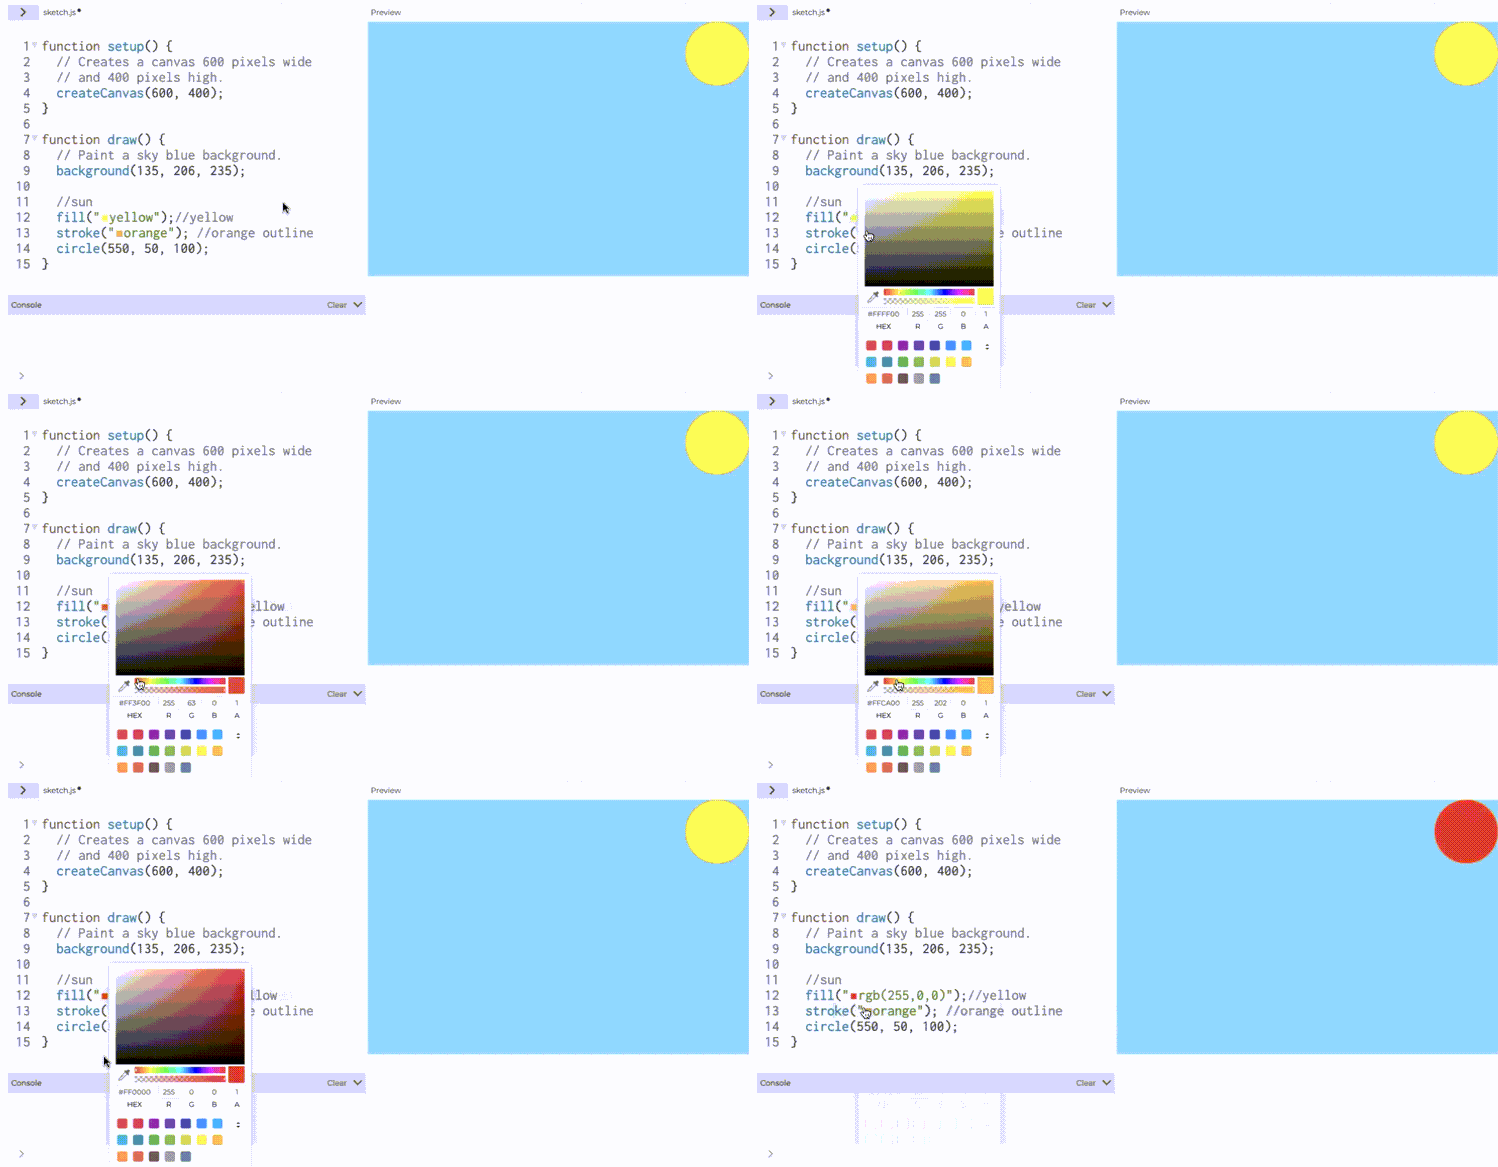
If your editor offers Auto-refresh, turn it on after you have successfully run the initial sketch. It is convenient, but expect temporary errors while you are halfway through typing a line. That is normal: the editor is attempting to run incomplete code.
Turn the starter into a tiny scene
Next, replace the entire contents of sketch.js with this code:
function setup() {
  createCanvas(600, 400);
}

function draw() {
  background(35, 70, 140);

  fill(255, 210, 40);
  circle(300, 200, 90);
}
Press Play. You should see a 600-by-400 canvas with a dark blue background and a yellow circle near the middle.
This sketch introduces two new drawing instructions:
fill(255, 210, 40);
circle(300, 200, 90);
fill() chooses the interior color for shapes drawn after it. Here it selects a yellow RGB color. circle() draws a circle. Its three inputs specify a horizontal location, a vertical location, and a diameter. We will properly learn the canvas coordinate system in the next module; for today, it is enough to see that changing these values moves or resizes the circle.
Try altering only one line at a time:
- Change
createCanvas(600, 400)to make a wide or tall play area. - Change the three values in
background(...)to create a new setting: night, grassland, lava, or space. - Change the three values in
fill(...)to change the circle. - Change the final
90incircle(...)to make the circle larger or smaller.
The order of instructions matters. background(...) should remain near the top of draw(). If you put it after circle(...), the background will paint over the circle, and the circle will appear to vanish.
Once you have a version you like, rename the project using the title area or pencil icon near the top of the editor. A name such as First Game Scene is much easier to find later than the automatic random title. Then use File > Save.
When the preview does not cooperate
Errors are not evidence that you are “bad at coding”; they are the ordinary feedback mechanism of programming. The console is your first diagnostic tool.
If the preview is not what you expect, use this quick process:
- Run the sketch again. Press Play if Auto-refresh is off.
- Look at the console. A red message usually includes a line number.
- Inspect the named line and the line just before it. A missing semicolon, parenthesis, or curly bracket can make the reported line slightly misleading.
- Compare spelling and capitalization carefully. JavaScript treats
createCanvasandcreatecanvasas different names. - Make one repair, then rerun.
For example, this is a typo:
crateCanvas(600, 400);
The editor may report that crateCanvas “is not defined.” It means p5.js does not know an instruction with that name. The repair is:
createCanvas(600, 400);
Two other common beginner mistakes are:
background(35, 70, 140)
This may still work in JavaScript, but consistently using semicolons makes code easier to scan:
background(35, 70, 140);
And this will prevent circle() from being drawn:
function draw() {
  circle(300, 200, 90);
  background(35, 70, 140);
}
The background is drawn last, so it covers the circle. Place the background first.
The console explanation in First steps with p5.js is useful when an unfamiliar message appears.
First steps with p5.js (Creative Coding)
Read this short troubleshooting section after you have run your modified sketch. It explains what the console is telling you and gives a realistic spelling-error example.
In the subsection “When something goes wrong,” read from the role of the console. Then continue through the example in which crateCanvas is misspelled. Focus on two clues supplied by an error message: the line number and the unknown name.
A productive beginner workflow
You can now use the core loop for making creative code:
- Start from a working sketch.
- Change one understandable detail.
- Run the sketch and inspect the preview.
- Read the console if it fails.
- Save versions that you want to keep.
This is more reliable, and more fun, than trying to write a large program all at once. Your current sketch is not a game yet, but it already has the basic structure one will need: a canvas, repeated drawing, and visible objects.
You have run a p5.js sketch, edited sketch.js, changed the canvas and colors, drawn a shape, saved a project, and used the console as a debugging tool. The key structural idea is that setup() prepares the sketch once, while draw() repeatedly creates the current frame.
Next, you will store game information in JavaScript variables and update it with arithmetic. That will let the scene remember things such as a player’s position, a score, or how many items have been collected.