Recommended resources
The freely available resources this lesson will direct you to.
- How I Run 19 OpenClaw Agents for $6/Month | Clawdbot API Cost Optimizationwww.youtube.com
- This DaVinci Resolve Plugin Just Made Me CANCEL Every AI Subscription (Cloud & Free Local)www.youtube.com
- Manage spend cap budgets | Cloud Billing | Google Cloud Documentationdocs.cloud.google.com
- Gemini Developer API pricingai.google.dev
Hello! Last time, you defined output profiles for Instagram Reels, YouTube Shorts, and YouTube long-form videos. A profile tells your system what kind of edit to make. Today we’ll add a different set of instructions: what the system is allowed to spend and what it is allowed to send off your computer.
Your DaVinci Resolve Studio workflow can do substantial work locally. Cloud AI may help analyze footage or plan edits, but a “free” service can have privacy trade-offs, and an inexpensive request can become expensive when repeated across a long video. By the end of this lesson, you’ll have a per-video policy that handles both risks while fitting a $10 monthly ceiling.
Privacy comes before choosing a model
Suppose you give the system an hour-long interview and ask for three Shorts plus a complete long-form edit. Before estimating a price, ask a simpler question: Which parts of this interview may leave this computer? A transcript could contain names or private details; a sampled frame could reveal a client document. Sending a smaller file is not automatically the same as sending less sensitive information.
Google’s Gemini API pricing page illustrates why price and privacy must be considered together.
Read Google's comparison of the Gemini API Free and Paid tiers. The point here is not to choose Gemini yet; it is to notice that a zero-dollar API request can have different data-use terms from a paid one.
Near the top of the page, find the “Free” and “Paid” lists. Read both tier descriptions, then continue to the final “Content used to improve our products” line in each list. Compare those lines rather than judging the tiers by price alone.
The page says Free-tier content is used to improve Google’s products, while Paid-tier content is not under the linked terms. That distinction does not mean every paid service has identical rules, or that “not used to improve products” means “never retained.” Before using any provider with sensitive material, check its current terms for retention, logging, access, and deletion.
For your system, three privacy settings make a useful starting policy:
| Setting | What may leave your computer | Appropriate use |
|---|---|---|
| Local only | No footage, frames, audio, transcripts, or edit instructions sent to cloud AI | Private, client, unreleased, or uncertain material |
| Reviewed text only | An approved, redacted transcript excerpt and minimal instructions | When cloud planning would help but visuals need not be shared |
| Reviewed samples | Specifically approved transcript excerpts and selected frames or short clips | When visual evidence is essential and you have permission to share it |
These are maximum permissions, not promises that an upload will occur. “Reviewed text only,” for example, should not silently become a full-video upload because a model accepts video. Remove unnecessary names, addresses, account details, and identifying file paths from anything sent. Keep the original footage and the editable Resolve timeline local by default. A coding assistant is also an external service: do not paste private transcripts or API keys into it while asking for script help.
A privacy check can change the plan. If the footage is private and local analysis gives an uncertain answer, the correct result is “needs human review,” not an automatic upload. Local processing also has hardware limits: your 4 GB graphics card is not a reason to assume demanding local AI video-generation models will run well. For this course, the sensible local baseline is media preparation, selective analysis, review, and editing—not generating whole videos from scratch on the GPU.
Give each video a cost estimate and a spending limit
A monthly ceiling alone does not tell the system whether it may spend $0.20 or $8 on the next job. Set a per-video cloud allowance before processing starts, then require approval to raise it. Count a job by the source and requested deliverables: making a long-form edit and several extracts from the same footage should not hide cloud calls in separate “free” sub-jobs.
Cloud AI prices may depend on input tokens, output tokens, processed media, or generated seconds. A token is a unit used for model billing; a long transcript, repeated instructions, and the model’s response all contribute to usage. Some tools have additional charges. Read two examples on the pricing page:
Return to Google's pricing page to compare inexpensive analysis or planning with AI-generated video. These are examples for estimating costs, not a recommendation to enable either service.
Under “Gemini 3.8 Flash,” find the first “Standard” table. Read the model introduction and price rows, concentrating on input versus output pricing and the stated dates. Then find “Gemini Omni Flash,” not its later Preview subsection. Read the video-output example through the footnote explaining its approximate per-second cost.
For a text-model estimate, the basic calculation is:
Here, is the estimated token count, is the current price per million tokens, and the last two terms cover any separately priced media or tools. The pricing page notes that output prices can include thinking tokens, so counting only the visible answer may underestimate a bill.
For illustration, the page lists a paid Gemini 3.8 Flash standard rate of $0.75 per million input tokens and $3.75 per million output tokens through December 31, 2026. At those dated rates, 50,000 input tokens and 10,000 output tokens would cost about $0.075 for those two components. That is not a quote for analyzing an hour of video: media processing, tool use, retries, and a different model could change the total. Check the current model, rate, and terms before enabling paid calls.
The video-generation example shows why you should distinguish editing existing footage from paying a model to produce new footage. Its approximate $0.10 per second of 720p output would put a 10-second generated clip around $1 in output cost alone. Your system does not need to generate new video to select moments, assemble a Resolve timeline, and export an edit.
To make an estimate useful, limit the amount of work proposed: analyze locally first where possible, send only relevant excerpts or approved samples, cap the number of cloud calls, and allow at most a specified number of retries. For a long source, estimate the whole planned job, not merely its first chunk.
A cap inside your system is not the same as a provider cap
Your future script can refuse to start a call if its estimated worst-case cost would exceed the job allowance or the uncommitted monthly balance. That is the per-job gate. It should include a margin for uncertain token counts and retries; otherwise, “three quick retries” can spend three times the original estimate. If the limit is reached, the job should save what it has and ask you to approve a narrower analysis, a local fallback, or more budget.
The provider may offer a separate billing safeguard. Google’s documentation describes spend cap budgets for certain eligible services, including the Gemini API. Read what the safeguard actually covers before treating it as a $10 guarantee.
Manage spend cap budgets | Cloud Billing | Google Cloud Documentation
Google Cloud's spend-cap guide explains both the protection and its boundaries. Focus on the distinction between a scoped provider-side cap and the total amount you might spend across your entire editing workflow.
Begin with “About spend cap budgets” and continue into “How spend cap budgets work to help you control spend.” Read the cap behavior, then finish the sentence about estimated costs. Under “Services that are eligible for spend cap budgets,” read the eligible-service list through “Cloud Run functions,” stopping before “Limitations of spend cap budgets.” Next, under “Configure a spend cap budget,” follow the “Define,” “Scope,” “Amount,” and “Actions” subsections. Read the setup and latency warning. Finally, in “Actions,” read the notification rules.
A Google Cloud spend cap is monthly and scoped to one project and one eligible service. When triggered, it pauses that service’s usage in that project; it does not cap other projects, other services, subscriptions, or a different AI provider. Enforcement is not instantaneous, and the documentation says you remain responsible for overages caused by reporting latency. Set any provider-side target below the absolute amount you can afford, rather than assuming it is a perfect hard ceiling.
The guide also distinguishes Spend cap enforcement from Alerts only. An email warning is valuable, but it does not stop a processing job. For spend caps, Google says the 50%, 80%, and 100% notifications and recipients are automatically configured rather than customizable.
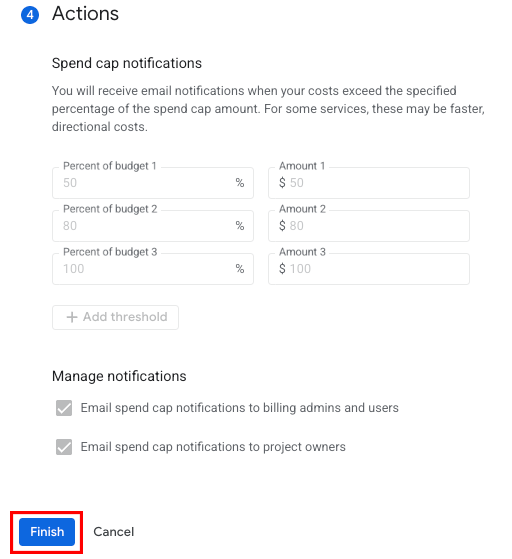
Your system’s own per-job gate and a provider-side cap serve different purposes. The first decides whether this video is allowed to make a request. The second helps contain usage of a specific billed service. Keep both, and check actual provider spending rather than trusting estimates alone.
A starter policy for a $10 month
Here is a planning example, not a prediction of what your videos will cost. It assumes no new paid subscription. If you add one, subtract its full monthly price from the cloud allowance before approving any jobs.
| Monthly allocation | Maximum |
|---|---|
| Eight ordinary video jobs, up to $0.75 of cloud usage each | $6.00 |
| Other approved cloud work, such as an unusually long job | $2.00 |
| Uncommitted margin for reporting delays or estimation errors | $2.00 |
| Total ceiling | $10.00 |
A private job’s cloud allowance is $0, regardless of how much monthly money remains. For an ordinary eligible job, start with $0.75, not an instruction to spend $0.75. The system should use the least cloud processing that produces a useful plan. A complex long-form job may need more than $0.75; it must request approval from the $2 flexible allocation or use a local/manual fallback. Do not silently increase the cap because the source is long.
Before each request, the system should check both balances: the remaining allowance for this job and the remaining monthly allocation, after accounting for jobs already approved but not yet billed. Once a request finishes, record its reported usage and estimated cost; reconcile those figures against the provider’s actual billing display. This prevents two jobs running close together from each assuming the same last dollar is available. If billing data is delayed or unavailable, pause further paid requests rather than treating “no charge displayed yet” as “free.”
You can express the policy on a per-video card without writing code yet:
Video: Interview edit with two Shorts and one long-form draft
Privacy: Reviewed text only; no raw footage, audio, or frames uploaded
Cloud allowance: $0.75 maximum for the entire job
Allowed purpose: Rank approved transcript excerpts and draft an edit plan
Call limit: Three paid calls, including retries; no paid video generation
Stop condition: Pause before a call that could exceed either remaining allowance
If stopped: Keep local analysis and the editable work; request approval or human review
The important design choice is that cost and privacy permissions travel with the video job. An output profile may request a Reel or a long-form video, but it cannot authorize an upload or an extra charge by itself.
Takeaways
Set a privacy level before selecting a cloud model. Give every video a cloud allowance, estimate the complete job—including retries and media charges—and stop before an unapproved call. Keep a separate monthly ledger with room for billing delays. Provider spend caps are useful additional protection when available, but their scope and latency mean they cannot replace your per-job rules or guarantee that all services stay under $10.
That completes the system-design module. Next, we’ll move to the Windows foundations needed to run and check the small automation scripts that will eventually enforce these policies.