Recommended resources
The freely available resources this lesson will direct you to.
- How I Fully Automated My Video Editing (Claude Code)www.youtube.com
- I Let an AI Edit My Video Timeline for me - Davinci Resolve Intelliscript Workflowwww.youtube.com
- DaVinci Resolve 18.5 Supported Formats and Codecsdocuments.blackmagicdesign.com
- JSON Schema Data Types: A Complete Guide to Validationblog.postman.com
Hello! This course is about building an AI-assisted editing system that takes your footage and instructions, then produces videos you can review and change in DaVinci Resolve Studio 21. We’ll design for Instagram Reels, YouTube Shorts, and full-length YouTube videos without assuming every job starts with the same kind of footage.
Before choosing AI tools or writing automation, we need a clear agreement about what goes into the system and what must come out. In this lesson, you’ll define that agreement: accepted media, the instructions a person supplies, and the editable deliverables for both short- and long-form jobs. The details of how the system processes them come next.
Start with a job, not a magic prompt
Imagine giving the system a folder containing a 14-minute camera recording, a phone demonstration, a logo, and an approved music track. You write: “Make a 45-second Reel about the main benefit, and an eight-minute YouTube explanation. Keep the demonstration. Don’t show customers’ faces.”
That request contains several different kinds of information. The recordings are source footage. The logo and music are optional assets. The sentence states a goal, but also contains a required moment, a prohibition, and two separate output requests. If all of this remains an unstructured prompt, the system might overlook a constraint or produce only one video.
For our purposes, a job is one submission containing:
- At least one source video.
- Editing instructions and restrictions.
- One or more requested output profiles.
- A place to save the editable work and viewing copies.
A job may request a short extract from a long recording, a complete long-form edit from several recordings, or both. These are different editorial tasks: an effective short extract may concentrate on one self-contained moment, while a long-form edit must preserve enough context and order to make a complete video. “Short-form” and “long-form” therefore describe requested outputs, not acceptable input lengths. A 90-minute source should be eligible for a short extract; several short clips should be eligible for a longer assembly if they contain enough material.
This first version aims to make a reviewable first edit, not promise an unattended final publication. An instruction such as “use the strongest hook” expresses an editorial preference. It does not make the AI’s judgment, factual claims, asset rights, or timing automatically correct.
Define what media the system accepts
A file extension is a useful first check, but it does not fully identify what is inside a file. Two .mp4 files can use different video codecs or recording settings. Our intake agreement should therefore say both which file families we intend to accept and what happens when an individual file cannot be processed.
Blackmagic Design’s Windows format list is a useful starting point. It is for Resolve 18.5, however, not your installed Resolve Studio 21. Treat it as evidence for a sensible initial shortlist, not as a guarantee that every file in that shortlist will work on your machine.
DaVinci Resolve 18.5 Supported Formats and Codecs
Read Blackmagic Design’s Windows format tables to see why a container such as MP4 and the video or audio format inside it both matter. We’ll use them to set a practical intake policy, rather than memorize codecs.
In the Windows 10 Video Format table on printed p. 8, find the H.264, H.265, and AV1 rows. Scan those video rows, noting the listed MOV, MKV, and MP4 containers. In Still and Sequence Formats on printed p. 9, find JPEG and Portable Network Graphics; scan those image rows. In Audio Format on printed p. 10, read from the WAV row through the FLAC row in the audio table. You can skip the specialist camera and cinema formats for now.
Here is a workable first-version intake contract. It is intentionally broad enough for your goals without claiming to handle every file ever produced:
| Input role | Initially accepted | If it cannot be used |
|---|---|---|
| Primary footage | One or more local video files, initially MP4 or MOV; MKV can be tested rather than assumed | Identify the file and problem; request a compatible copy or prepare an intermediate copy before editing |
| Additional visuals | Optional JPEG or PNG images, such as screenshots or approved graphics | Omit the optional asset and report why |
| Additional sound | Optional WAV, MP3, or M4A/AAC audio, such as a supplied voice track or approved music | Continue without optional audio, or ask for a replacement if it is essential |
| Asset library | An optional folder of approved logos, B-roll, memes, and other media | Use only assets with known permission for the intended use; do not silently substitute an internet find |
Local files are the default. A filename alone is not proof that an asset is licensed or appropriate. The job should distinguish supplied footage from a reusable asset library, and mark which assets the system is allowed to use. A future library can hold richer search information; for now, “approved for this job” is enough to set a meaningful boundary.
Do not restrict inputs to talking-head videos. The source list may contain interviews, podcasts with video, gaming or screen recordings, demonstrations, or mixed clips. Some videos will have no speech, so a transcript cannot be a universal requirement for accepting a job. Conversely, a job with only still images is outside this first version’s stated contract: it requires at least one video. That boundary can be expanded later.
On your Windows computer with 16 GB of RAM and a 4 GB graphics card, “accepted” should mean the system can inspect and handle the file, possibly after making a more manageable working copy—not that every original will play smoothly at full quality. Intake should report an unreadable file rather than guess at its contents. Later lessons will cover file inspection and conversion.
Turn instructions into fields the system can check
A free-text prompt remains valuable: it is how you express an intention such as “make this energetic but trustworthy.” The system also needs fields for decisions it must not forget. Think of the fields as a form wrapped around the prompt: they make required information visible, allow sensible defaults, and reveal contradictions before editing begins.
The Postman guide introduces a useful idea here: a data contract states which fields are required and what kind of value belongs in each. You do not need to build a schema or use Postman today.
JSON Schema Data Types: A Complete Guide to Validation
Read the opening “What is JSON Schema?” discussion in Postman’s guide for the idea of checking information at the boundary of a system. We’ll apply that idea to editing requests, without implementing validation yet.
In What is JSON Schema?, start with the sentence defining JSON Schema and read the contract explanation through the short “Schemas turn assumptions” statement. Focus on required fields, value types, and catching a problem before the main work starts. Skip the API and testing details.
For a first job definition, separate instructions into these groups:
- Objective and audience: What should the video communicate, to whom, and what should viewers do afterward? These give the editor a basis for choosing material.
- Editorial direction: Desired tone or pace; moments to include; material to exclude; whether footage may be reordered; and any reference or special instruction. A “must include” moment should identify its source file as well as an approximate time when possible.
- Output requests: Each requested version names a profile—Instagram Reel, YouTube Short, or YouTube long-form—and may give a target duration. A target is a preference, not permission to manufacture missing material.
- Asset and safety limits: Whether only supplied assets may be used, whether external services may receive footage or transcripts, a cloud-spending cap, and whether approval is required before export.
The minimum required fields can remain small: source video locations, an objective, and at least one output profile. For reliable results, the system should ask for an audience and key restrictions as well; if they are absent, it should use stated defaults rather than invent specific facts. Optional fields such as “must include,” “exclude,” and “tone” can be empty.
Some instructions need to be treated differently from preferences. “Aim for 45 seconds” can be adjusted if the footage will not support it. “Do not show this person” is a restriction: the system must not relax it to hit 45 seconds. If instructions conflict—for example, the only requested demonstration also shows the person who must be excluded—the job should stop for clarification or present a compliant alternative. It should not quietly choose which instruction to ignore.
A similar distinction applies to “use current social-media trends.” You can request a contemporary style, but the system should not claim that a specific trend is current unless it has dated evidence. We will define platform profiles and research rules later in the course.
Specify what “editable output” means
An exported video file is convenient to watch and upload. It is not the same thing as an editable timeline. If captions, music, and pictures are permanently combined into one MP4, you can play it, but changing a caption or replacing a shot may mean rebuilding the edit.
This short Resolve demonstration shows one narrower form of AI-assisted timeline creation. Notice both that it produces a timeline and that the creator still checks the cuts.
I Let an AI Edit My Video Timeline for me - Davinci Resolve Intelliscript Workflow
Watch “I Let an AI Edit My Video Timeline for me – Davinci Resolve Intelliscript Workflow” by Chris Sullivan (Five Freaking Onion Rings) to see the difference between AI-assisted selection and a finished, editable Resolve edit.
Watch the premise, then timeline creation and the trim review. Notice that this example depends on matching wording in a transcript and that some clip edges still need attention. Treat it as an example of editable timeline work, not a solution for every type of footage.
The following image makes the distinction concrete. A timeline holds clips arranged in an edited order; each clip refers back to a selected range of an underlying media file.
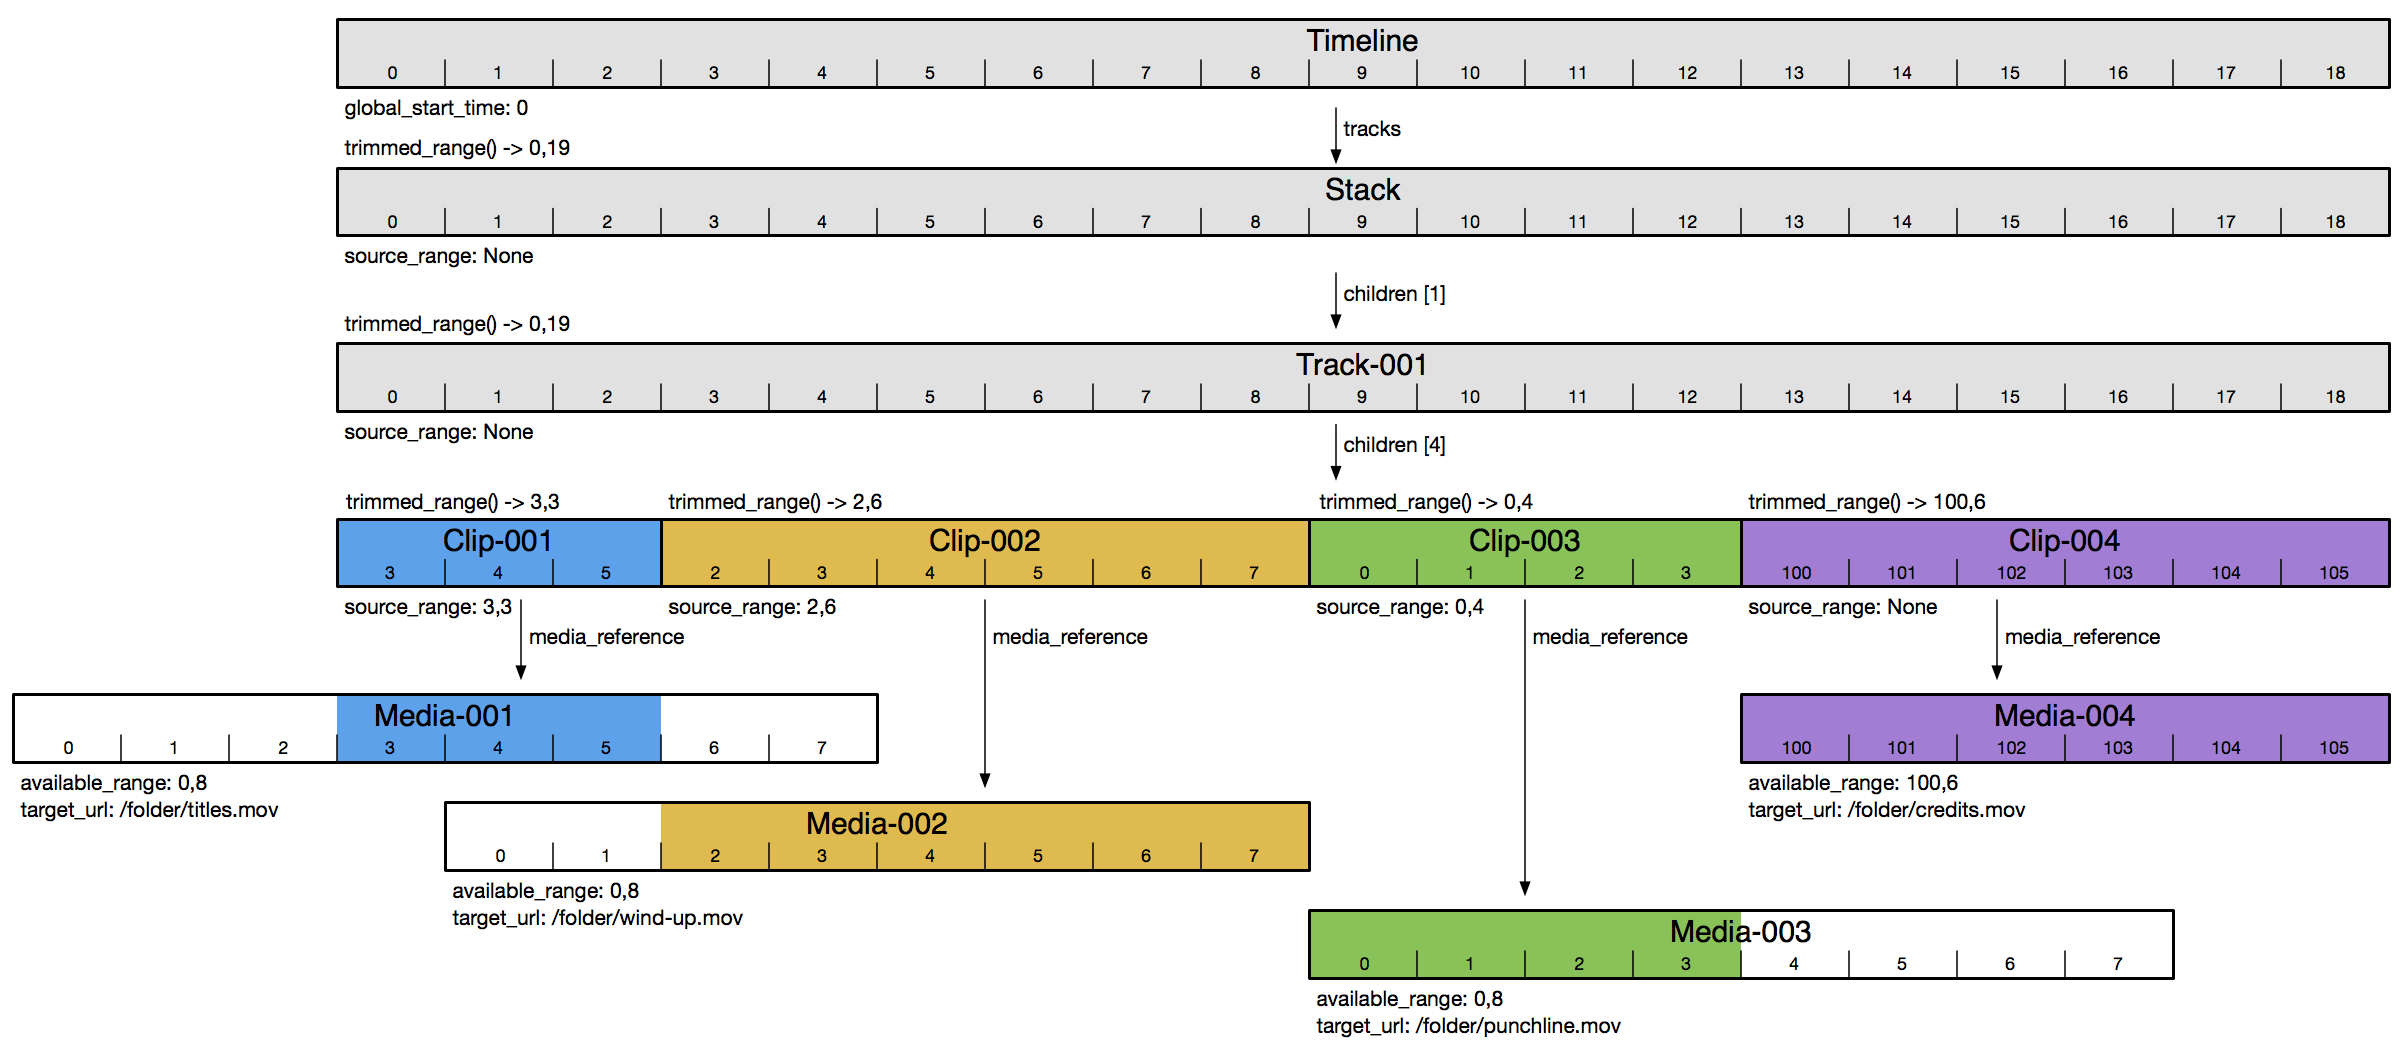
For every requested version, define three deliverables:
- An editable Resolve timeline and project. Clips should remain as individually selectable source ranges, with usable links to their media. Where captions, titles, graphics, dialogue, and music are included, keep them independently changeable where practical rather than providing only a flattened video. A saved Resolve project—or an exported project file such as a
.drp—does not by itself guarantee that source files are bundled inside it. The handoff must keep the media available and verify that it relinks and opens. - A viewing copy. A rendered video lets you review the actual result and eventually upload it. The viewing copy is a deliverable alongside, not instead of, the editable project.
- A brief job report. Record which sources were used, which requested moments or assets were omitted, unresolved warnings, and which versions were produced. This prevents a plausible-looking render from concealing a missed instruction.
A short-form version should have its own timeline, not merely a crop of the long-form export. Its selected moment, opening, pacing, and framing may differ. A long-form version should likewise have its own complete timeline, capable of holding an introduction, an ordered body, and an ending rather than just a chain of highlights. The exact frame sizes, caption conventions, and platform settings belong in output profiles we will design later.
For this course, DaVinci Resolve Studio 21 is the primary editable destination. You also want to learn about Premiere Pro, but a Resolve project is not automatically a native Premiere project. Interchange files may help transfer some timeline information; they can also lose or change effects, titles, or other details. Native Premiere editability is therefore a separate compatibility goal to test, not an implied promise of this first contract.
A concrete first-version agreement
The following is an illustrative job request, not code you need to run. Its paths show how a Windows job might refer to local files. The two entries under outputs request two distinct edits from the same source material.
{
  "job_name": "Product demonstration",
  "source_videos": [
    "C:/video_jobs/demo/raw/recording.mp4",
    "C:/video_jobs/demo/raw/phone_demo.mp4"
  ],
  "approved_assets_folder": "C:/video_jobs/demo/assets",
  "instructions": {
    "objective": "Explain the product's main benefit using only supported claims",
    "audience": "First-time buyers",
    "viewer_action": "Visit the product page",
    "tone": "Direct and clear",
    "must_include": ["The demonstration in recording.mp4 around 00:03:12"],
    "exclude": ["Customer faces without permission"],
    "asset_policy": "Approved local assets only"
  },
  "outputs": [
    {
      "profile": "instagram_reel",
      "target_duration_seconds": 45
    },
    {
      "profile": "youtube_long",
      "target_duration_seconds": 480
    }
  ],
  "limits": {
    "max_cloud_spend_usd": 0,
    "cloud_upload": false,
    "require_review_before_export": true
  }
}
The zero cloud-spend setting makes this an explicitly local-first request; it does not claim that every AI feature is free or that local processing will be fast. If a later workflow requires a paid service or uploading a transcript, it must respect these limits or ask permission before continuing.
The corresponding delivery agreement is specific enough to inspect: two separately named Resolve timelines, their accessible source media and approved assets, a viewing copy for each profile, and a report of omissions or problems. If a source will not open, the job reports it. If an eight-minute coherent edit cannot be supported by the material, the system flags that instead of padding the video or inventing content. If the Reel violates an exclusion, it fails the agreement even if the export looks polished.
That is what makes a prompt-to-video system customizable: not an ever-longer prompt, but a small set of inputs, restrictions, and deliverables whose meaning stays consistent from one job to the next.
Takeaways
Your first system contract accepts varied video-first local inputs, optional approved visual and audio assets, structured editing instructions, and one or more short- or long-form output requests. It promises editable Resolve work plus viewing copies, not just a finished MP4. Unsupported files, contradictory instructions, uncertain rights, and footage that cannot support the requested story must be reported rather than hidden.
In the next lesson, we’ll place these inputs and deliverables on an end-to-end map—from media intake through analysis and edit planning to a Resolve timeline, review, and export.