Hello! Welcome to the final lesson of your course.
Over the last few months, you've gone from the fundamentals of OnShape to designing, analyzing, and documenting three complete engineering projects. In our previous lesson, you curated the technical appendices for these projects, assembling the detailed calculations and analyses that form the engineering backbone of your work.
Now, we bring it all together. This capstone lesson addresses the final learning outcome of the entire course: Compile all three projects into a professional portfolio document with supporting visuals and narratives.
Our goal today is to transform your collection of projects, drawings, and analyses into a single, polished, and persuasive portfolio. This document will be your most powerful tool in showcasing your skills as a design engineer, moving beyond a simple resume to tell a compelling story of what you can do.
Let's begin.
1. The Purpose and Power of Your Portfolio
Before we start assembling the document, it's crucial to understand its purpose. A resume lists your skills; a portfolio proves them. It's the tangible evidence of your ability to solve problems, think critically, and execute designs.
To frame our thinking, let's start with a high-level overview of why a portfolio is so essential for a mechanical design engineer.
Mechanical Design Portfolio: The Key to Unlocking Top Engineering Jobs
The video 'Mechanical Design Portfolio' by Newtonian World excellently captures the spirit of what we're about to build. It explains why a portfolio helps you stand out and how it acts as a platform for your professional identity.
Please watch from the beginning to 04:57. Pay attention to: The idea of engineering as a mix of art and science. The difference between tailoring a portfolio for a specific job versus creating a general one for personal branding.
The key takeaway is that your portfolio should be targeted. While you will create a comprehensive "master" portfolio with all your projects, for any specific job application, you should tailor it to highlight the skills and experiences most relevant to that role.
The MIT Comm Lab resource provides a fantastic example of this. Imagine you completed a project designing a prosthetic foot.
- For a structural design engineer role, you would highlight the FEA you performed, the material selection based on stress analysis, and the mechanical testing.
- For a product design engineer role, you might instead focus on the user-centric design process, the ergonomic shape, and the iterative prototyping based on user feedback.
The underlying project is the same, but the story you tell about it changes with the audience.
2. Structuring a Professional Portfolio Document
A well-structured portfolio is easy to navigate and allows a busy hiring manager to quickly grasp your capabilities. Based on industry best practices, we will use a clear, logical structure.
Most professional engineering portfolios, especially in PDF format, contain the following sections:
- Cover Page:
- Title: "Mechanical Design Portfolio"
- Your Name
- (Optional) A high-quality rendering of your best work.
- Introduction / "About Me":
- A brief professional bio (150-250 words). State your specialization (e.g., "Mechanical Engineer specializing in mechanism design and structural analysis").
- A concise list of your key technical skills (CAD software, FEA tools, programming languages).
- Your contact information (Email, LinkedIn profile URL, phone number).
- Table of Contents (Optional but Recommended):
- A simple list of the projects included, with page numbers, allowing readers to jump to what interests them.
- Project Pages:
- This is the core of your portfolio. Aim for 3-5 of your strongest projects. Each project gets its own dedicated section (typically 1-2 pages). We'll detail this in the next section.
- Resume/CV:
- You can either include a final page with a link to download your full resume or embed the resume itself.
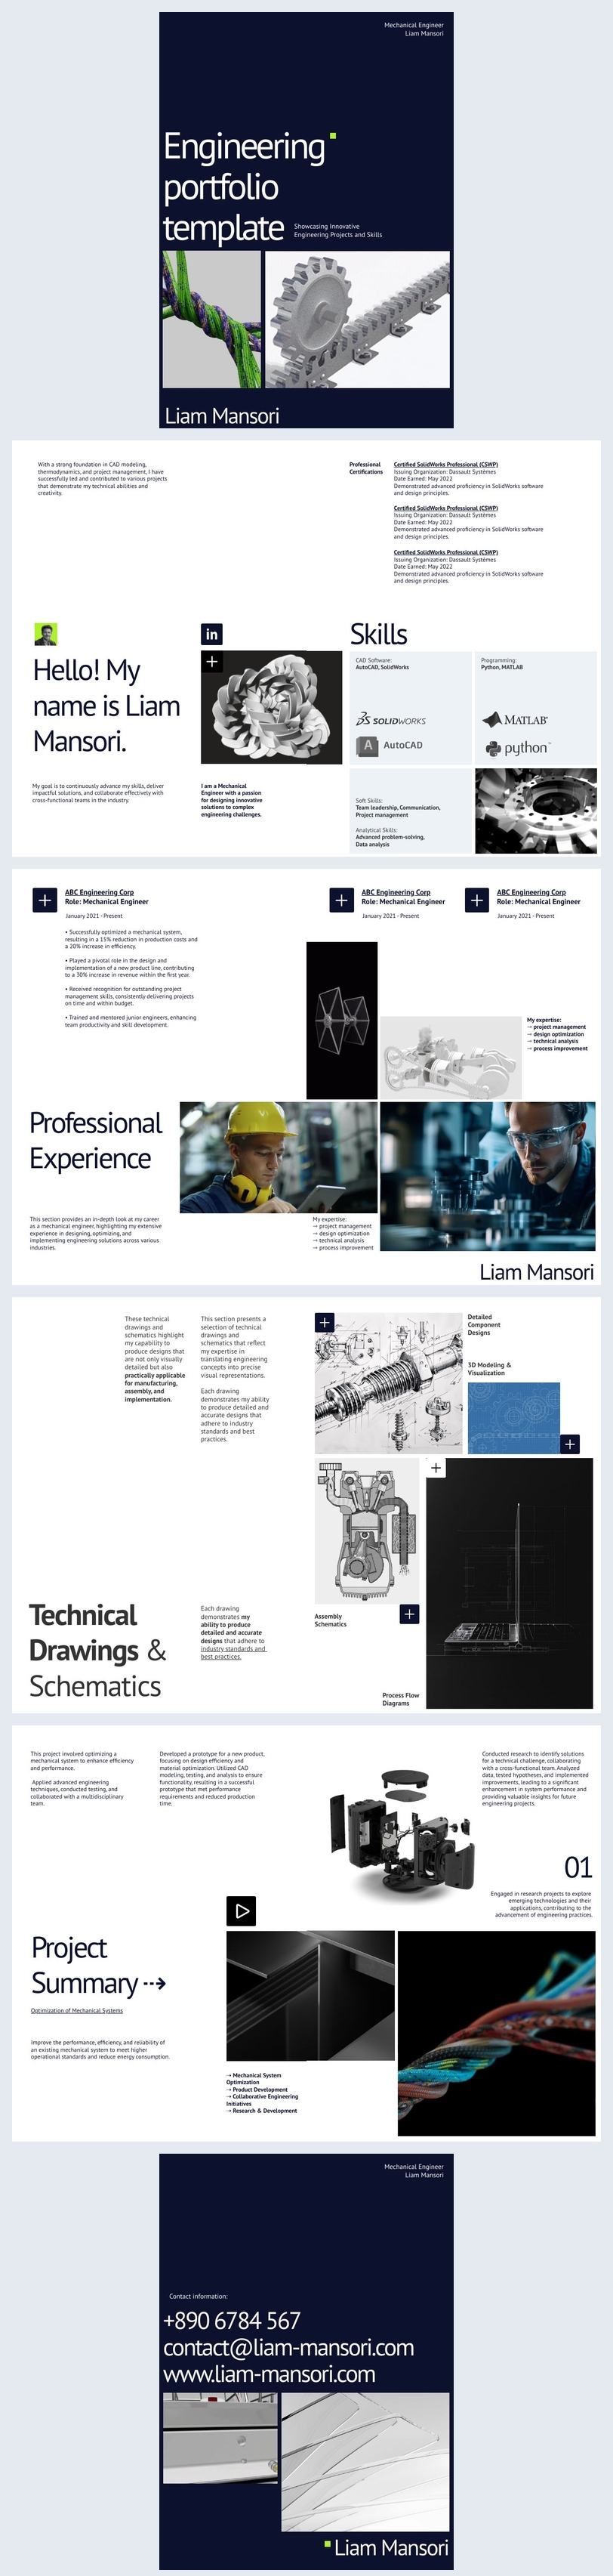
This image of a portfolio template gives a good visual sense of how these sections can be laid out across multiple pages.
Format: PDF vs. Website
You have two main options for your portfolio format: a PDF document or a personal website.
Portfolio : Mechanical Engineering Communication Lab
The MIT Comm Lab page on portfolios offers a clear comparison between PDF and website formats.
Please read the section under the 'Structure Diagram,' focusing on the pros and cons of PDFs versus websites.
For your immediate goal of creating a portfolio for job applications, a PDF is the recommended starting point. It's universal, easily attached to emails and online forms, and gives you full control over the narrative. You can easily create a high-quality PDF using tools like PowerPoint, Google Slides, or Canva.
3. Crafting Compelling Project Pages
Each project page is a standalone story. Its goal is to quickly explain the project's objective, your specific contribution, and the outcome, all supported by strong visuals.
A simple yet effective way to structure your project narrative is the "What, How, Results" framework.
How to Create an Engineering Portfolio
Let's watch Tamer Shaheen walk through his own portfolio in the video 'How to Create an Engineering Portfolio'. He uses this 'What, How, Results' structure effectively.
Watch from 04:18 to 08:24. Notice how for each project, he clearly explains: What the project was. How he accomplished it (tools, process). The Results (quantified where possible, e.g., 'reduced production costs by 62%').
To elevate this structure to a top-tier professional standard, we can use the "Inverted Pyramid" method, which organizes information from most to least critical.
Portfolio : Mechanical Engineering Communication Lab
The MIT Comm Lab guide details this 'Inverted Pyramid' structure. It's a sophisticated way to organize your project story that ensures the most important information is delivered first.
Please read the section 'Frame your story'. It breaks down the key components of a project page narrative.
Let's combine these ideas into a definitive structure for each of your project pages:
- Project Title: An impactful, descriptive title (e.g., "High-Precision Linear Motion System for Automated Gantry").
- The Objective (The "What"): A 1-2 sentence summary. What was the problem? What was the goal?
- My Process & Contribution (The "How"): This is where you detail your work.
- Use action verbs: "Designed," "Analyzed," "Modeled," "Selected," "Validated."
- Describe your thought process. Why did you choose a lead screw over a ball screw? What trade-offs did you make?
- Show the process visually: from initial sketches to final renders.
- The Outcome (The "Results"):
- What was the final result? Did it meet the requirements?
- Quantify your achievements whenever possible (e.g., "Achieved a positioning accuracy of ±0.1mm," "Verified a factor of safety of 3.5 under maximum load").
- What did you learn?
- Technical Skills Showcase:
- List the key skills and software used (e.g.,
OnShape,FEA,GD&T,FMEA,Lead Screw Sizing).
- List the key skills and software used (e.g.,
Visual Storytelling
Visuals should dominate your project pages. They are faster to parse than text and show, rather than tell.
Portfolio : Mechanical Engineering Communication Lab
The MIT Comm Lab guide also provides an excellent set of best practices for visual presentation.
Please read the section 'Creating strong visuals' and 'Best practices for presenting your visuals'. Focus on the tips about staging photos, using a mix of CAD and drawings, and integrating text.
This image of a complete drawing set for a bearing assembly is a perfect example of a powerful, information-dense visual. It combines 3D views, an exploded assembly with a BOM, and detailed 2D drawings with GD&T. A single, well-composed image like this can communicate a huge amount about your capabilities.

Test your understanding!
For your Project 1: Linear Motion System, what are three different types of visuals you could create for its project page to "show the process"?
Show answer
- System-Level Render: A high-quality isometric rendering of the complete, assembled linear motion system.
- Analysis Summary Graphic: A composite image showing a screenshot of the FEA results for a critical bracket (with stress or displacement plots) alongside the key hand calculation used to validate it.
- Detailed Drawing View: An excerpt from your assembly drawing, perhaps an exploded view with balloon callouts pointing to a Bill of Materials, or a section view showing the internal bearing and lead screw arrangement.
4. Your Action Plan: Assembling the Portfolio
You have all the ingredients. Here is a step-by-step plan to compile your portfolio.
- Choose Your Tool: Select a program you are comfortable with that can export to PDF. PowerPoint or Google Slides are excellent choices. Use a slide-based approach, where each slide or pair of slides represents a page in your portfolio.
- Gather Your Assets: For each of your three projects, create a dedicated folder. In it, place:
- High-quality image exports from OnShape (renderings, exploded views, drawings). Aim for a high resolution (e.g., 1920x1080).
- Screenshots of your key analysis results (FEA plots, FMEA tables).
- The technical appendix documents you created in the last lesson.
- Build One Project Page First: Start with your strongest project. Lay out the visuals and write the narrative using the "Inverted Pyramid" structure. Refine it until you are happy with the layout and story. This will serve as your template for the other projects.
- Create the Surrounding Pages: Draft your "Cover Page" and "Introduction / About Me" page.
- Assemble the Full Document: Combine all pages in the correct order. Add hyperlinks from the project pages to your technical appendices (which can be hosted online or attached as separate files) and to your LinkedIn profile.
- Review and Export:
- Proofread everything carefully. Check for consistency in formatting and tone.
- Export the final document as a PDF.
- Check the file size. If it's too large (over 10-15 MB), use an online PDF compressor to reduce it, as Tamer Shaheen suggested in his video.
Conclusion: Your Professional Showcase
Congratulations! You have reached the end of this course and have now built not only three substantial engineering projects but also the professional documentation to showcase them.
This portfolio is a living document. As you complete more projects and gain more experience, you will continue to add to it, refine it, and tailor it for every new opportunity you pursue.
Key Takeaways from Today's Lesson:
- Your portfolio is a visual story that proves your skills and makes you stand out.
- Structure it professionally: Use a clear sequence of Cover, Introduction, Projects, and Contact/Resume. A PDF created with a tool like PowerPoint is an excellent, versatile format.
- Craft each project page carefully: Use the "Inverted Pyramid" structure to tell a compelling story about the objective, your process, and the results.
- Lead with visuals: High-quality renderings, drawings, and analysis plots should be the primary communication tool, supported by concise text.
- Always tailor your message: Create a master portfolio, but adapt a specific version for each audience to highlight the most relevant skills.
You started this journey with the goal of building your portfolio and expanding your knowledge. You have systematically acquired the skills to take a project from requirements through design, analysis, and final documentation. You are now fully equipped to present your work with the confidence and professionalism that will open doors to exciting opportunities in your career. Well done.