Hello! Welcome to the final lesson for your first major project.
In our last session, you did the essential work of a curator, selecting and organizing the key visual assets from your linear motion system project. You now have a folder full of renderings, drawings, and analysis plots—the evidence of your engineering work.
Today, we move from curator to author. Your learning outcome is to write a technical summary for the project highlighting the problem-solving approach. This is where you'll craft the narrative that brings your visuals to life, transforming a collection of files into a compelling portfolio piece that tells the story of your design journey.
1. The Structure of a Great Project Story
A portfolio project isn't just a report; it's a story designed to be understood quickly. The most effective structure for this is the "inverted pyramid," a concept used in journalism and technical communication. You start with the most important information first and then progressively add detail.
The MIT Mechanical Engineering Communication Lab provides an excellent breakdown of this structure, which we will use as our template.
Portfolio : Mechanical Engineering Communication Lab
The article 'Portfolio' from the MIT Comm Lab details a highly effective 'inverted pyramid' structure for project pages. This will be the framework for your technical summary.
Read the section titled 'Skills', focusing on the subsection 'Frame your story'. Pay close attention to the five key components: Impactful title, Outcome, Experience, Learning & Skills, Motivation, and Technical Details. The 'Instead of… Try…' examples are particularly useful.
Based on this, your project summary should include these five key elements:
- Impactful Title: Clear, descriptive, and professional.
- Outcome: A 2-3 sentence "hook." Start with the result. What did you design, and what was its key achievement?
- Motivation: Briefly explain the project's objective and the core problem you were solving.
- Experience, Learning & Skills (The Process): This is the main body. Describe your process, your specific role and contributions, the key decisions you made, and the skills you applied.
- Technical Details: A place for specifics (e.g., component types, software versions) for the most interested readers.
2. Framing the Narrative: What, How, and Results
A simple way to think about the content for your summary is the "What, How, Results" framework. This maps perfectly to the inverted pyramid structure and helps ensure you're answering the questions a recruiter or hiring manager will have.
This video provides a practical guide on how to articulate these points clearly and concisely.
How to Create an Engineering Portfolio
In his video 'How to Create an Engineering Portfolio', Tamer Shaheen provides excellent, direct advice on how to write the descriptions for your projects. He demonstrates the 'what, how, and results' framework with concrete examples.
Please watch from 04:46 to 05:39, from 06:08 to 07:20, and from 09:56 to 11:00. Focus on: How he quantifies results (e.g., '97% accuracy', 'reduce production costs by 62%'). How he describes the 'how' by mentioning specific software (SolidWorks) and processes (design, manufacturing contact). The advice to be brief and let the images do most of the talking.
The key takeaway is to be direct and data-driven. For Project 1, a great "Result" isn't just "the design was successful." It's "the final design met all requirements, with the critical motor bracket achieving a final Factor of Safety of 3.5, exceeding the target of 2.0."
3. Highlighting Your Problem-Solving Approach
This is the most critical part of your summary and what separates a great portfolio from a good one. You need to show that you are a reflective engineer who can identify problems, analyze them, and implement effective solutions.
Your redesign of the motor bracket is the perfect story for this. Don't present the final, perfect bracket as if it were your first idea. Instead, narrate the journey:
- The Problem: The initial, simpler bracket design failed under the specified load during FEA simulation.
- The Analysis: You identified the high-stress areas and determined the design was not stiff enough, with a Factor of Safety below the requirement.
- The Solution: You researched and applied design principles (adding ribs) to increase stiffness specifically where it was needed.
- The Validation: You ran a new FEA simulation on the revised design to prove that it now met the performance criteria.
This "problem-analysis-solution-validation" loop is what engineering is all about. The video below, while focused on UX design, has a brilliant segment on the importance of reflecting on your own design process.
How To Create A Design Case Study (With A Perfect Example)
The video 'How To Create A Design Case Study' explains the power of showing your thought process. While the example is from software design, the principle of reflecting on your work and showing iteration is universal and highly valued.
Watch the segment from 09:08 to 10:10. The key idea here is showing that you reflected on your initial design, identified its 'pain points,' and proposed new ideas. This demonstrates critical thinking beyond just executing a task.
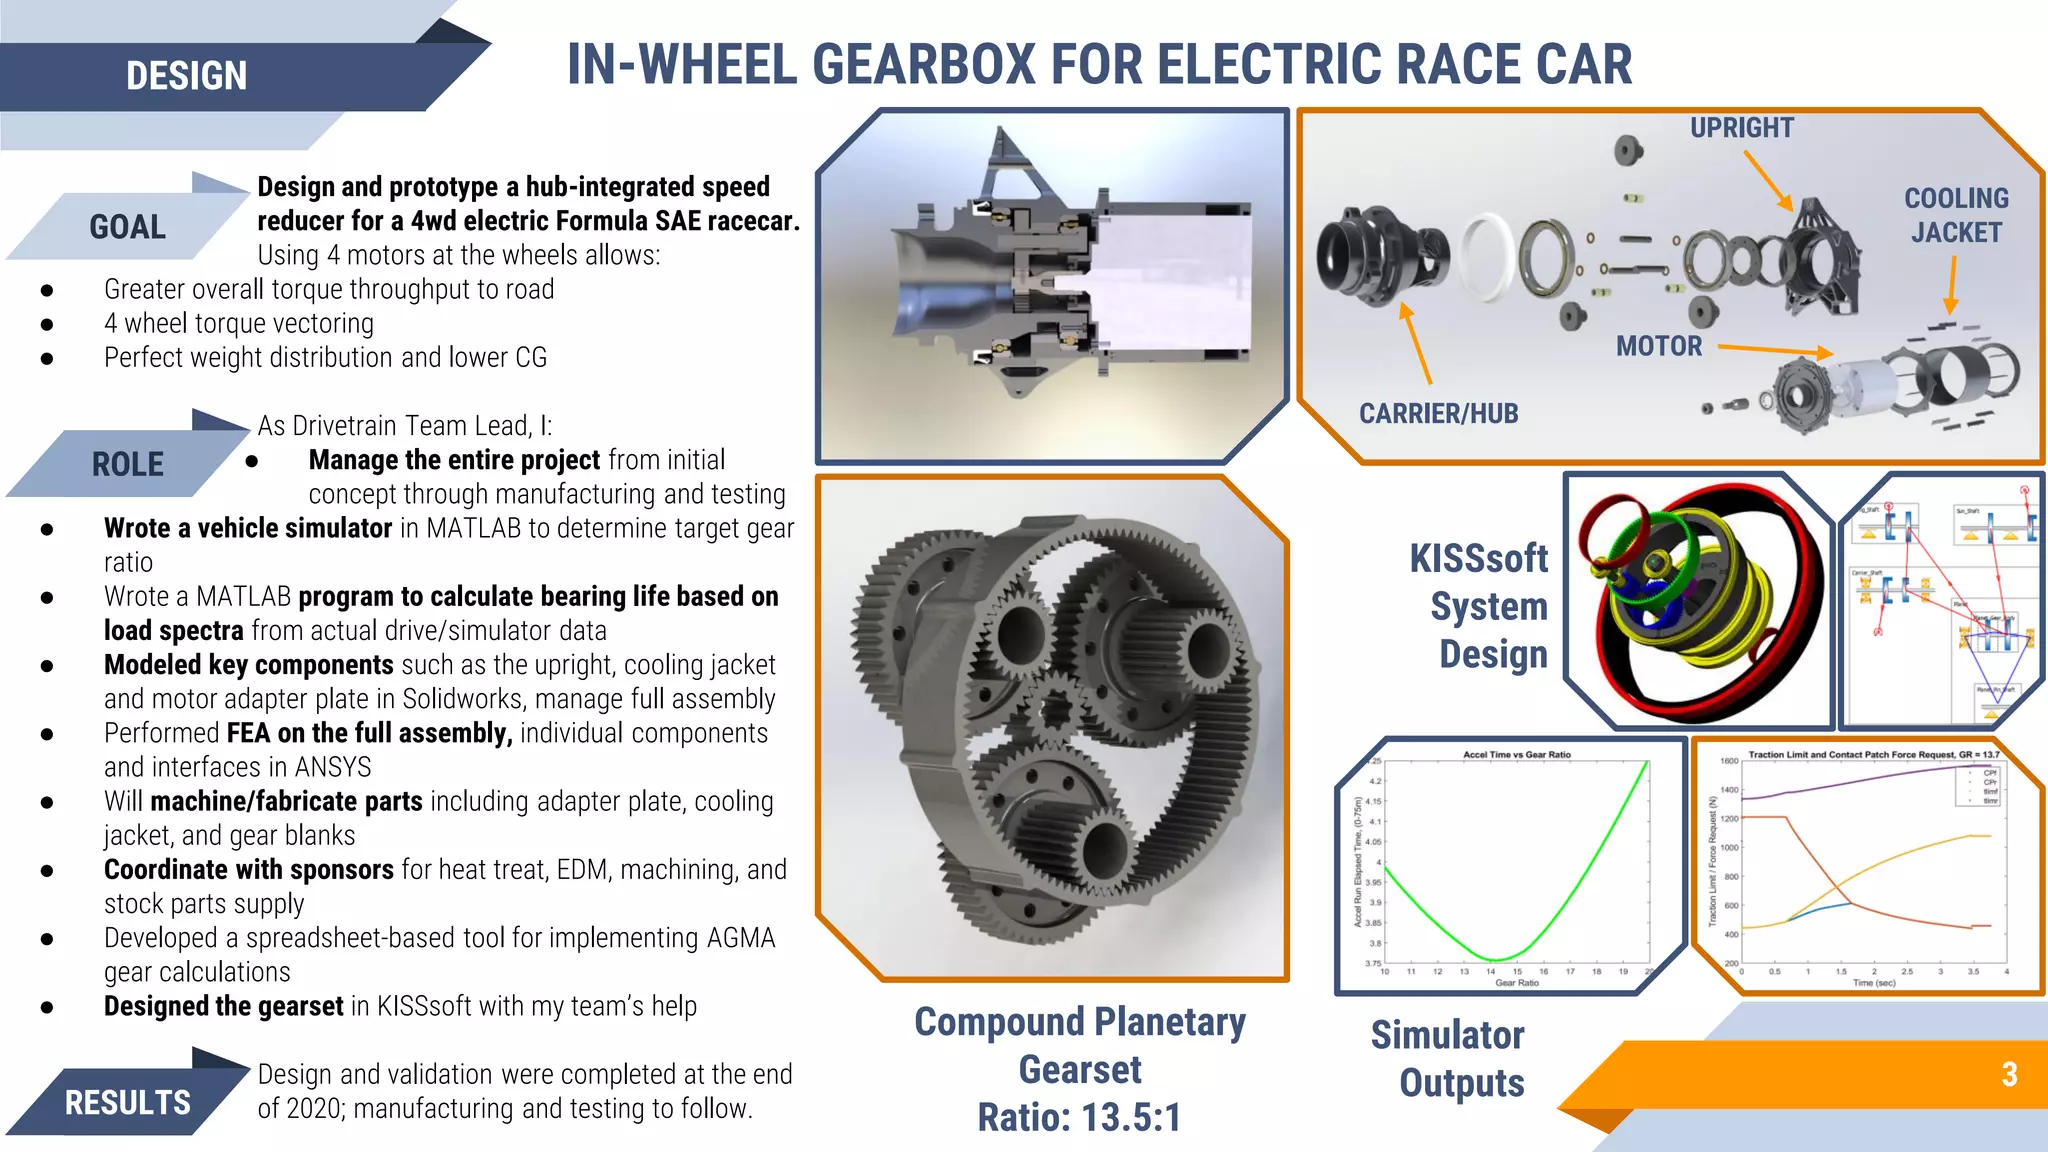
Look at this example portfolio slide. Notice how it combines visuals with text to tell a complete story. It has a goal, states the role, lists the results, and shows evidence of the process (CAD, analysis). This is the level of integration you should aim for.
4. Writing with Professional Clarity
Finally, the quality of your writing matters. It should be clear, concise, and professional. Technical reports are formal documents, but formality does not mean using overly complex language.
A guide to technical report writing
The 'guide to technical report writing' from the IET provides timeless advice on writing style, clarity, and structuring summaries.
Please read section 4.5 'Formality' and 4.6 'Example' to understand how to make your writing clear and direct. Then, read section 6.1 'Summaries' for tips on crafting the opening paragraph of your project description.
Key writing tips to apply:
- Use the active voice: "I designed the bracket" is stronger than "The bracket was designed."
- Be concise: Use simple words. Say "to meet the demand" instead of "to have the facility to supply."
- Front-load information: Your summary/outcome section should give the whole picture in brief, as it may be the only part a busy manager reads.
Test your understanding!
Which of these two statements is more effective for the "Outcome" section of your project summary? Why?
Statement A: "For this project, a linear motion system was designed. The process involved creating parts in OnShape, running an FEA analysis on a bracket to see if it would fail, and then putting everything into an assembly. The project was successful."
Statement B: "Designed and validated a lead screw-driven linear motion system to meet specified load and speed requirements. Key contributions included an FEA-driven redesign of a critical support bracket, increasing its Factor of Safety from 1.5 to 3.5, and conducting an FMEA to identify and mitigate system-level risks."
Show answer
Statement B is far more effective. Here's why:
- Active Voice: It starts with strong action verbs ("Designed and validated").
- Quantifiable Results: It includes specific data ("Factor of Safety from 1.5 to 3.5").
- Highlights Problem-Solving: It explicitly mentions the "FEA-driven redesign" and "FMEA," showcasing advanced engineering skills and thought processes.
- Professional Language: It uses precise terminology like "validated," "critical support bracket," and "mitigate system-level risks."
Statement A is passive, vague, and simply lists tasks without demonstrating impact or a problem-solving mindset.
5. Your Task: Write the Technical Summary for Project 1
Now it's time to put it all together. Open a new document (e.g., Google Docs, Microsoft Word) and write the text for your portfolio page for the Linear Motion System. Use the assets you gathered in the last lesson to inform your writing.
Follow the Inverted Pyramid structure. Here are some prompts to guide you for each section:
1. Title:
- e.g., Design & Validation of a Lead Screw-Driven Linear Motion System
2. Outcome (2-3 sentences):
- Start with a strong verb: "Designed...", "Developed...", "Engineered...".
- State the main purpose of the system.
- Mention your most impressive achievement. (Hint: The bracket redesign story is perfect here).
3. Motivation (2-3 sentences):
- What was the overall goal? (e.g., "The objective was to design a compact linear actuator...").
- What were the key requirements or constraints? (e.g., "...capable of moving a 10 kg load with a speed of 50 mm/s, while maintaining a Factor of Safety of at least 2.0 on all structural components.").
4. Experience, Learning & Skills (Main Body):
- My Role: "As the sole design engineer on this project, I was responsible for the entire lifecycle..."
- Design Process: Write a few paragraphs telling the story. This is where you describe the process:
- Initial component selection (lead screw, guide rails).
- Design of custom components (brackets, supports).
- The Bracket Redesign Story: Describe the initial FEA failure and how you solved it. This is crucial!
- System-level risk assessment (FMEA).
- Final assembly and drawing creation.
- Skills & Tools Used: Create a bulleted list.
- CAD: OnShape
- Analysis: OnShape FEA, FMEA
- Documentation: GD&T, Engineering Drawings, BOMs
5. Technical Details (Optional but good to include):
- Create a short, bulleted list of key specifications for the curious reader.
- Actuation: 16mm Diameter, 4mm Pitch Lead Screw
- Guidance: 12mm Linear Guide Rails & Bearing Blocks
- Material (for custom parts): 6061-T6 Aluminum
Take your time with this. Refer back to your project files and the design review presentation you created. The goal is to produce a polished draft that tells the complete story of your excellent work on this project.
Conclusion
Congratulations! By completing this task, you are turning your hard work on Project 1 into a tangible career asset. You've learned not just how to do engineering work, but how to communicate it effectively—a skill that is just as important.
Key Takeaways:
- A strong project summary follows an "inverted pyramid" structure, starting with the most impactful results.
- Framing your narrative as "What, How, Results" ensures you answer the key questions an employer has.
- The most compelling story is the problem-solving journey. Show your iterations and how you used analysis to drive design decisions.
- Clear, concise, and active writing makes your summary professional and easy to read.
Preview of the Next Lesson:
This lesson concludes Module 6 and our work on finalizing Project 1. You now have a complete portfolio piece ready to go. In our next session, we will begin Module 7: Design for Manufacturing and Assembly (DFMA). We'll start by exploring the key constraints of CNC machining, a fundamental process for any mechanical designer. This will equip you with the knowledge to create parts that are not just strong, but also efficient and economical to produce.