Hello! Welcome to the first lesson in our new module, "Shortest Paths and Minimum Spanning Trees."
In our previous module, we explored how to traverse graphs using BFS and DFS to solve problems like finding connected components and performing a topological sort. You'll recall that the topological sort previewed today's topic, mentioning that we would now focus on weighted graphs.
Your learning goal for this lesson is to implement Dijkstra's algorithm using a priority queue to find single-source shortest paths. This is one of the most fundamental and famous algorithms in computer science, with direct applications in areas like network routing and GPS navigation. While BFS finds the shortest path in terms of the number of edges, Dijkstra's finds the path with the minimum total weight or cost.
1. The Shortest Path Problem
Imagine a road network where cities are nodes and roads are edges, each with a weight representing the travel time. The goal is to find the fastest route from a starting city to all other cities. This is the essence of the single-source shortest path problem.
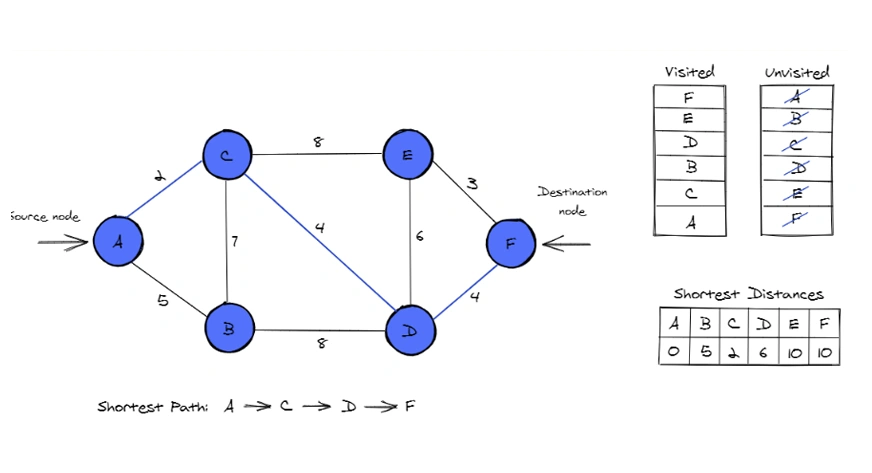
Dijkstra's algorithm solves this problem using a greedy strategy. At each step, it visits the unvisited node that has the smallest known distance from the start node. It's like always choosing the next closest city to explore from your current set of options.
To understand this greedy approach visually, let's watch a detailed walkthrough.
[7.5] Dijkstra Shortest Path Algorithm in Python
The video '[7.5] Dijkstra Shortest Path Algorithm in Python' from ThinkX Academy provides an excellent step-by-step conceptual explanation of the algorithm's logic. It visualizes how distances are initialized and updated.
Watch from 01:45 to 14:15. Focus on these key ideas: Initialization: Why are all distances set to infinity except for the source node (which is 0)? Greedy Choice: At each step, how is the next node to visit chosen? Relaxation: How and when are the distances to neighboring nodes updated? Pay attention to the rule: a distance is updated only if a new, shorter path is found.
2. The Core Components of Dijkstra's Algorithm
As you saw in the video, the algorithm maintains a few key pieces of information:
- A
distancesdata structure: This stores the shortest distance found so far from the source node to every other node. It's typically an array or dictionary, initialized with infinity for all nodes except the source, which is 0. - A set of visited nodes: To avoid processing a node more than once and getting into cycles. Once we finalize the shortest path to a node, we add it to this set.
- A priority queue: This is the crucial component for efficiency. It stores
(distance, node)pairs and always allows us to quickly retrieve the unvisited node with the smallest current distance. This is exactly what theheapqmodule you learned about in Module 8 is for.
3. Why Use a Priority Queue?
The video mentioned that using a priority queue is a critical optimization. Let's make that concrete.
Without a priority queue, at every step of the algorithm, you would have to scan through the entire distances array to find the unvisited node with the minimum distance. This would take time for each of the vertices, leading to a total time complexity of .
By using a min-heap (our priority queue), we can get the next closest node in time. This simple change dramatically improves the algorithm's performance.
Dijkstra's Algorithm — Templates and Problem Solving
The article 'Dijkstra's Algorithm — Templates and Problem Solving' by Rajendra Bisoi has a great, concise explanation for why the heap is so important.
Read the section titled 'Why heap is used'. It clearly contrasts the O(V²) approach with the much faster O((V + E) log V) complexity achieved with a heap, which is standard for competitive programming.
4. Implementing Dijkstra's Algorithm in Python
Now, let's translate this logic into a clean Python implementation. For competitive programming, you want a template that is both correct and quick to write.
Let's watch a walkthrough of a typical implementation. This will help you connect the conceptual steps to actual code.
Implement Dijkstra's Algorithm
The video 'Implement Dijkstra's Algorithm' by NeetCodeIO provides a clear, practical coding demonstration. It's structured very much like how you would solve a problem in a coding contest.
Watch from the beginning to 05:21. Follow along as the presenter: Builds an adjacency list from the input edges. Initializes the min-heap with the source node. Runs the main while loop, popping the closest node. Explains the logic for updating distances (relaxation) and pushing to the heap.
The video shows the complete logic. Let's formalize that into a standard template you can use. This template is very similar to the one found in the coderraj07 article.
The Python Template
Here is a well-commented template for Dijkstra's algorithm.
import heapq

def dijkstra(n, edges, start_node):
    # 1. Represent the graph using an adjacency list (dictionary in this case)
    adj = {i: [] for i in range(n)}
    for u, v, weight in edges:
        adj[u].append((v, weight))

    # 2. Initialize distances to all nodes as infinity
    distances = {i: float('inf') for i in range(n)}
    distances[start_node] = 0

    # 3. Initialize the priority queue (min-heap) with the start node
    # The heap stores tuples of (distance, node)
    min_heap = [(0, start_node)]

    while min_heap:
        # 4. Pop the node with the smallest distance from the heap
        current_dist, current_node = heapq.heappop(min_heap)

        # 5. IMPORTANT: If we've found a shorter path already, skip
        # This handles "stale" entries in the heap
        if current_dist > distances[current_node]:
            continue

        # 6. Explore neighbors (Relaxation step)
        for neighbor_node, weight in adj[current_node]:
            new_dist = current_dist + weight

            # 7. If we found a shorter path to the neighbor, update it
            if new_dist < distances[neighbor_node]:
                distances[neighbor_node] = new_dist
                # 8. Push the updated distance and neighbor to the heap
                heapq.heappush(min_heap, (new_dist, neighbor_node))

    # Post-processing: Mark unreachable nodes if required by the problem
    for i in range(n):
        if distances[i] == float('inf'):
            distances[i] = -1 # Or whatever the problem specifies

    return distances

# Example Usage:
# n = number of nodes
# edges = list of [source, destination, weight]
# start_node = the node to start from

n = 6
edges = [[0, 1, 7], [0, 2, 9], [0, 5, 14], [1, 2, 10], [1, 3, 15],
         [2, 3, 11], [2, 5, 2], [3, 4, 6], [4, 5, 9]]
start_node = 0

shortest_paths = dijkstra(n, edges, start_node)
print(f"Shortest paths from node {start_node}: {shortest_paths}")
# Expected output: {0: 0, 1: 7, 2: 9, 3: 20, 4: 26, 5: 11}
The check if current_dist > distances[current_node]: continue is a crucial optimization. When we find a shorter path to a node, we push the new, shorter path to the heap. We don't remove the old, longer path entry. This check ensures we only process a node the first time we pull its true shortest path from the heap.
Test your understanding!
Consider a graph with 4 nodes (0, 1, 2, 3) and the following edges: (0, 1, 1), (0, 2, 4), (1, 2, 2), (1, 3, 5), (2, 3, 1). The source node is 0.
Trace the first three iterations of the while loop. What are the contents of the distances dictionary and the min_heap after the third node has been processed (i.e., after the third heappop)?
Show answer
-
Initial State:
distances = {0: 0, 1: inf, 2: inf, 3: inf}min_heap = [(0, 0)]
-
Iteration 1 (Pop
(0, 0)):current_node= 0.- Neighbors of 0 are 1 and 2.
- Update
distances[1]to0 + 1 = 1. Push(1, 1)to heap. - Update
distances[2]to0 + 4 = 4. Push(4, 2)to heap. - State after Iteration 1:
distances = {0: 0, 1: 1, 2: 4, 3: inf}min_heap = [(1, 1), (4, 2)]
-
Iteration 2 (Pop
(1, 1)):current_node= 1.current_dist= 1.- Neighbors of 1 are 2 and 3.
- Path to neighbor 2:
1 + 2 = 3. This is< distances[2](which is 4). So, updatedistances[2]to 3. Push(3, 2)to heap. - Path to neighbor 3:
1 + 5 = 6. This is< distances[3](which is inf). So, updatedistances[3]to 6. Push(6, 3)to heap. - State after Iteration 2:
distances = {0: 0, 1: 1, 2: 3, 3: 6}min_heap = [(3, 2), (4, 2), (6, 3)](Note the two entries for node 2)
-
Iteration 3 (Pop
(3, 2)):current_node= 2.current_dist= 3.- Neighbors of 2 is 3.
- Path to neighbor 3:
3 + 1 = 4. This is< distances[3](which is 6). So, updatedistances[3]to 4. Push(4, 3)to heap. - Final State after Iteration 3:
distances = {0: 0, 1: 1, 2: 3, 3: 4}min_heap = [(4, 2), (6, 3), (4, 3)]
Conclusion
Congratulations! You have now learned how to implement one of the most essential graph algorithms for competitive programming.
Key Takeaways:
- Dijkstra's algorithm finds the single-source shortest paths in a weighted graph with non-negative edge weights.
- It operates on a greedy principle, always exploring from the unvisited node that is currently closest to the source.
- Using a min-heap (priority queue) is critical for an efficient implementation, achieving a time complexity of .
- The core logic involves initializing distances, using a
whileloop that pops from the heap, and performing the relaxation step for all neighbors.
Up Next:
Dijkstra's algorithm has one major limitation: it does not work correctly if the graph contains negative edge weights. In our next lesson, we will explore the Bellman-Ford algorithm, which is designed to handle exactly that scenario.