Hello! Welcome back to your second lesson in our Cybersecurity course.
In the last lesson, we distinguished between authentication ("who are you?") and authorization ("what can you do?"). We ended by mentioning that after a user is authenticated, a server often issues a "token" that the client application uses for subsequent requests. Today, we're going to dissect one of the most common types of these tokens: the JSON Web Token (JWT).
Your goal for this lesson is to be able to describe the structure of a JSON Web Token (header, payload, and signature). Understanding this structure is crucial because it reveals how JWTs can securely transmit user identity and permissions without the server needing to store session information, a key concept in modern web applications, including those built with Next.js.
1. The Anatomy of a JWT
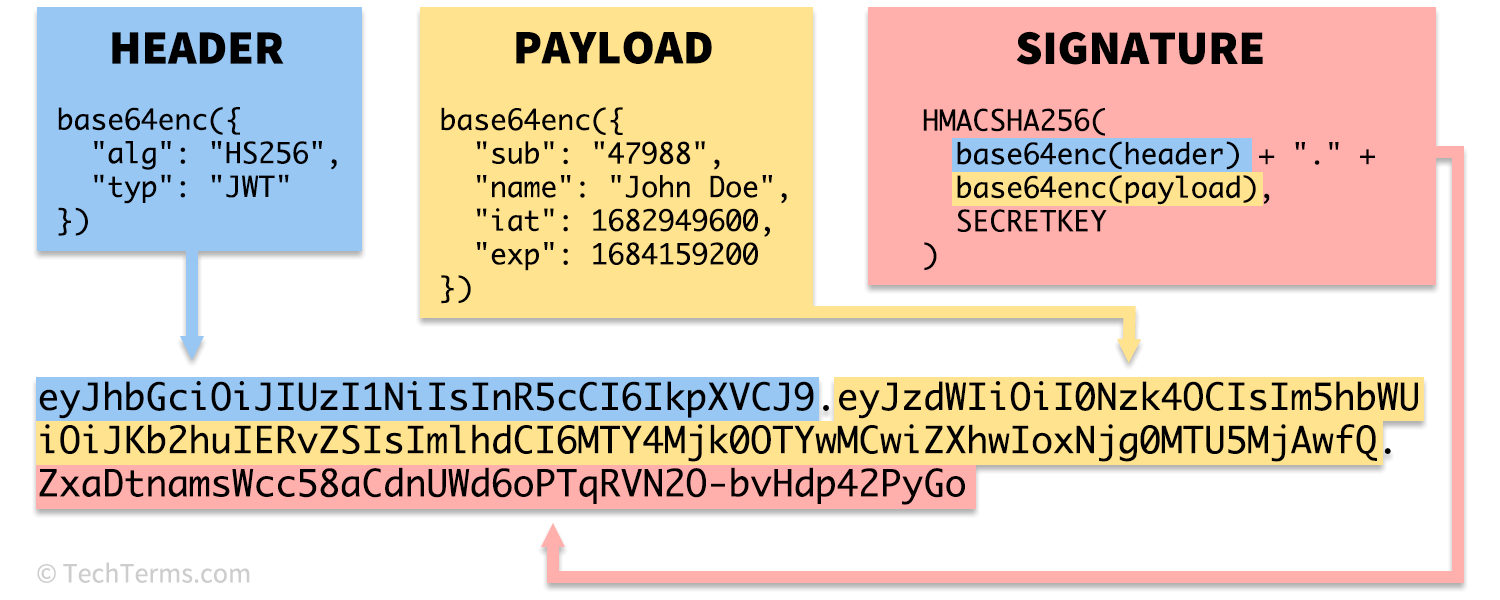
A JSON Web Token (JWT) is a compact and self-contained string of characters that looks like random gibberish at first glance. However, it has a very specific structure. It consists of three parts, separated by dots (.):
HEADER.PAYLOAD.SIGNATURE
Each part serves a distinct purpose in ensuring the token is both informative and secure.
To get a quick and intuitive understanding of what each of these three parts represents, let's watch a short video that uses a helpful analogy of a sealed envelope.
JSON Web Tokens (JWTs) explained with examples | System Design
This video from ByteMonk explains the three parts of a JWT using an analogy of an envelope with a return address (Header), a message (Payload), and a wax seal (Signature).
Watch the segment from 4:28 to 9:31. Pay close attention to the analogy used for each part and the explanation of what information they contain.
Now that you have a conceptual overview, let's dive into the technical details of each component.
2. A Closer Look at the Three Parts
The official JWT website, jwt.io, provides a concise and clear breakdown of the token structure. As you read, you'll see how the concepts from the video map directly to the technical specification.
JSON Web Token Introduction - jwt.io
This resource from jwt.io is the standard reference for understanding JWTs. It will walk you through the specifics of the header, payload, and signature.
Please read the section titled 'What is the JSON Web Token structure?', including its three subsections: 'Header', 'Payload', and 'Signature'.
Let's summarize and reinforce the key points from your reading.
Part 1: The Header
The header is a JSON object that provides metadata about the token itself. It typically contains two key-value pairs:
"typ": "JWT": Specifies that the token is a JSON Web Token."alg": "HS256": Specifies the signing algorithm used to create the signature.HS256(HMAC using SHA-256) is a common choice that uses a single secret key.
This JSON object is then Base64Url encoded to form the first part of the JWT.
{
  "alg": "HS256",
  "typ": "JWT"
}
Part 2: The Payload
The payload is another JSON object that contains the claims. Claims are statements about the user and any other data the application needs. This is where you'd put the information needed for authorization.
There are different types of claims:
- Registered Claims: These are standardized, recommended claims like
iss(issuer),exp(expiration time),sub(subject, often the user ID), andiat(issued at). Their names are kept short to keep the JWT compact. - Private Claims: These are custom claims you define for your application. For example, you might include a user's role, which connects directly to the Role-Based Access Control (RBAC) we discussed in the last lesson.
{
  "sub": "1234567890",
  "name": "John Doe",
  "admin": true,
  "iat": 1516239022
}
Crucial Security Note: The payload is only Base64Url encoded, not encrypted. Anyone who intercepts the token can easily decode it and read its contents. Therefore, you must never store sensitive information, like passwords, in the JWT payload.
Part 3: The Signature
The signature is what makes the JWT secure. It's used to verify that the token was not tampered with after it was issued.
It is created by taking:
- The encoded Header
- The encoded Payload
- A secret key (which must be kept private on the server)
These components are combined and signed using the algorithm specified in the header (alg).
The formula for an HS256 signature looks like this:
HMACSHA256(base64UrlEncode(header) + "." + base64UrlEncode(payload), secret)
If a malicious user tries to change the payload (e.g., changing "admin": false to "admin": true), the signature they have will no longer be valid. When the server receives the tampered token, it will try to regenerate the signature with the original secret. The new signature won't match the one on the token, and the server will reject it. This protects the integrity of the claims.
3. Exploring JWTs Hands-On
The best way to solidify your understanding is to see this in action. The website jwt.io has an interactive debugger that lets you decode and verify JWTs.
This short video provides a great walkthrough of the tool.
What Is JWT and Why Should You Use JWT
This clip from Web Dev Simplified demonstrates how the jwt.io debugger visually separates the encoded token into its decoded header, payload, and signature components.
Watch the segment from 5:37 to 6:22. Notice how the tool color-codes the different parts of the token.
Now, try it yourself!
- Go to jwt.io.
- On the left, in the "Encoded" box, you will see a default JWT.
- On the right, you can see the decoded "Header" and "Payload".
- Try changing a value in the payload, for example, the
nameorsubfield. Notice how the encoded token on the left changes and the tool immediately tells you the signature is invalid (it turns red). This happens because the original signature no longer matches the new payload.
Test your understanding!
An attacker intercepts a JWT sent from your application's server to a user. The payload contains the claim "role": "user". The attacker decodes the payload, changes the claim to "role": "admin", and re-encodes it. They then send a request with this modified token to a protected API endpoint that requires admin privileges.
Will the attacker gain access? Why or why not?
Show answer
No, the attacker will not gain access.
Although they successfully changed the payload, they do not have the server's secret key. When the server receives the tampered token, it will perform its own signature calculation using the modified payload and its secret key. The resulting signature will not match the original signature attached to the token. The server will detect this mismatch, deem the token invalid, and reject the request.
Conclusion
You've now dissected the structure of a JSON Web Token and understand the role of each of its three fundamental parts.
Key Takeaways:
- A JWT consists of three dot-separated parts: Header, Payload, and Signature.
- The Header defines the token type and the signing algorithm.
- The Payload contains claims about the user (like user ID or roles) but should never contain sensitive data, as it is only encoded, not encrypted.
- The Signature is the most critical part for security. It's created using the header, payload, and a server-side secret, and it guarantees the token's integrity.
In our next lesson, we'll put all this together and explore the JWT-based authentication flow in a web application. You'll see how a user logs in, receives a JWT, and uses it to access protected pages and API routes—a pattern you'll implement later in this course with Next.js.