Welcome to the next lesson in our Spring Boot module. In our last session, we explored Spring Boot Actuator, focusing on how to monitor a service's health and operational state in a production environment. Knowing your service is running is crucial, but ensuring only authorized parties can access it is equally important. This brings us to the fundamental topic of security.
In a microservices architecture, services often need to act on behalf of a user to access resources from other services. Securely managing this delegated access is a core challenge. The industry-standard solution is OAuth2, and understanding its mechanisms is a frequent topic in system design and backend engineering interviews.
Today, you will learn to describe the steps of the OAuth2 Authorization Code grant flow, from user consent to token issuance. This is the most common and secure OAuth2 flow for web applications with a server-side component, making it essential knowledge for the roles you are targeting.
1. The Core Problem: Delegated Authorization
Before diving into the flow, let's establish the "why." Imagine a web application, let's call it PhotoBookPrinter.com, that you want to use to print photos from your Google Photos account. You wouldn't want to give PhotoBookPrinter.com your Google username and password. That would grant them full access to your entire Google account, which is a massive security risk.
This is the problem OAuth2 solves: it allows a third-party application (the Client) to access specific resources from a service (the Resource Server) on behalf of a user (the Resource Owner), without ever sharing the user's credentials. This is achieved with the help of an Authorization Server.
In our example:
- Resource Owner: You, the user.
- Client:
PhotoBookPrinter.com. - Authorization Server: Google's authentication service.
- Resource Server: The Google Photos API.
The video below from The Curious Coder provides an excellent real-world walkthrough of this concept using LeetCode and Google Sign-In.
OAuth 2.0 Deep Dive | Access Token & Google Login in Spring Boot
This video sets the stage by explaining the problem OAuth2 solves and introduces the key actors in the flow.
Watch the first section from the beginning up to this point. Pay attention to how it defines the user, authorization server, and client, and clarifies that the goal is to issue an access token, not share credentials.
2. The Authorization Code Flow: A Step-by-Step Guide
The Authorization Code grant is the most secure flow for applications that have a backend component (what OAuth2 calls a "confidential client"). Your experience building backend services with Spring Boot falls directly into this category. The entire process is a carefully choreographed dance between the user's browser (the "front-channel") and direct server-to-server communication (the "back-channel").
This sequence diagram provides a high-level map of the journey we're about to explore.
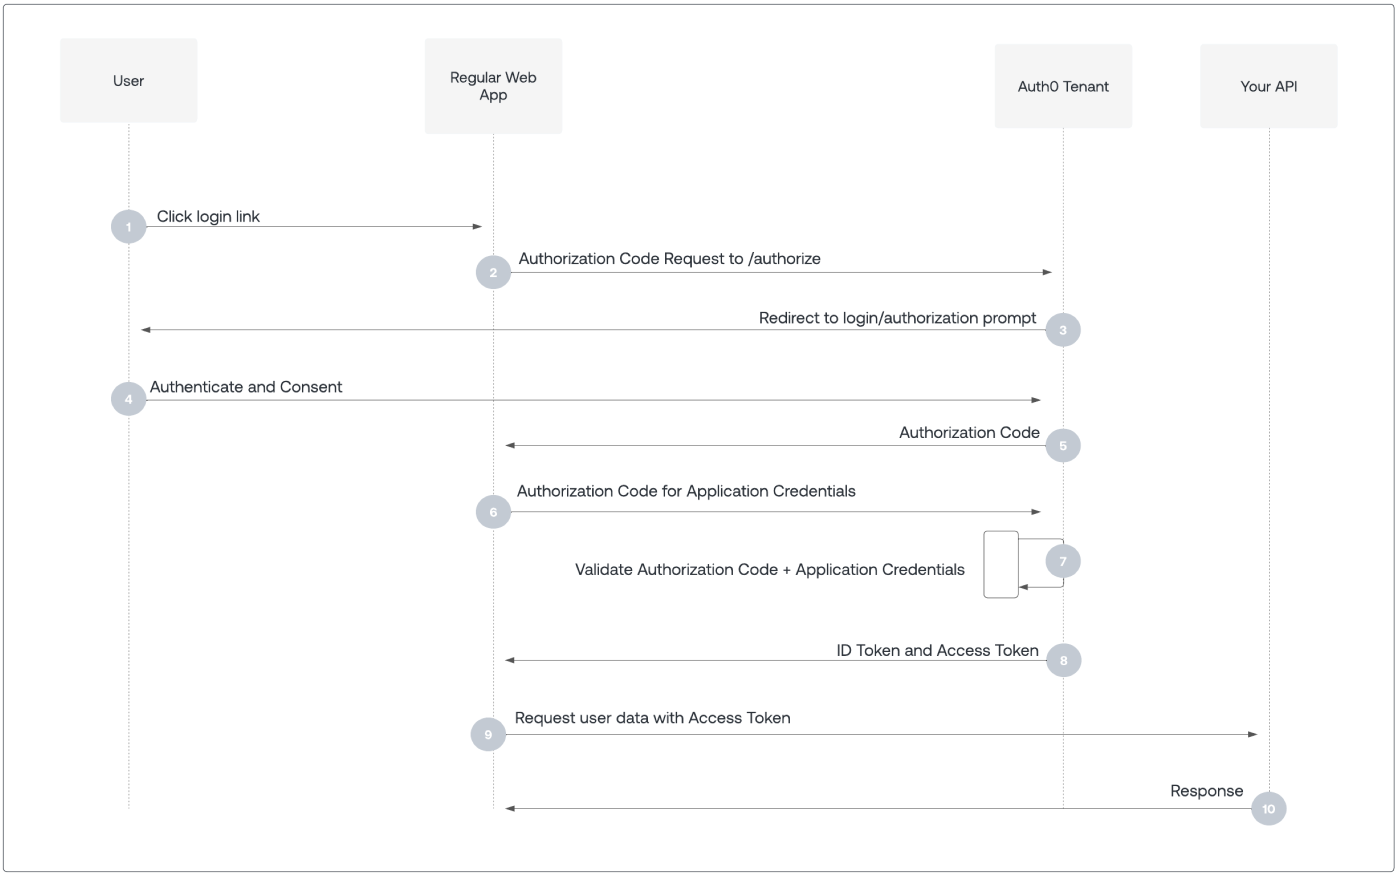
Now, let's break down each step in detail.
Step 1: The Authorization Request (Front-Channel)
The flow begins when you, on PhotoBookPrinter.com, click "Import from Google Photos."
-
Redirection: The client application (
PhotoBookPrinter.com) constructs a URL and redirects your browser to the Authorization Server's/authorizeendpoint. This is a critical step: the user is now interacting directly with the trusted Authorization Server (e.g.,accounts.google.com), not the client application. -
Query Parameters: The redirect URL contains several important query parameters:
response_type=code: This tells the Authorization Server that we are initiating the Authorization Code flow.client_id: A public identifier for the client application, obtained during a one-time registration process.redirect_uri: The URL on the client application where the Authorization Server should send the user back after they approve or deny the request. For security, this URI must be pre-registered with the Authorization Server.scope: Defines the specific permissions the client is requesting (e.g.,photos.read).state: A random, unguessable string generated by the client. It's used to prevent Cross-Site Request Forgery (CSRF) attacks. The Authorization Server will echo this value back, and the client must verify it matches the original.
The video below explains this initial setup and redirection very clearly.
This video by Jan Goebel walks through the initial application registration and the first redirect to the authorization server.
Watch the segment from this section. It covers the one-time registration to get a client_id and client_secret, and then details the parameters sent in the first redirect.
Step 2: User Authentication and Consent (Front-Channel)
Now that your browser is on the Authorization Server's site:
- Authentication: The Authorization Server prompts you to log in (if you aren't already). You enter your Google credentials on Google's domain. The client application never sees these credentials.
- Consent: After successful authentication, the server displays a consent screen based on the
scoperequested. It will ask, "Do you want to allowPhotoBookPrinter.comto view your photos?" You can grant or deny this request.
Step 3: The Authorization Code Grant (Front-Channel)
Assuming you grant consent:
- Redirection with Code: The Authorization Server redirects your browser back to the
redirect_urispecified in Step 1. - Code in URL: Appended to this redirect URL is a new query parameter:
code. This is the Authorization Code. It's a short-lived, single-use credential. Thestateparameter is also returned here for verification.
It is crucial to understand that this code is not the access token. It's a temporary proof of consent that the client must exchange for an actual token.
Step 4: The Token Exchange (Back-Channel)
This is the most critical security step and it happens entirely between servers, hidden from the user's browser.
- Server-to-Server Request: The client's backend receives the request at its
redirect_uri, extracts theauthorization_codefrom the URL, and verifies thestateparameter. - Token Endpoint: The client backend then makes a direct, server-to-server POST request to the Authorization Server's
/tokenendpoint. This request includes:grant_type=authorization_code: Specifies the grant type.code: The authorization code received in the previous step.redirect_uri: The same URI used in the initial request, for verification.client_id: The client's public identifier.client_secret: A secret credential known only to the client and the Authorization Server. This authenticates the client itself, proving it's the legitimate application and not an imposter that somehow intercepted the authorization code.
The inclusion of the client_secret in a secure back-channel call is what makes this flow suitable for confidential clients like your Spring Boot applications.
The Stack Overflow Blog article "The Authorization Code grant (in excruciating detail)" provides a superb, code-level explanation of this entire process.
The Authorization Code grant (in excruciating detail) Part 2 of 2 - Stack Overflow
This article provides a deep dive into the technical implementation of the flow. Focus on the transition from front-channel to back-channel.
First, read the section on receiving the code. This covers how the client's redirect_uri is called with the code and state. Next, carefully study the example code in the section that follows, beginning with the oauth-callback route. This demonstrates the crucial back-channel request to the /token endpoint, where the client sends its client_secret and the received code to exchange them for an access token.
Step 5: Token Issuance
If the Authorization Server successfully validates all the information from the back-channel request (code, client ID, client secret), it responds with a JSON payload containing the precious tokens.
- Access Token: A short-lived credential (e.g., valid for 1 hour) that the client will include in the
Authorizationheader of its requests to the Resource Server (the Google Photos API). - Refresh Token (Optional): A long-lived credential (e.g., valid for months) that can be used to obtain a new access token once the current one expires, without requiring the user to go through the entire login and consent process again. Refresh tokens are extremely sensitive and must be stored securely by the client.
The distinction between these two tokens is a common interview question.
Advanced OAuth 2.0 Interview Questions for Experienced ...
This resource explains the purpose of different token types clearly and concisely.
Read question 11, on access vs. refresh tokens, to solidify your understanding of their distinct roles and lifecycles.
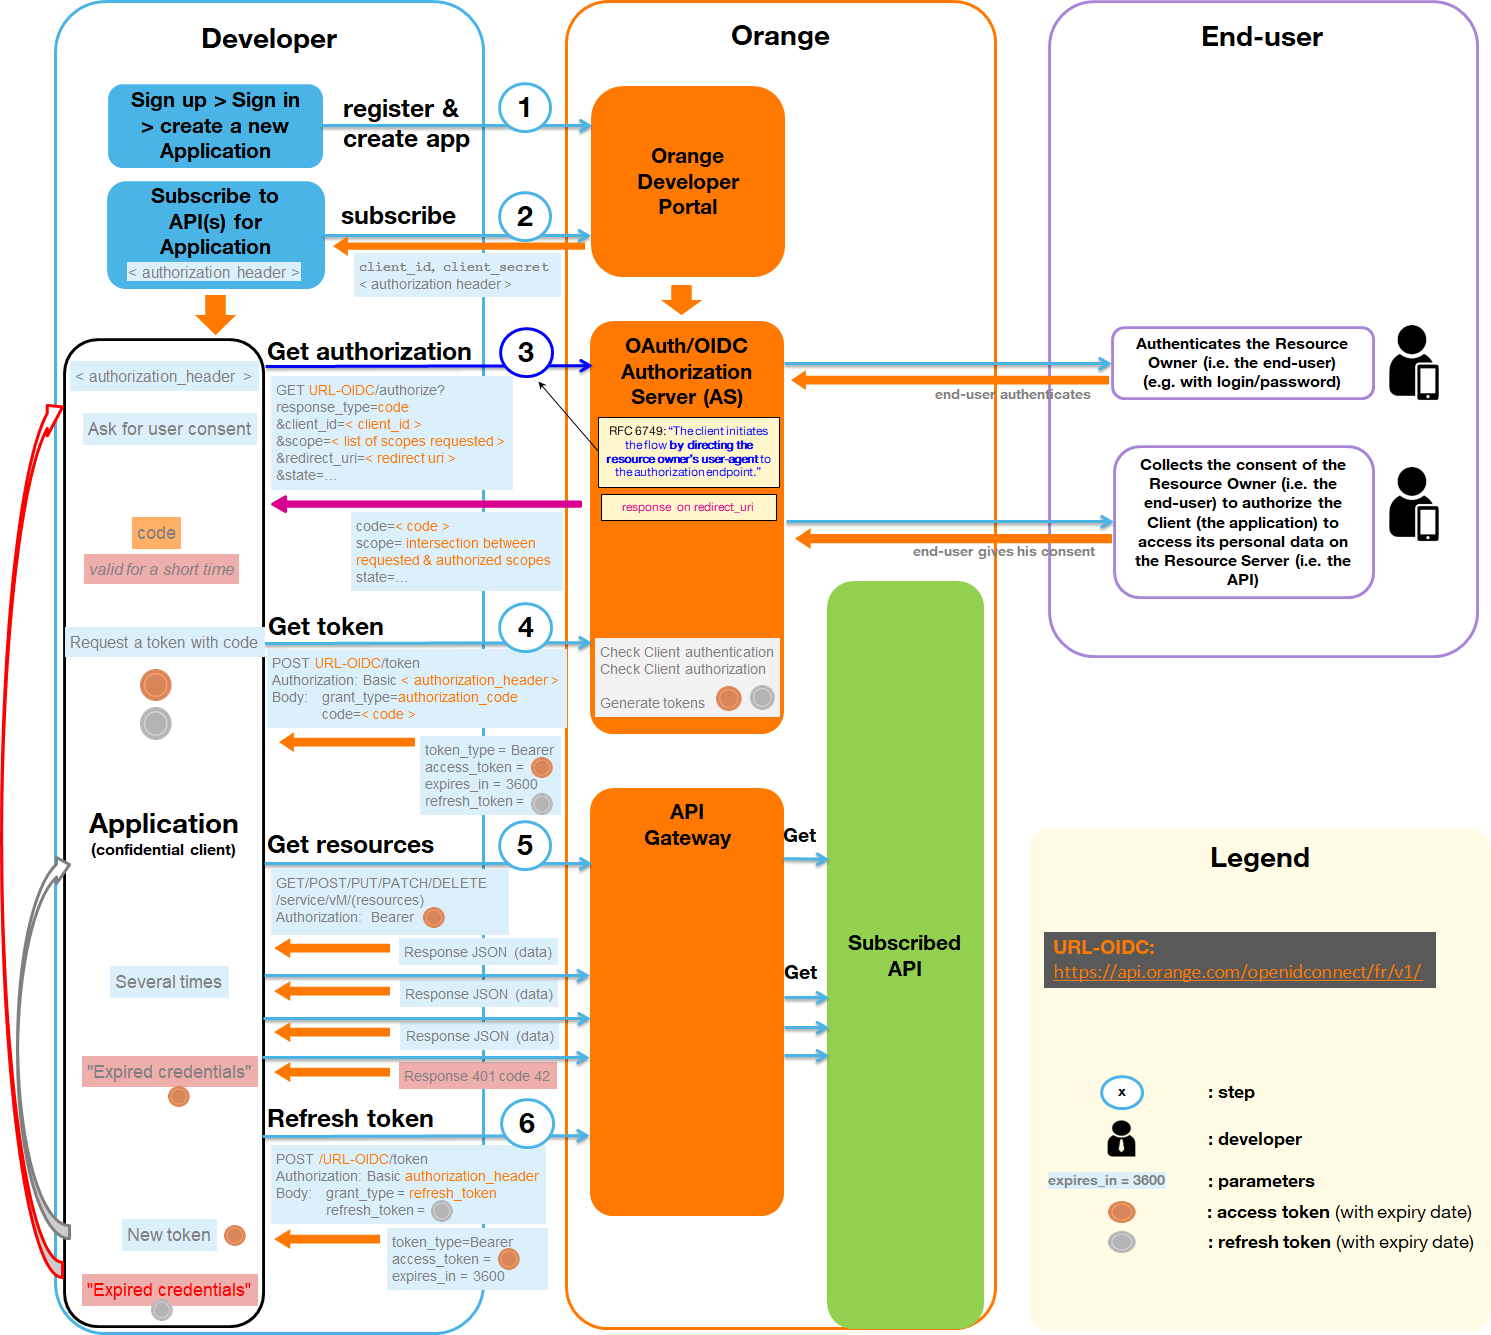
This detailed diagram shows the entire flow, including the token refresh step, which uses the refresh token.
Modern Enhancements: PKCE
You may have noticed a parameter called code_challenge in some of the resources. This is part of an extension called Proof Key for Code Exchange (PKCE), pronounced "pixy". Originally designed for public clients (like mobile or single-page apps) that cannot securely store a client_secret, PKCE is now recommended for all clients, including confidential ones, as an additional layer of security.
It works by having the client generate a secret (code_verifier) and send a hash of it (code_challenge) in the initial authorization request. When exchanging the authorization code for a token, the client includes the original code_verifier. The authorization server can then verify that the client making the token request is the same one that initiated the flow.
Conclusion
You are now equipped to describe the OAuth2 Authorization Code grant flow in detail, a key skill for any backend engineering interview.
Here are the critical takeaways:
- Purpose: To delegate authorization, allowing a client application to access a user's resources without obtaining their credentials.
- Actors: The flow involves the Resource Owner (user), Client, Authorization Server, and Resource Server.
- The Flow in a Nutshell:
- Front-Channel: The client redirects the user to the Authorization Server for login and consent.
- Front-Channel: The Authorization Server redirects the user back to the client with a temporary Authorization Code.
- Back-Channel: The client's backend securely exchanges the Authorization Code and its
client_secretfor an Access Token by calling the Authorization Server's token endpoint.
- Key Security Features: User credentials are never exposed to the client, and the final token exchange happens on a secure, server-to-server back-channel.
- Tokens: The flow results in a short-lived
access_tokenfor API requests and an optional long-livedrefresh_tokenfor renewing access.
In our next and final lesson of this module, we will explore what happens after the client has the access token. We will examine how Spring Security's filter chain validates JWTs (JSON Web Tokens) on incoming requests, completing the security picture from authentication to API call validation.