Hello! Welcome back to our course.
In the last lesson, you did a fantastic job applying your deconstruction skills to architecture, breaking down a building into a wireframe of simple boxes in perspective. You learned to analyze a reference, establish a perspective grid, and build up the structure from primary to secondary forms.
Today, we'll tackle a more complex subject. The learning outcome for this lesson is to: Select a reference photo of a vehicle and create a simplified wireframe construction drawing.
While vehicles are also constructed from basic forms, their shapes are often more rounded and stylized than buildings. This lesson will show you how to manage that complexity by focusing on key proportions and a systematic block-in process. The "wireframe" thinking you've developed, which is very similar to creating low-poly models in computer graphics, will be your greatest asset here.
Let's begin!
Part 1: Deconstruction Mindset for Vehicles
The core idea remains the same: simplify complex surfaces into basic volumes. For vehicles, this means looking past the sleek body panels and seeing the underlying boxes, cylinders, and wedges.
A great construction drawing starts with a solid foundation. Here's what we're aiming for: a clear wireframe that shows the vehicle's volume and structure, with all construction lines visible.

Part 2: It's All About Proportions
With buildings, you can often approximate the size of the main forms. Vehicles, however, have recognizable proportions that are crucial to making them look correct. A common mistake for beginners is misjudging the distance between the wheels or the height of the cabin.
A robust method used by professional designers is to use the vehicle's own wheel as a unit of measurement.
How To Draw a Sci-Fi Sports Car
Let's read a section from the article 'How To Draw a Sci-Fi Sports Car' that explains this proportional measurement system. This is a practical, non-mathematical way to ensure your vehicle's foundation is accurate.
Please read 'Step 2: Design a Side View Sketch Of The Sci-Fi Motor Car'. Focus on how the author uses the wheel's diameter, which they call an 'FD' (Front Diameter), to measure everything else: the distance between the wheels (the wheelbase), the height of the car, and the overhangs at the front and back.
As you read, note these key proportional rules-of-thumb, which apply to many standard cars:
- Wheelbase: The distance between the center of the front and rear wheels is often around 2.5 to 3 wheel diameters.
- Height: The total height is typically less than 2 wheel diameters.
- Overhang: The parts of the car extending past the wheels are often less than one full wheel diameter.
Analyzing your reference photo with these measurements in mind is the first and most critical step.
Test your understanding!
You are analyzing a reference photo of a sedan. You measure the distance between the front and rear wheels and find it is approximately equal to the length of five wheel diameters. What might this tell you about the car or your drawing?
Show answer
A wheelbase of five wheel diameters is unusually long for a standard sedan. This might indicate that the car is a limousine or a stylized custom vehicle. It also might be a sign that you are misinterpreting the effects of perspective foreshortening in your measurement. Always be mindful that you are measuring on a 2D image of a 3D object.
Part 3: The Initial Block-In
Once you have a sense of the proportions, you can begin constructing the vehicle in perspective. Just like with the building, we start with the largest, simplest form. For a car, this is typically two boxes: a large one for the main body and a smaller one on top for the passenger cabin.
This first video gives a very fast and intuitive demonstration of this initial block-in.
Let's watch a short clip from 'How To Draw CARS' by artist David Finch. He starts with an extremely simple two-box construction that effectively captures the essence of a car's form in perspective.
Watch from 00:31 to 02:24. Notice how he establishes a simple two-point perspective grid and then draws a large rectangle for the body and a smaller one for the cabin. This is the foundational first step.
After establishing this basic block-in, the process becomes one of "sculpting"—slicing away parts of the boxes to create the slanted hood and windshield, and rounding the corners to match the reference.
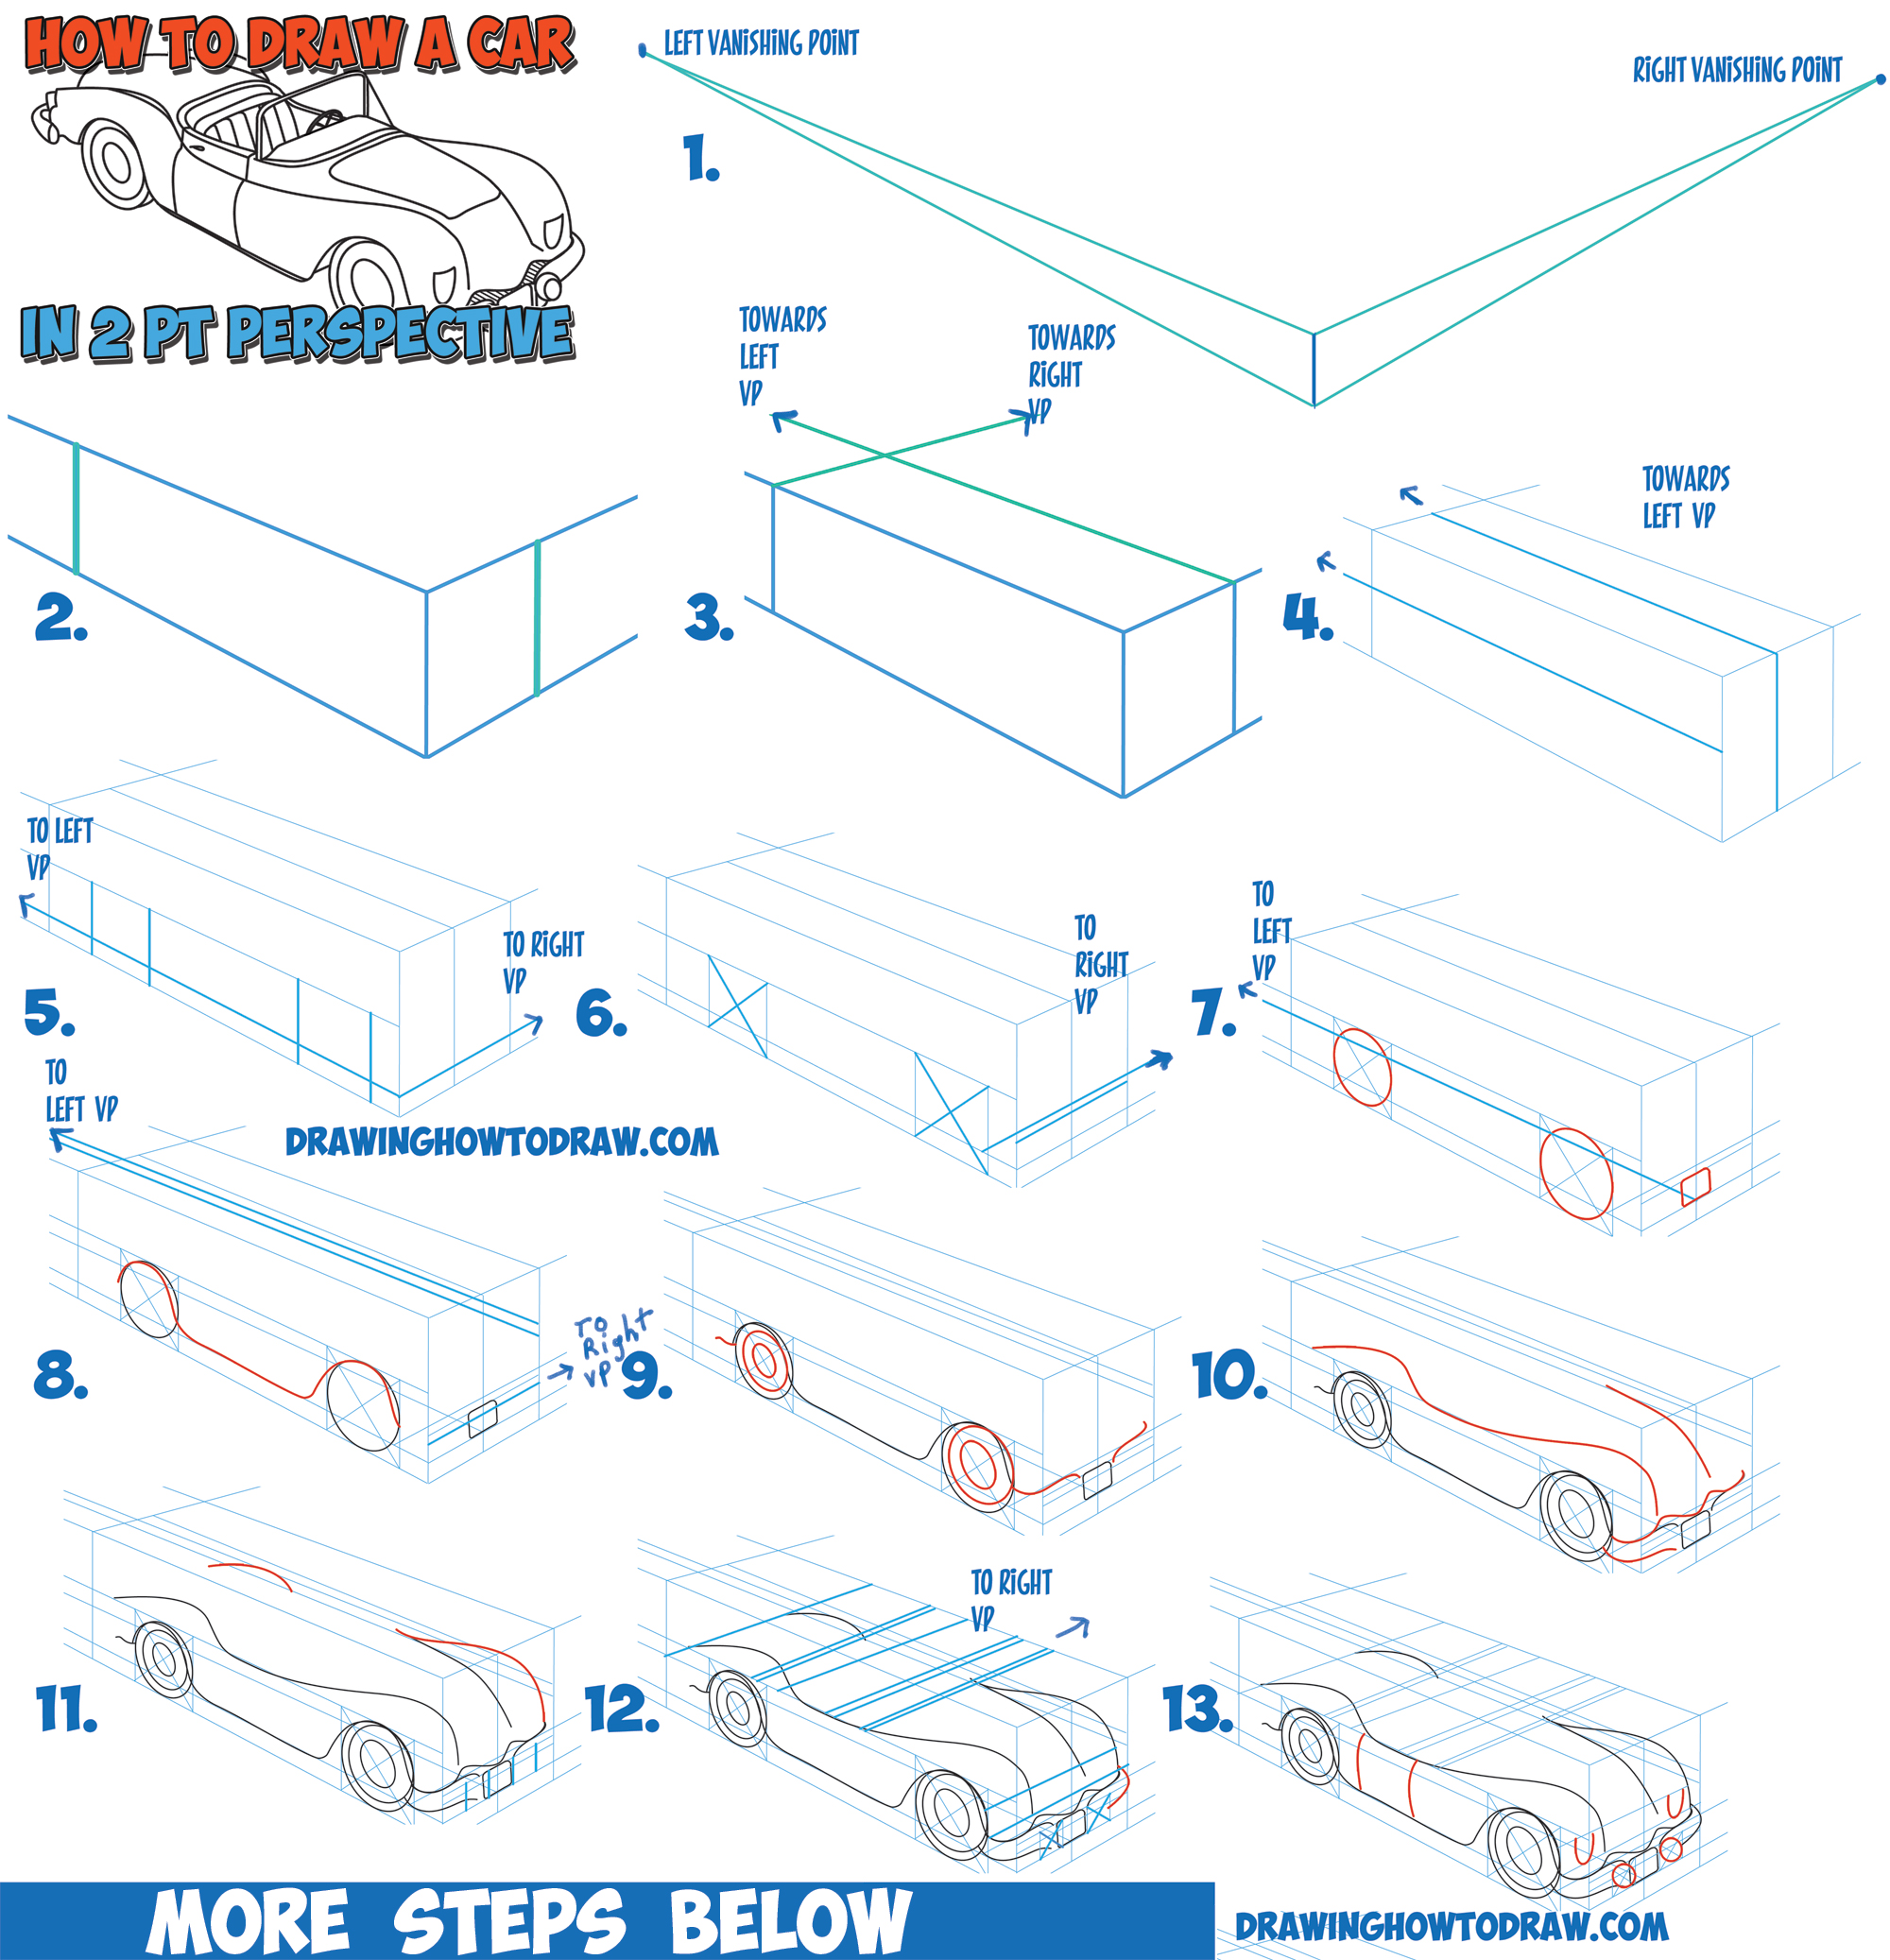
Part 4: A Precise Method for Wheel Placement
The most challenging part of drawing a vehicle is placing all four wheels correctly in perspective. While you can eyeball their placement within your main box, a more precise method will guarantee accuracy and make your drawings feel solid.
This technique uses the plane duplication method you've learned previously to accurately measure the distance from the front wheel to the back wheel, automatically accounting for perspective foreshortening.
A Must Know Method For DRAWING VEHICLES In Perspective - PART 1
The video 'A Must Know Method For DRAWING VEHICLES In Perspective' by Dan Beardshaw offers a very clear, methodical approach to this problem. His process will likely appeal to your structured way of thinking.
Watch from 03:53 to 07:29. Focus on these key steps: He starts by drawing the bounding square for the front wheel in perspective. He then uses the perspective duplication method (finding the center, drawing a diagonal through it) to repeat that square 2.5 or 3 times to find the exact location for the rear wheel.
By using this technique, you can build a precise "chassis" or footprint for your vehicle on the ground plane, ensuring the wheelbase is correct before you build the body on top of it.
Practice Exercise (25 minutes)
Now it's time to create your own vehicle wireframe.
-
Find a Reference Photo: Search online for a car in a 3/4 view. This view shows the front and side of the car and is ideal for practicing two-point perspective.
- Good subjects: A simple sedan, hatchback, SUV, or truck (like a Ford F-150 or VW Golf).
- Avoid for now: Exotic sports cars with very complex curves (like a Lamborghini) or extreme camera angles (worm's-eye or bird's-eye view).
-
Analyze and Plan: Before drawing, analyze your reference. Mentally (or with a quick thumbnail sketch) determine the proportions using the wheel diameter as your guide. Identify the horizon line and vanishing points.
-
Create Your Wireframe Drawing: On a clean sheet of paper, follow these construction steps:
- Set up the Grid: Lightly draw your horizon line and establish your two vanishing points.
- Place the Wheels: Draw the perspective square for the front wheel closest to the viewer. Use the duplication method to find the position of the rear wheel. Then, project lines to the opposite vanishing point to find the location of the two far wheels. You should now have the four "footprints" for your tires on the ground plane.
- Build the Body: Construct the main box for the car's body around these wheel positions. Add the smaller box for the cabin.
- Sculpt the Form: Refine the boxes. Draw lines to define the slope of the windshield and hood. Lightly sketch the curves of the wheel wells.
- Draw the Wheels: Draw ellipses inside each of the four wheel-squares you established.
Remember: The goal is a construction drawing. Keep all your perspective lines, duplication lines, and the hidden edges of your boxes visible. The drawing should look like a transparent, wireframe model.
Conclusion
Excellent work today! You've taken the principles of deconstruction and applied them to a significantly more complex subject. By learning to see past the curves and identifying the underlying structure and proportions, you can now build a believable vehicle from the ground up.
Key Takeaways:
- Vehicles are deconstructed by establishing a primary bounding box in perspective, just like buildings.
- Using the wheel diameter as a standard unit of measurement is a powerful technique for achieving accurate proportions.
- The plane duplication method provides a precise way to position wheels and other repeating features in perspective.
- The process is one of building and then sculpting: Block in the main forms, then refine them to match your reference.
Next Lesson Preview:
In our next lesson, we will shift our focus back to organic forms as we enter the "Head Construction with the Loomis Method" module. You'll learn how to construct the basic Loomis head: a sphere with sliced sides and a centerline for orientation. This will be our first step toward deconstructing the human head for portrait drawing.