Hello! In our previous lessons, you did an excellent job mastering the construction of the human head, deconstructing its complex organic curves into a system of spheres and planes that you could rotate in 3D space using pitch, yaw, and roll.
Today, we transition from the organic to the geometric as we begin the "Deconstructing Architecture" module. The learning outcome for this lesson is to: Select a reference photo of a building and create a simplified wireframe construction drawing.
We'll take the same fundamental idea of deconstruction and apply it to buildings. You'll find this a great way to solidify your understanding of perspective, as buildings are primarily composed of the boxes and simple forms we've practiced before. Your background in graphics programming will be helpful here, as the process is very similar to creating a simple 3D model: breaking a complex object down into a "wireframe" of primitive shapes.
Part 1: The 'Simplify and Conquer' Mindset
Before you can draw a building, you need to learn how to see it. Any complex object, whether it's a skyscraper or a coffee mug, can be mentally broken down into a combination of basic 3D forms: cubes, cylinders, spheres, and cones. This is the core principle of constructive drawing.
For architecture, the most dominant form will be the rectangular prism, or the box. Your first job when looking at a reference is to ignore the details—the bricks, the window frames, the decorations—and see the big, simple boxes that make up the building's main structure.
The following reading explains this simplification process. While it uses a baseball cap as an example, the methodology is universal.
The Ultimate Guide To Drawing In Perspective From ...
Let's read the 'Simplify and Conquer' section from 'The Ultimate Guide To Drawing In Perspective'. It provides an excellent step-by-step method for analyzing a real-world object and breaking it down into its core volumes.
Read the section titled 'Simplify and Conquer'. Pay close attention to the three steps outlined: 1) viewing the object from multiple angles, 2) orienting it for easier drawing, and 3) matching its parts to basic volumes.
Part 2: Analyzing a Building Reference
Now, let's apply this mindset to a building. The analysis process can be broken down into three steps:
- Identify the Primary Form: Look at the building and enclose its largest, most central mass in a single, simple box. This is your "bounding box."
- Identify Secondary and Tertiary Forms: Find the other major shapes that are either added to or subtracted from your primary box. A garage might be a smaller box attached to the side. A porch could be another box added to the front. A tower could be a cylinder or a tall box.
- Determine the Perspective: Analyze the lines of the building to identify the perspective system in use. Is the building facing you head-on (one-point)? Are you looking at a corner (two-point)? Or are you looking up from below or down from above (three-point)?
This quick video will refresh your memory on the three main perspective types specifically for architecture.
Basic Rules of PERSPECTIVE DRAWING in Architecture + Free Downloadable Guide
This video, 'Basic Rules of PERSPECTIVE DRAWING in Architecture,' gives a concise overview of one, two, and three-point perspective and shows a quick sketch of a house in each.
Watch from the beginning to 04:47. The goal here is not to learn perspective from scratch, but to quickly see how each type applies to a building, which will help you identify them in your reference photos.
Part 3: The Wireframe Construction Process
Once you've analyzed your reference, it's time to draw. Your goal isn't a detailed, finished piece, but a wireframe construction drawing. This means all your construction lines—the perspective grid, the hidden edges of the boxes—should be visible. This drawing is the blueprint for a more detailed illustration later.
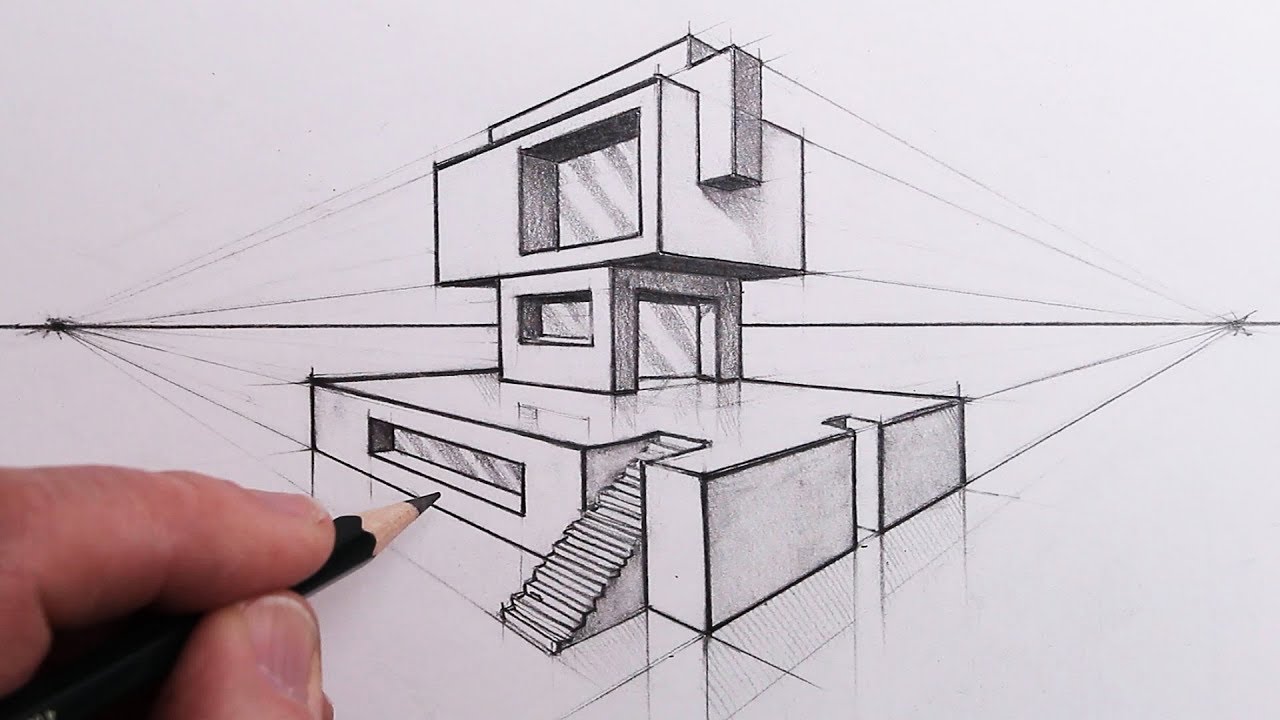
Here is the step-by-step process:
- Set Up Your Grid: Based on your analysis, establish your horizon line and vanishing points on your paper.
- Draw the Primary Form: Using your perspective grid, construct the main bounding box for the building. Remember to draw "through" the form, meaning you should draw all edges, even the ones that would normally be hidden. This ensures the box is structurally sound.
- Add and Subtract Secondary Forms: Construct the secondary boxes and other primitive shapes, attaching them to or intersecting them with the primary form. In a previous module, you learned about combining forms; this is where that skill becomes critical. Make sure every line you draw converges to the correct vanishing point. This is the "sculpting" phase of your drawing.
- Block in Major Openings: Using the same perspective rules, lightly indicate the location of large features like doors, windows, or archways. You don't need details. Just draw the simple 2D shapes (rectangles, arches) on the surfaces of your 3D forms. You can use the "X-method" you learned previously to find centers and divide walls for symmetrically placed windows.
Test your understanding!
You're drawing a house in two-point perspective. You've drawn the main box for the house. Now you need to add a garage that sticks out from the right-hand wall. What is the most important rule to follow when drawing the lines for the garage?
Show answer
All parallel lines on the garage must converge to the same two vanishing points that you established for the main house. The top and bottom lines of the garage's side wall will go to the right vanishing point, and the lines for its front-facing wall will go to the left vanishing point.
Practice Exercise (25 minutes)
It's time to put it all together. Your task is to complete the learning outcome for this lesson.
-
Find a Reference: Search online for a photo of a simple building. Good subjects include:
- A modern house
- A small barn or shed
- A simple storefront
- What to avoid for now: Complex buildings with many curves, intricate details, or unusual angles (like a historic cathedral or a Frank Gehry building). Choose something that is clearly "boxy."
-
Analyze Your Reference: On a scrap piece of paper or just mentally, identify the primary and secondary forms and determine the perspective type (it will most likely be one or two-point).
-
Create Your Wireframe Drawing: On a clean sheet of paper, follow the 4-step construction process outlined above.
- Start with light lines for your perspective grid.
- Draw through all your forms.
- Keep your lines clean and purposeful. The goal is a clear structural drawing, not a sketchy mess.
- Focus on getting the major forms and their perspective correct. Don't add any detail, shading, or texture.
Use the image A hand-drawn illustration of a modern building in two-point perspective. as your guide for the final look and feel of the drawing.
Conclusion
Great job today! You've successfully transitioned your deconstruction skills from organic forms to architectural ones. This process of breaking down complexity into simple, manageable volumes is one of the most powerful tools an artist can have.
Key Takeaways:
- Analyze First: Before drawing, always simplify your subject into its basic primitive forms (mostly boxes for buildings).
- Identify Perspective: Determine if your subject is in one, two, or three-point perspective to set up your drawing correctly.
- Construct from Big to Small: Start with the largest primary form and then add or subtract secondary forms, ensuring all lines obey the same perspective grid.
- Think in Wireframe: Draw through your objects to ensure they are structurally correct in 3D space.
Next Lesson Preview:
Now that you can create the basic wireframe structure of a building, our next lesson will focus on adding the next layer of complexity. We will learn how to construct building facades with correctly aligned windows and doors in two-point perspective, bringing your architectural drawings one step closer to realism.