Hello! Welcome back.
In our last lesson, we successfully mapped out the vertical proportions of the face using the "rule of thirds," establishing the hairline, brow line, nose line, and chin line on our cranium sphere. You now have a properly proportioned scaffold, waiting for the final piece of its foundational structure.
Today, we will complete that foundation. Our goal is to attach the jaw and chin structure to the sphere, transforming it from a simple ball into a complete, recognizable head shape. This step is like adding a major component to your 3D wireframe model, giving it volume and defining the lower half of the face.
1. Conceptualizing the Jaw as a 3D Form
Before we start drawing lines, it's crucial to think about the jaw not as a simple outline, but as a solid, three-dimensional object being attached to the sphere of the cranium. Your experience with 3D modeling concepts will be helpful here. Imagine the cranium is one primitive shape (a sphere) and the jaw is another (a block-like form). Our job is to connect them correctly.
The Proko resources are excellent for explaining this concept. Let's start with a short reading that introduces the jaw as a distinct block.
How to Draw the Head from Any Angle Part 1
This article, 'How to Draw the Head from Any Angle Part 1' by Stan Prokopenko (Proko), clearly explains the idea of simplifying the head into two basic forms.
Please read the sections 'The Basic Forms' and 'A Block as the Jaw and Cheek Bones'. Pay close attention to the image under the second heading, which shows how the blocky jaw form attaches to the sphere. Note the key connection points mentioned: the brow line and the center of the side-plane oval.
As the article illustrates, this "block" has distinct planes: a front plane, side planes, and sometimes a visible bottom plane. Recognizing these planes is the key to drawing a head that feels solid and three-dimensional.
Now, let's see this in motion.
Quickly Draw Heads with the Loomis Method - Part 1
The video 'Quickly Draw Heads with the Loomis Method - Part 1' by Proko demonstrates this 'sphere and block' idea and shows how to define the planes of the jaw.
Watch from 00:53 to 03:00. Focus on how he attaches the 'triangular boxy shape' of the jaw and then divides it into a front plane and a side plane. This is the core concept for today.
2. Attaching the Jaw: From Profile to 3/4 View
With the concept clear, let's get practical. We'll start with the simplest view, the profile, and then move to the more complex front and three-quarter views.
Profile View (Side View)
In the profile view, the construction is straightforward.
- Start with your profile construction from the previous lessons: a circle with the brow, nose, and chin lines marked as straight horizontal lines.
- The back of the jaw attaches to the cranium at the vertical centerline of the side-plane circle. This point is where the ear will eventually be placed, right behind the jaw hinge.
- From this hinge point, draw the jawline as a single line that angles down and forward, connecting to the chin mark you've already established.
The following video demonstrates this clearly.
Quickly Draw Heads with the Loomis Method - Part 1
Let's watch another segment from the Proko video, this time focusing on the profile view.
Watch from 08:25 to 09:10. Notice how he establishes the brow, nose, and chin, and then attaches the jaw, starting from the 'perpendicular line in the middle' (the ear line) down to the chin.
Front and Three-Quarter Views
These views are where your 3D thinking really comes into play. You aren't just drawing an outline; you are defining the change in plane from the side of the jaw to the front.
- Front View: The jaw tapers down from the widest part of the cheekbones (the edges of your sliced side planes) toward the chin. The width of the chin determines the angle of this taper.
- Three-Quarter View: This is the most illustrative view. You will draw the jawline on the visible side, connecting the ear area to the chin. Then, you'll define the "corner" of the chin, which separates the side plane of the jaw from the front plane. This corner typically lines up vertically with the outer corner of the eye socket area.
This detailed tutorial provides a great step-by-step process for the 3/4 view.
How to Draw a Face from the 3/4 VIEW (Loomis Method)
The article 'How to Draw a Face from the 3/4 VIEW (Loomis Method)' from RapidFireArt provides a very clear, illustrated guide to this process.
Scroll down to the heading 'Locate The Facial Features'. Read from this point down to the image showing the jawline being drawn. The key instruction is: 'The jawline can be drawn by extending the ear line down and then angling your stroke towards the chin.' This simple rule is very effective.
Test your understanding!
In a three-quarter view, what are the two main anchor points you need to connect to draw the basic line of the jaw?
Show answer
The two main anchor points are:
- The area where the ear will be placed (the vertical centerline of the sliced side-plane).
- The chin mark (which you found using the 'rule of thirds' in the last lesson).
Visual Summary
Let's look at two images that summarize this process and the final result.
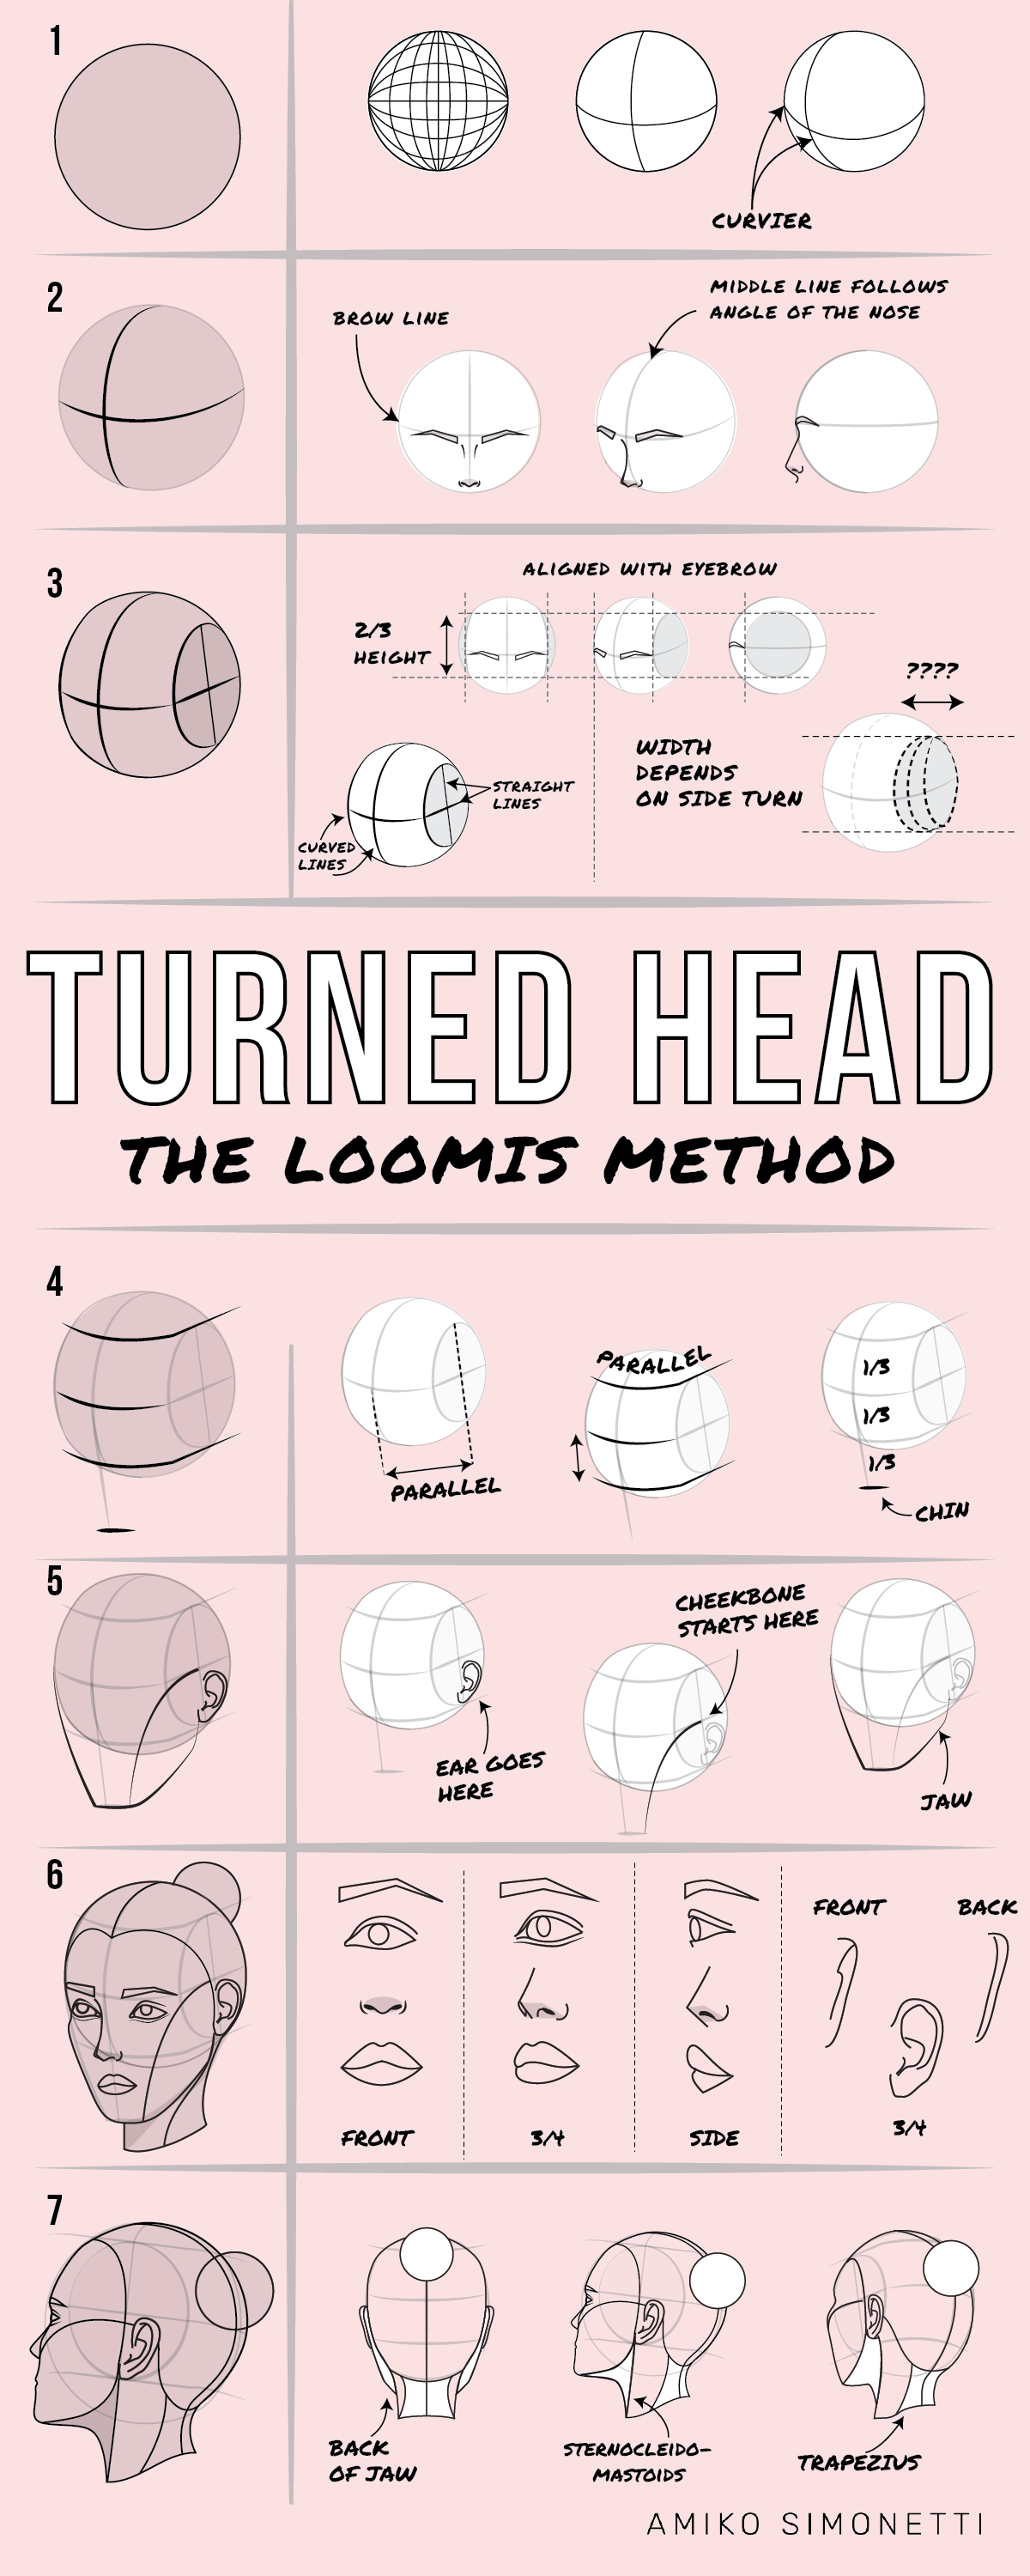

Practice Exercise (25 minutes)
Time to put this into practice. It's best to use the drawings you created in the previous lesson's exercise.
- Take your drawings of the front, profile, and three-quarter view heads, which should already have the cranium, side planes, and facial thirds marked out.
- On the profile view: Locate the vertical ear line. From this line, draw the angle of the jaw down to connect with your chin mark.
- On the front view: Draw the two sides of the jaw, starting from the edges of the sliced-off planes and tapering them down to meet the chin. Decide if you want a wider or narrower jaw.
- On the three-quarter view: This is the most important one.
- First, draw the jawline on the visible side, connecting the ear line to the chin mark.
- Now, define the structure. Draw a line from the corner of the forehead area down to the "corner" of the chin. This separates the front plane of the face from the side plane. You've now created a clear, blocky, 3D structure.
As you draw, try to feel the volume you are creating. You are no longer just drawing flat shapes; you are sculpting a form on the page.
Conclusion
Excellent work today! You have successfully attached the jaw to the cranium, completing the foundational structure of the Loomis head. You can now construct a complete, solid head shape from the ground up.
Key Takeaways:
- The jaw is best understood as a separate, block-like 3D form attached to the sphere of the cranium.
- The primary connection points for the jaw are the ear region (center of the side plane) and the chin line.
- In any view other than a direct profile, it is crucial to define the different planes of the jaw (front, side, bottom) to create a convincing sense of three-dimensional form.
Next Lesson Preview:
You now have all the individual components of the Loomis method. In our next lesson, we will put it all together. We will practice constructing the complete Loomis head from the front, profile, and three-quarter views, reinforcing the entire process from the initial sphere to the finished jawline to build your confidence and speed.