Hello! Welcome back to your course on deconstruction and drawing.
In our last lesson, you learned how to set up a two-point perspective system, which allows you to draw the exterior of a box from any corner view. This was a huge step toward drawing realistic buildings and vehicles. However, so far we've only dealt with the outside shell.
Today, we'll learn how to work inside those perspective planes. This lesson focuses on a fundamental skill: using construction lines (the "X-method") to find the center and divide planes in perspective. This is the key to accurately placing details like windows on a building, wheels on a car, or even features on a face. It’s a simple but incredibly powerful technique that replaces guesswork with geometric certainty.
1. The Problem of the Center in Perspective
When you look at a wall receding into the distance, you know that due to foreshortening, the far side looks smaller than the near side. This means you can't just take a ruler, measure the halfway point, and call it the center. The visual center is different from the measured center.
So, how do we find the true geometric center of a rectangle in perspective? We use diagonals.
Let's start with a video that explains this core idea.
X-ray Perspective Drawing Techniques
The video 'X-ray Perspective Drawing Techniques' by Proko offers an excellent introduction to the 'X-method'. It clearly demonstrates why our intuition often fails when estimating the center in perspective.
Watch from the beginning to 01:32. Pay close attention to the comparison between the 'eyeballed' center and the true center found using the X-method. This highlights the importance of the technique.
As you saw, drawing two light construction lines from corner to corner creates an 'X'. The point where these lines intersect is the perfect center of that plane, no matter how distorted it is by perspective.
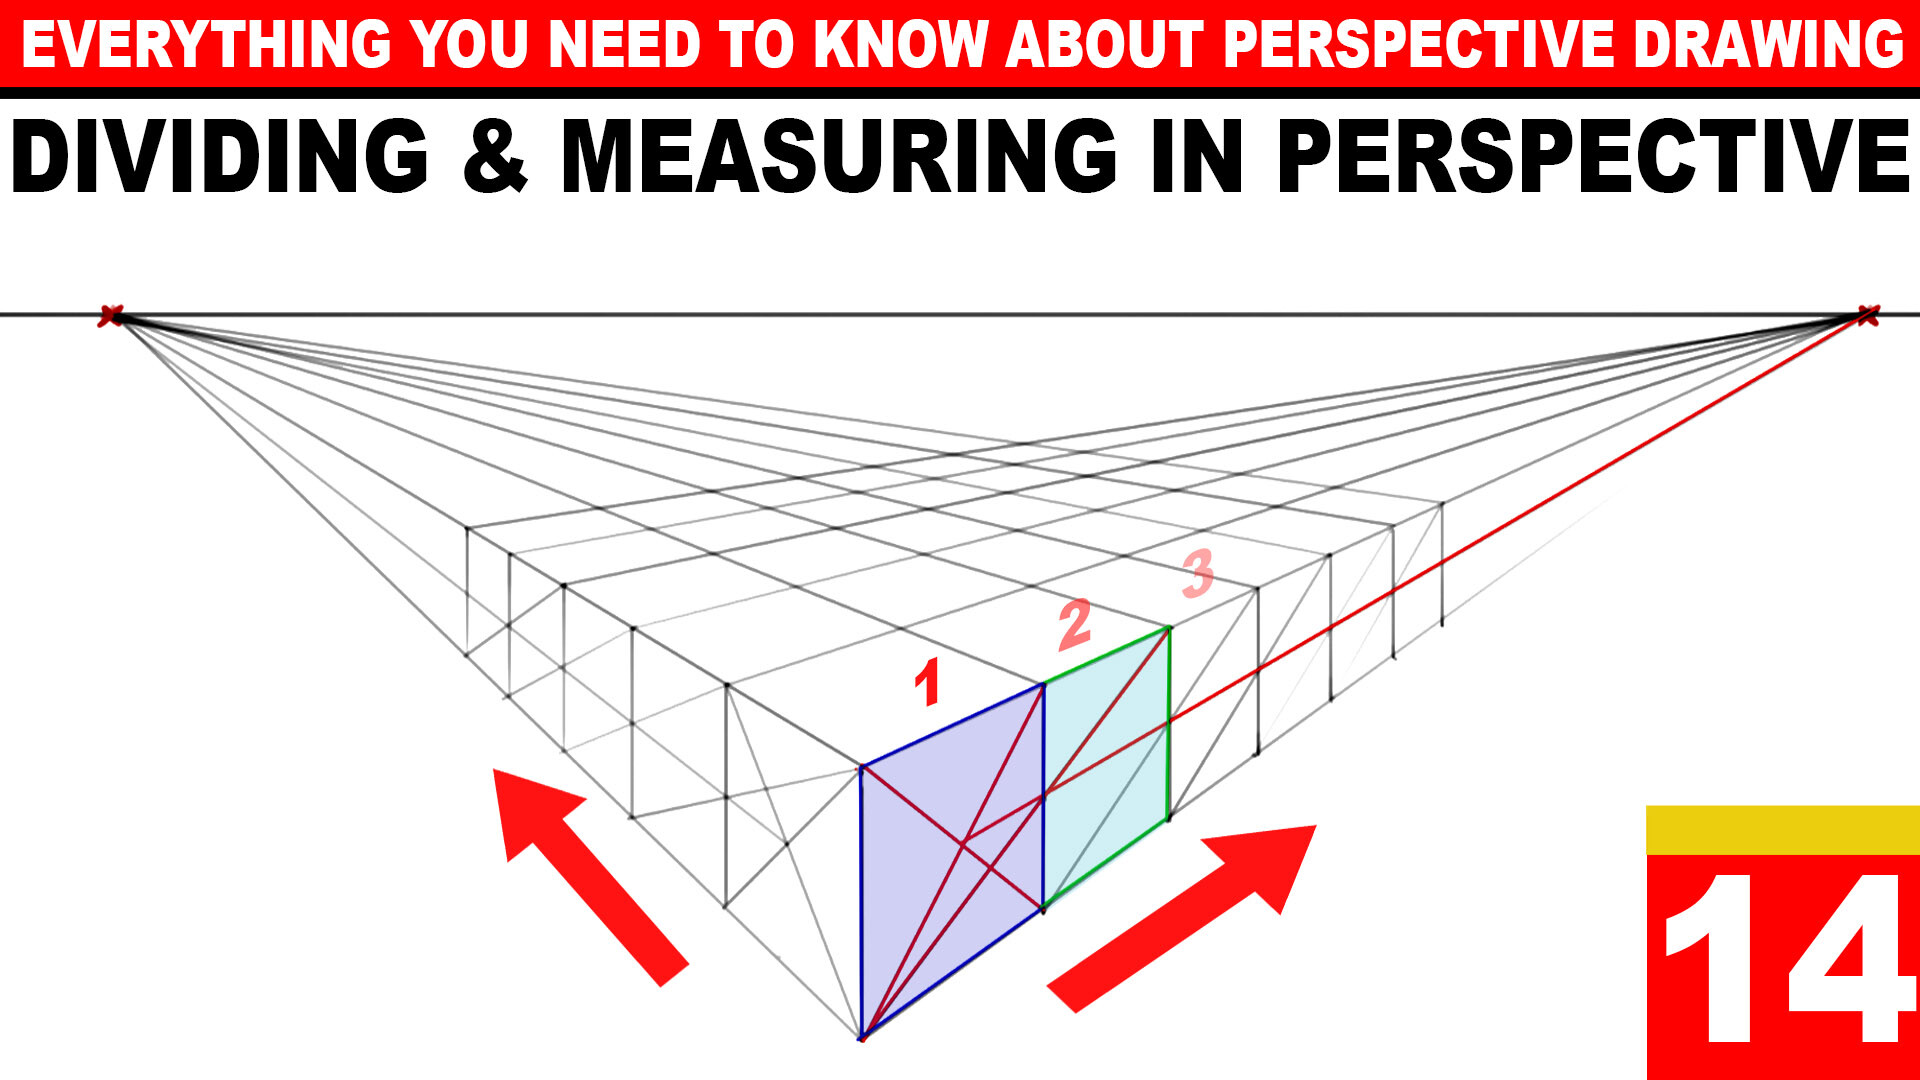
A vertical line through this intersection gives you the vertical centerline, and a perspective line (converging to the appropriate vanishing point) gives you the horizontal centerline. You've just divided your plane into four smaller, but perspectively correct, quadrants.
2. Dividing Planes into Grids
Finding the center is just the beginning. The same logic can be applied repeatedly to divide a plane into any number of equal sections, like creating a grid for window panes or floor tiles.
To divide a plane into quarters, you first find the center. This gives you two halves. Then, you simply apply the X-method to each of those halves to divide them again. You can continue this process to create a grid of 4x4, 8x8, or more.
The following resource provides a very efficient demonstration of this recursive division.
How To Divide Planes Using The "X" Trick
The video 'How To Divide Planes Using The "X" Trick' by Drawsh Studio quickly shows how to subdivide a plane into many even squares.
Watch from 00:34 to 01:22 to see the rapid division into 16 and 64 squares. Then, watch from 01:33 to 02:17, which reinforces the key idea that the perspectively correct center is offset from the measured center.
Practice Exercise 1: Create a Perspective Grid
- On a piece of paper, set up a two-point perspective system (horizon line and two VPs).
- Draw a large rectangular plane below the horizon line, as if you were drawing a tiled patio.
- Using the X-method, divide this plane into four equal quadrants.
- Now, apply the X-method to each of those quadrants.
- Your goal is to create a 4x4 grid. Remember to keep your construction lines light!
Test your understanding!
You have successfully divided a plane into a 4x4 grid. If you wanted to create an 8x8 grid, how many more 'X's would you need to draw in total?
Show answer
You would only need to apply the X-method to each of the 16 squares in your current 4x4 grid. So, you would need to draw 16 more 'X's.
3. Repeating and Duplicating Forms in Space
The X-method has another powerful application: creating a series of equally sized and spaced objects receding into the distance, like fence posts, columns, or parked cars. This is often called "perspective duplication."
The logic is as follows: if you have a plane (representing your first object, e.g., a fence panel), you can find its midpoint. A diagonal line drawn from the top corner of your first plane, through the midpoint of its opposite side, will extend to the bottom corner of the next identical plane.
This is easier to see than to describe. Let's watch it in action.
X-ray Perspective Drawing Techniques
Let's return to the Proko video. He demonstrates how to use a variation of the X-method to double a distance, effectively creating a repeating form in perspective.
Watch from 03:27 to 05:25. Focus on how he uses the midpoint of one section to project the boundary of the next. He does this for the Minecraft character's arm.
This technique is incredibly useful for architectural and environmental drawing. For a more detailed, text-based explanation with clear diagrams, you can review the following guide.
The Ultimate Guide To Drawing In Perspective From ...
The article 'The Ultimate Guide To Drawing In Perspective' provides excellent static diagrams for these concepts. The sections on duplicating and dividing planes are particularly relevant.
Read the sections titled 'Duplicating and Mirroring' and the following section that begins 'If you want to save some time...'. This will reinforce the video content with step-by-step images showing how to both duplicate a plane and divide a larger plane into equal sections.
Practice Exercise 2: The Receding Fence Posts
- In a one-point perspective system, draw a tall rectangle on the left side of your page (this is your first fence post).
- Draw perspective lines from its top and bottom corners to the vanishing point.
- Use the duplication method you just learned to draw two more posts receding into the distance. They should appear to get closer together.
- Your drawing should look something like the fence post example in the "A Beginner's Guide to Perspective – Part 2" article (resource ID LINK).
4. Practical Application: Drawing a Roof
Let's apply this method to a practical problem you'll encounter when drawing buildings. How do you find the peak (apex) of a roof so that it's perfectly centered?
- Start with the front-facing plane of your building, drawn in perspective.
- Use the X-method to find its center.
- Draw a vertical line straight up from this center point.
- Decide how high you want the roof to be and mark that point on the vertical line. This is your apex.
- Connect the top corners of your wall plane to this apex point. You've just created a perfectly centered roof gable.
The following resource illustrates this process clearly.
A Beginner's Guide to Perspective – Part 2
The blog post 'A Beginner's Guide to Perspective – Part 2' has a fantastic, simple example of using the halfway line to construct a roof.
Read the section 'How to find the roof pitch'. The diagrams clearly show how the X-method is used to find the vertical centerline, which is then extended to define the roof's apex.
This same principle is the foundation for adding any symmetrical feature to a form. You can use it to place a nose on the centerline of a face, a door in the middle of a wall, or a logo on the side of a truck.
Conclusion
Congratulations on mastering one of the most essential construction techniques in drawing! While it seems simple, the X-method is the key that unlocks the ability to build complex, detailed, and accurate forms in perspective. Your interest in graphics programming may give you an appreciation for how such a simple geometric algorithm can solve a complex visual problem.
Key Takeaways:
- Drawing an 'X' from corner to corner reliably finds the geometric center of any four-sided plane in perspective.
- This method allows you to divide planes into halves, quarters, eighths, and so on, to create precise grids.
- A variation of this technique allows you to duplicate forms in space, creating repeating elements that correctly diminish in size as they recede.
- This method is critical for symmetrically placing features on a form, such as a roof on a house or a window on a wall.
Next Lesson:
Now that you can construct boxes and accurately divide their surfaces, we will move on to manipulating them in 3D space. In the next lesson, we will explore how to visualize and draw a simple box form rotating around its primary axes, connecting directly to the concepts of pitch, yaw, and roll that you're interested in.