Hello! Welcome back to your course on deconstructing objects into simple forms.
In our last lessons, we built a solid foundation in one- and two-point perspective. You learned to draw rectangular forms viewed from a corner, keeping their vertical lines perfectly parallel. You also mastered the crucial "X-method" for dividing planes and adding details accurately.
Today, we're going to take a dramatic leap. What happens when we are no longer looking at an object head-on, but are instead looking up at a towering skyscraper or down from a cliff? The vertical lines, which we've always kept straight, now appear to converge. This effect is achieved using three-point perspective.
This lesson will teach you how to set up a three-point perspective system. You'll learn how to draw forms from a high angle (a "bird's eye view") and a low angle (a "worm's eye view"). This technique is fundamental for drawing the impressive buildings and dynamic vehicles you're interested in. It also serves as a visual introduction to the concept of "pitch" or camera tilt, which we'll explore more when we get to rotating objects.
1. Why a Third Vanishing Point?
In two-point perspective, we assume our viewpoint is perfectly level. We are looking forward, and the vertical lines of objects appear parallel to each other. However, the moment we tilt our head (or our "camera") up or down, those vertical lines also begin to recede from our view, appearing to converge at a distant point. This requires a third vanishing point (VP3).
Let's start with a short video that explains this core concept.
Perspective Drawing - 04: Three Point Perspective
The video 'Perspective Drawing - 04: Three Point Perspective' by Matt Laskowski provides a concise explanation of why and when a third vanishing point is needed.
Watch from the beginning to 01:12. Pay close attention to how tilting the camera introduces the third vanishing point and where it's placed relative to the horizon line.
As the video explained, the rules are quite simple:
- Bird's Eye View (Looking Down): The horizon line is high on the page, and the third vanishing point (VP3) is placed far below it.
- Worm's Eye View (Looking Up): The horizon line is low on the page, and the third vanishing point (VP3) is placed far above it.
In three-point perspective, none of the object's primary edges are parallel to the sides of your paper. All three dimensions—width, depth, and height—recede towards one of the three vanishing points.
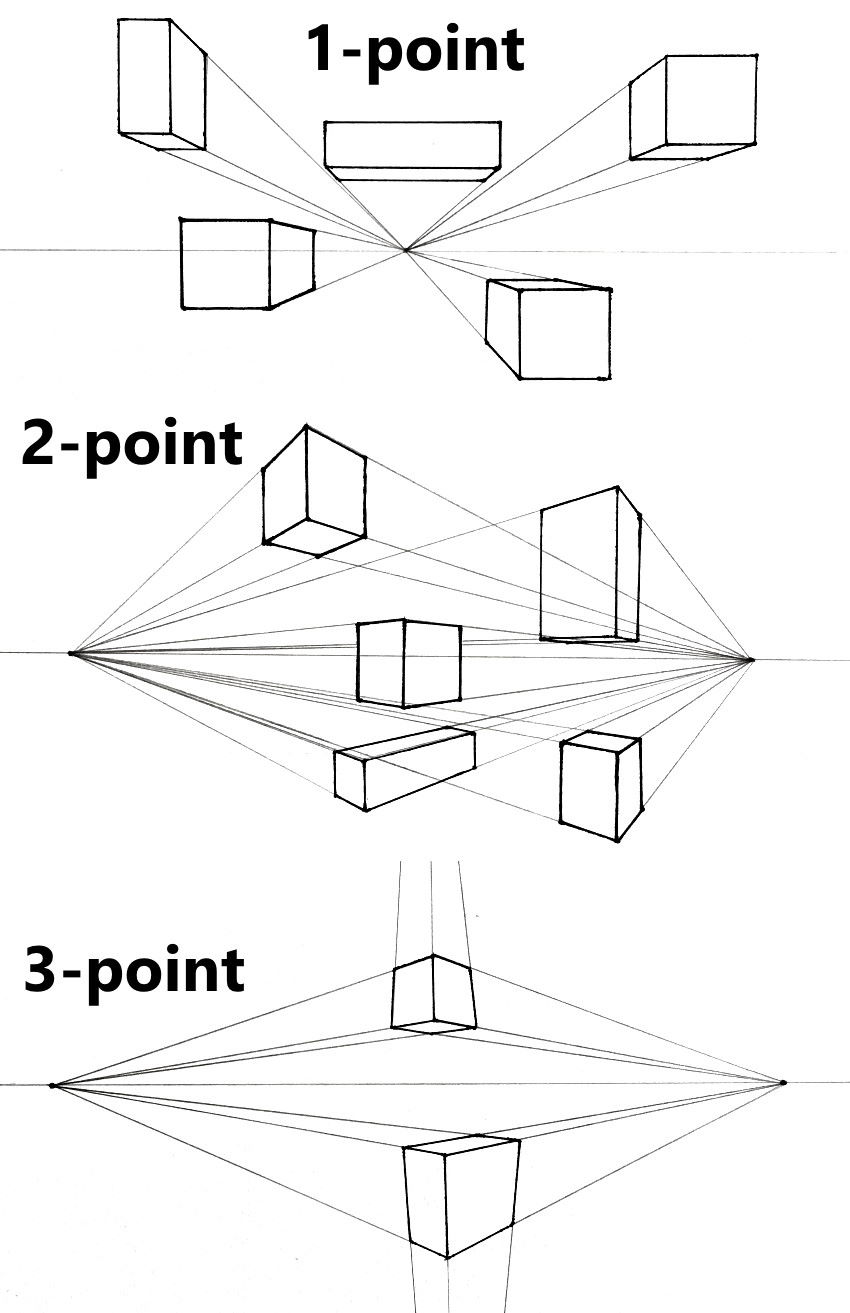
2. Constructing a Form: Bird's Eye View
Let's walk through the process of drawing a simple box from a high viewpoint. This is the fundamental skill for drawing a building as seen from a helicopter or a car seen from a bridge.
The following resource provides an excellent, animated step-by-step guide. We'll use it to construct our first three-point perspective form.
The article 'Three Point Perspective' from The Virtual Instructor clearly breaks down the construction process. We will focus on the first part, which demonstrates a bird's eye view.
First, read the brief introduction to understand the context. Then, carefully follow the steps under 'Here’s how three point perspective works step by step…' from Step 1 to Step 8. Pay attention to how the form is built by connecting lines to all three vanishing points.
To summarize the construction process for a bird's eye view:
- Establish the Scene: Draw your horizon line high up on your page. Place two vanishing points (VP1 and VP2) far apart on this line. Place your third vanishing point (VP3) far below the horizon line, generally centered between VP1 and VP2.
- Define the Closest Corner: Unlike in two-point perspective where you start with a vertical line, here you start with a point representing the corner of the box closest to the viewer.
- Draw Construction Lines: From this starting point, draw light lines connecting to all three vanishing points.
- Define the Planes: Decide how wide and deep your box is. Mark these points on the lines going to VP1 and VP2. From these new points, draw lines to the opposite vanishing points on the horizon (VP1 and VP2) and also down to VP3.
- Complete the Form: The intersection of these new lines will define the back corners of your box. You can then darken the final lines of your box.
Practice Exercise 1: Draw a Box from Above
Grab a piece of paper and a pencil. Follow the steps above (and in the resource) to draw your own simple box in a bird's eye view. Don't worry about perfection; focus on understanding the process. Keep your construction lines light!
Test your understanding!
You've drawn a box using three vanishing points. What do you think would happen to the drawing if you moved VP1 and VP2 much closer together on the horizon line?
Show answer
Moving the vanishing points closer together would cause extreme distortion. The sides of the box would appear to recede much more sharply, making the object look unnaturally stretched or "pinched." This is why it's recommended to keep your vanishing points well outside the area of your main subject if possible.
3. Inverting the View: Worm's Eye View
Now, what if we want to draw that same box as if we're an ant looking up at it? This is the "worm's eye view," and it's perfect for conveying a sense of scale and grandeur, like for a towering skyscraper.
The process is exactly the same, but the setup is inverted.
- Establish the Scene: Draw your horizon line low on your page. Place VP1 and VP2 on this line.
- Place VP3: Place your third vanishing point (VP3) far above the horizon line.
- Construct the Form: Follow the exact same construction logic as before, starting with the closest corner and drawing lines to all three vanishing points to build your form.
The article from The Virtual Instructor (LINK) shows a clear diagram of this setup in its final step (labeled "3-point-perspective-step-9.gif").
This perspective is essential for creating a sense of awe and making objects feel massive.
4. Application: Drawing a Cityscape
Drawing isolated boxes is good practice, but the real power of three-point perspective comes alive when you construct entire scenes. Let's watch an artist build a cityscape using this method.
How to Draw a City using 3-Point Perspective: Narrated
The video 'How to Draw a City using 3-Point Perspective' by Circle Line Art School provides a fantastic, practical demonstration. We'll watch the initial setup and the construction of the first building.
Watch from the beginning (00:12) to 04:00. Observe how the artist sets up the three vanishing points for a bird's eye view and then methodically constructs the first skyscraper. Notice how every line goes to one of the three VPs.
Watching this process, you can see how the simple box construction method you just learned is the building block (quite literally) for complex architectural drawings. The artist is simply stacking and modifying boxes within the same rigid perspective system.
Conclusion
You have now completed the foundations of linear perspective! By adding three-point perspective to your toolkit, you can now create the illusion of depth from any viewpoint. You can make objects feel massive and imposing with a worm's eye view, or create a sense of scale and overview with a bird's eye view.
Key Takeaways:
- Three-point perspective is used for high-angle (bird's eye) or low-angle (worm's eye) views.
- It is created by adding a third vanishing point for the vertical lines, which now also converge.
- For a bird's eye view, VP3 is below the horizon.
- For a worm's eye view, VP3 is above the horizon.
- In a three-point system, no lines are drawn parallel to the edges of your paper; every set of parallel lines recedes to one of the three vanishing points.
Next Lesson:
We have now explored how tilting our entire viewpoint changes the scene. In the next lesson, we will move into Module 3: Manipulating Forms in 3D Space. You'll learn how to take a single box and draw it rotating around its primary axes. This will directly connect to the concepts of pitch, yaw, and roll that you expressed interest in, giving you the power to dynamically pose any object you want to draw.