Hello! Welcome back to our final lesson in the "Video Assembly and Editing in CapCut" module.
In our last session, you learned how to balance audio levels to create a professional mix where your voiceover, music, and sound effects work together harmoniously. Now that your videos sound great, it's time to master their visual rhythm.
Today's lesson addresses the learning outcome: Apply transitions and pacing techniques optimized for short-form video retention. In the world of TikToks and Reels, viewer attention is the most valuable currency. Pacing is how you earn and keep it. We'll explore how to hook your audience in the first few seconds and use a variety of editing techniques—from simple cuts to dynamic effects—to maintain momentum and keep them watching until the very end.
This is the last skill-building lesson before you start your first capstone project, so let's dive in and learn how to make your videos truly captivating.
1. The Pacing Mindset: Hook, Rhythm, and Flow
For short-form content, the first three to five seconds are make-or-break. If you don't grab the viewer's attention immediately, they will swipe away. Pacing is the art of controlling the speed and rhythm of your video to keep the viewer engaged.
Let's start by understanding the "hook" and how to structure your edit to hold attention.
7 Video Editing Tips to Get 1,000,000+ Views on Shorts & Reels | CapCut Tutorial
The video '7 Video Editing Tips to Get 1,000,000+ Views on Shorts & Reels' by Joris Hermans provides excellent insights into retention. This first clip focuses on the most critical part of your video: the hook.
Watch from 03:52 to 05:26. Pay close attention to the strategies for grabbing attention in the first 5 seconds, such as posing a question and using engaging text animations instead of standard captions for your opening line.
Once you've hooked the viewer, you need to maintain a compelling rhythm. This can be achieved through a combination of techniques that we will explore next.
2. Core Pacing Techniques in CapCut
Fast-paced, rhythmic editing is a hallmark of successful short-form video. Here are three fundamental techniques to build that rhythm.
A. Cutting on the Beat
One of the easiest ways to make your video feel more dynamic is to synchronize your video cuts with the beat of your background music. This creates a satisfying, subconscious rhythm for the viewer. CapCut has an amazing feature that automates this.
21 BEST CapCut Tricks to Take you from a Noob to PRO! 🔥
In '21 BEST CapCut Tricks to Take you from a Noob to PRO!' by Matt Loui, you'll see how to use CapCut's automatic beat detection.
Watch from 13:17 to 13:44. This short segment demonstrates how to activate 'Auto beat' on your music track. CapCut will place yellow markers on the beat, giving you perfect visual guides for where to make your cuts.
B. The Jump Cut
When editing talking-head or UGC-style videos, you'll often cut out pauses, mistakes, or "ums" and "ahs." This creates a "jump" in the footage. A well-executed jump cut can increase energy, but a jarring one can be distracting. The trick is to make it feel intentional.
A common technique is to slightly zoom in or reposition the subject after the cut. This signals a change and makes the jump feel smoother.
21 BEST CapCut Tricks to Take you from a Noob to PRO! 🔥
Let's return to Matt Loui's video to see how professionals create smooth jump cuts.
Watch from 02:40 to 04:05. The key takeaway here is to not only scale up the second clip but also to use the 'Guides' feature to ensure the subject's eye-line remains consistent between the two shots. This prevents the viewer's gaze from jumping uncomfortably.
C. Cutting on Action
"Cutting on action" is a classic film editing principle that makes cuts feel invisible and seamless. The idea is to cut from one shot to another during a moment of motion. The viewer's brain is so focused on the action that it doesn't even register the cut. This is often far more effective than a flashy digital transition.
Master the Cutting on Action | Make Your Videos Flow Like a Pro
To understand this fundamental concept, please read this article from CapCut's own resource hub.
Read the sections 'What is cutting on action editing' and 'Why use cutting on action in videos'. This will give you a solid understanding of the theory behind this powerful technique.
For example, if you have a shot of your AI avatar beginning to raise its hand and another shot of the hand completing the motion from a different angle, you would cut in the middle of the movement.
3. Using Transitions Effectively
While a simple cut (or a cut on action) is your most important tool, digital transitions have their place. They can signal a change in location, time, or topic. CapCut has a vast library of transitions.
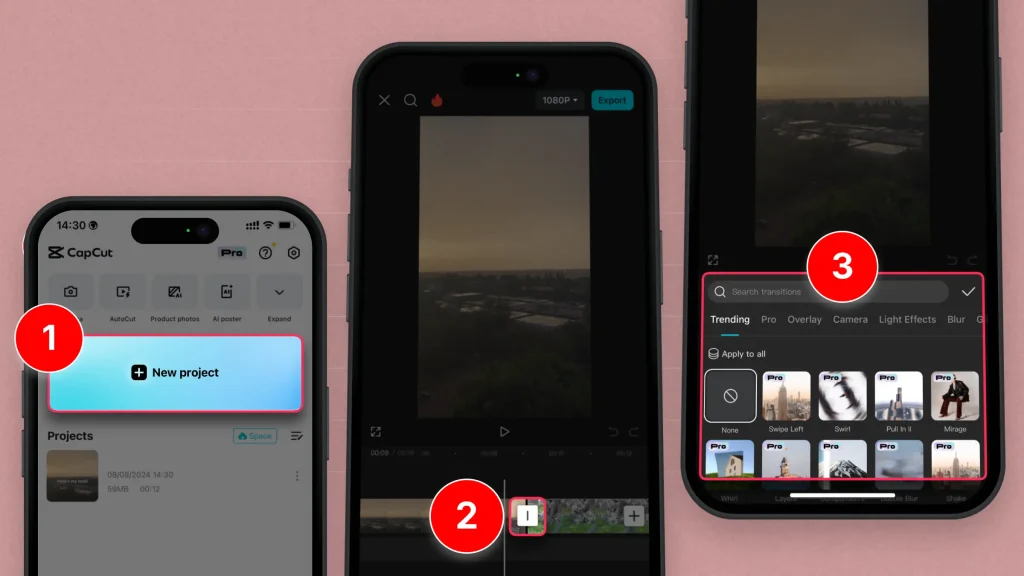
The key is to use them with purpose, not just for decoration.
- Simple Transitions: A
FadeorDissolveis great for a subtle, soft change. - Dynamic Transitions: A
Zoom,Whip Pan, orGlitchcan add energy and match a fast-paced moment.
Your choice of transition and its duration has a significant impact on pacing.
CapCut Tutorial For Creating Viral TikToks And Instagram Reels
This article from KraftGeek provides practical advice on choosing and timing transitions.
Find the section 'Enhancing Your Video' and read the sub-section titled 'Transitions'. Focus on the advice given about custom transition timing: quick transitions for high energy, and slower ones for dramatic effect.

4. Advanced Pacing with Dynamic Effects
Beyond cuts and transitions, you can use motion within your clips to maintain visual interest.
A. Smooth Digital Zooms
A slow, subtle zoom-in can draw the viewer's attention to an important point you're making. A quick zoom-out can reveal more of a scene. Using keyframes, you can create these effects with precision. For a truly professional look, you can "ease" the animation, making it start and end more smoothly.
21 BEST CapCut Tricks to Take you from a Noob to PRO! 🔥
Matt Loui's tutorial demonstrates how to create a beautiful, smooth zoom that looks much more professional than a simple linear zoom.
Watch from 05:18 to 06:28. The crucial step here is using the 'Graphs' icon after setting your keyframes and selecting 'Cubic Ease'. This simple click transforms a basic zoom into a cinematic one.
B. Speed Adjustments (Slow Motion & Speed Ramping)
Varying the speed of your clips is a powerful pacing tool.
- Slow Motion: Can be used to add drama, emphasize a beautiful visual, or give the viewer a moment to absorb information.
- Speed Ramping: Involves smoothly transitioning from normal speed to slow-motion (or fast-motion) and back again within a single clip.
CapCut's "Optical Flow" feature can create incredibly smooth slow-motion, even from standard footage.
21 BEST CapCut Tricks to Take you from a Noob to PRO! 🔥
Let's see how to create high-quality slow motion in CapCut.
Watch from 11:19 to 12:11. The key is to first lower the clip's speed and then select 'Smooth slow-motion' and set the frame blending to 'Optical flow'. This tells CapCut to intelligently generate new frames to make the slow motion look buttery smooth, not choppy.
C. Motion Blur
As a final touch of polish, adding motion blur to any fast movement—like a quick zoom, a whip pan transition, or a fast-moving object—makes it look more realistic and professional.
21 BEST CapCut Tricks to Take you from a Noob to PRO! 🔥
One last trick from Matt Loui's video will add a layer of realism to all your animations.
Watch from 12:11 to 12:56. Note that you first need to create a 'compound clip' of the clip that has the animation, and then apply the motion blur effect to that compound clip.
Conclusion
Congratulations on completing this lesson and the entire module on editing in CapCut! You've gone from organizing your assets and basic cutting to professional audio mixing, and now, to mastering the visual rhythm of your video.
Key Takeaways:
- Pacing Starts with the Hook: The first 3-5 seconds are everything. Use questions and dynamic visuals to grab attention.
- Rhythm is Everything: Use jump cuts to maintain energy, cut on the beat to create flow, and use "cutting on action" to make edits invisible.
- Transitions with Purpose: A simple cut is usually best. Use digital transitions thoughtfully to signal a change, and always consider their duration.
- Dynamic Effects Keep it Interesting: Use smooth zooms, speed changes, and slow motion to add emphasis and visual flair.
- Polish with Motion Blur: Apply motion blur to fast movements to achieve a more cinematic and professional look.
Next Lesson Preview:
You now have all the skills necessary to produce a complete, professional-looking AI-generated video. In our next module, you will begin your first capstone project: creating a 30-second UGC-style product review video. It will be your chance to apply everything you've learned—from scripting and asset generation to editing, audio mixing, and pacing—to create a finished piece from start to finish.