Hello and welcome to your first lesson in the Data Analysis course!
I'm excited to guide you on this journey. Your goal to build a comprehensive, end-to-end skill set in data analysis is ambitious and highly rewarding. We'll start right at the beginning, building a solid foundation that will support all the advanced topics to come.
This first module, "Python Fundamentals for Data Analysis," is designed to get you comfortable with the primary programming language used by data analysts. Today, we'll focus on the very first step: setting up your professional data analysis environment. By the end of this 60-minute lesson, you will have installed and configured the essential tools—Anaconda and Jupyter Notebook—and you'll be ready to write your first lines of code.
1. Understanding Your Toolkit: Anaconda and Jupyter Notebook
Before we install anything, let's clarify what these tools are and why they are central to data analysis.
What is Anaconda?
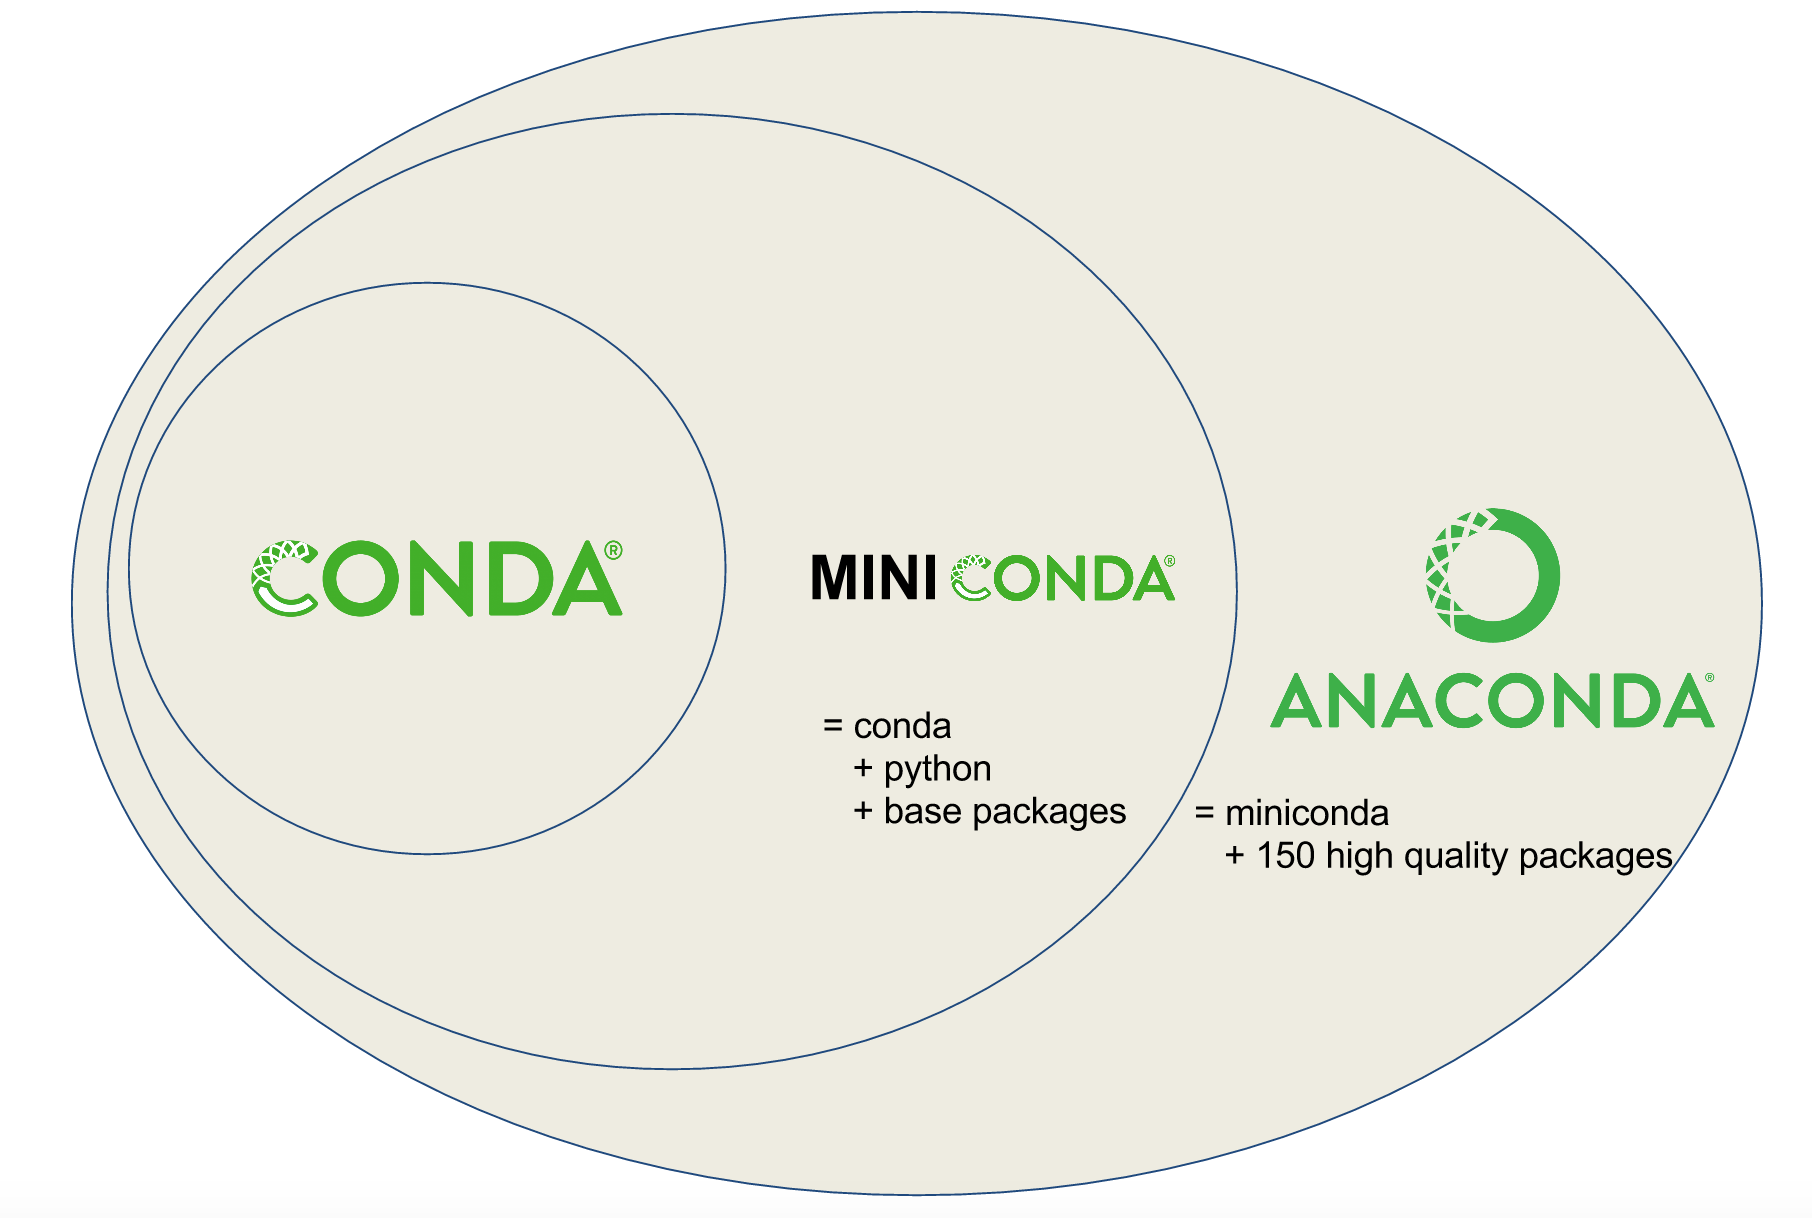
Think of Anaconda as a comprehensive toolkit for data science. While Python is the programming language, Anaconda is a distribution—a single package that bundles Python with hundreds of the most popular libraries (pre-written code for specific tasks) and management tools. This is incredibly convenient because it saves you the hassle of finding and installing everything one by one.
Key components of Anaconda include:
- Python: The core programming language we will use.
- Essential Libraries: Tools like NumPy (for numerical operations), Pandas (for data manipulation), and Matplotlib (for plotting), which we will use extensively.
- Conda: A powerful package and environment manager.
- Anaconda Navigator: A graphical user interface to launch applications like Jupyter Notebook.
The following diagram illustrates how Anaconda provides a complete ecosystem on top of the core Conda package manager. We are installing the full Anaconda package to get everything we need for this course right from the start.
What is Jupyter Notebook?
Jupyter Notebook is an interactive, web-based application that allows you to create and share documents containing live code, visualizations, and narrative text. It’s the go-to tool for exploratory data analysis because you can run small snippets of code in "cells," see the output immediately, and document your thought process along the way. This cell-based approach makes it perfect for learning and experimenting.
For a deeper understanding of what these tools are and why they're so popular in data science, I recommend reading the introductory sections of these two articles.
How to Install Anaconda: A Complete Guide for Beginners
First, read this article from KukuCourses to get a clear, beginner-friendly overview of what Anaconda is and why it's the ideal starting point for data science.
Please read the sections titled 'What Is Anaconda?' and 'Why Use Anaconda for Data Science?'. This will solidify your understanding of the tool we're about to install.
Jupyter Notebook Tutorial: A Beginner's Guide for the Data Science Tool
Next, this Udacity article provides an excellent introduction to Jupyter Notebooks, explaining their importance and core features for data analysis.
Please read the 'Introduction' section. Focus on the explanation of what a Jupyter Notebook is and the key aspects that make it important for data science (interactivity, reproducibility, etc.).
2. Installation and Setup
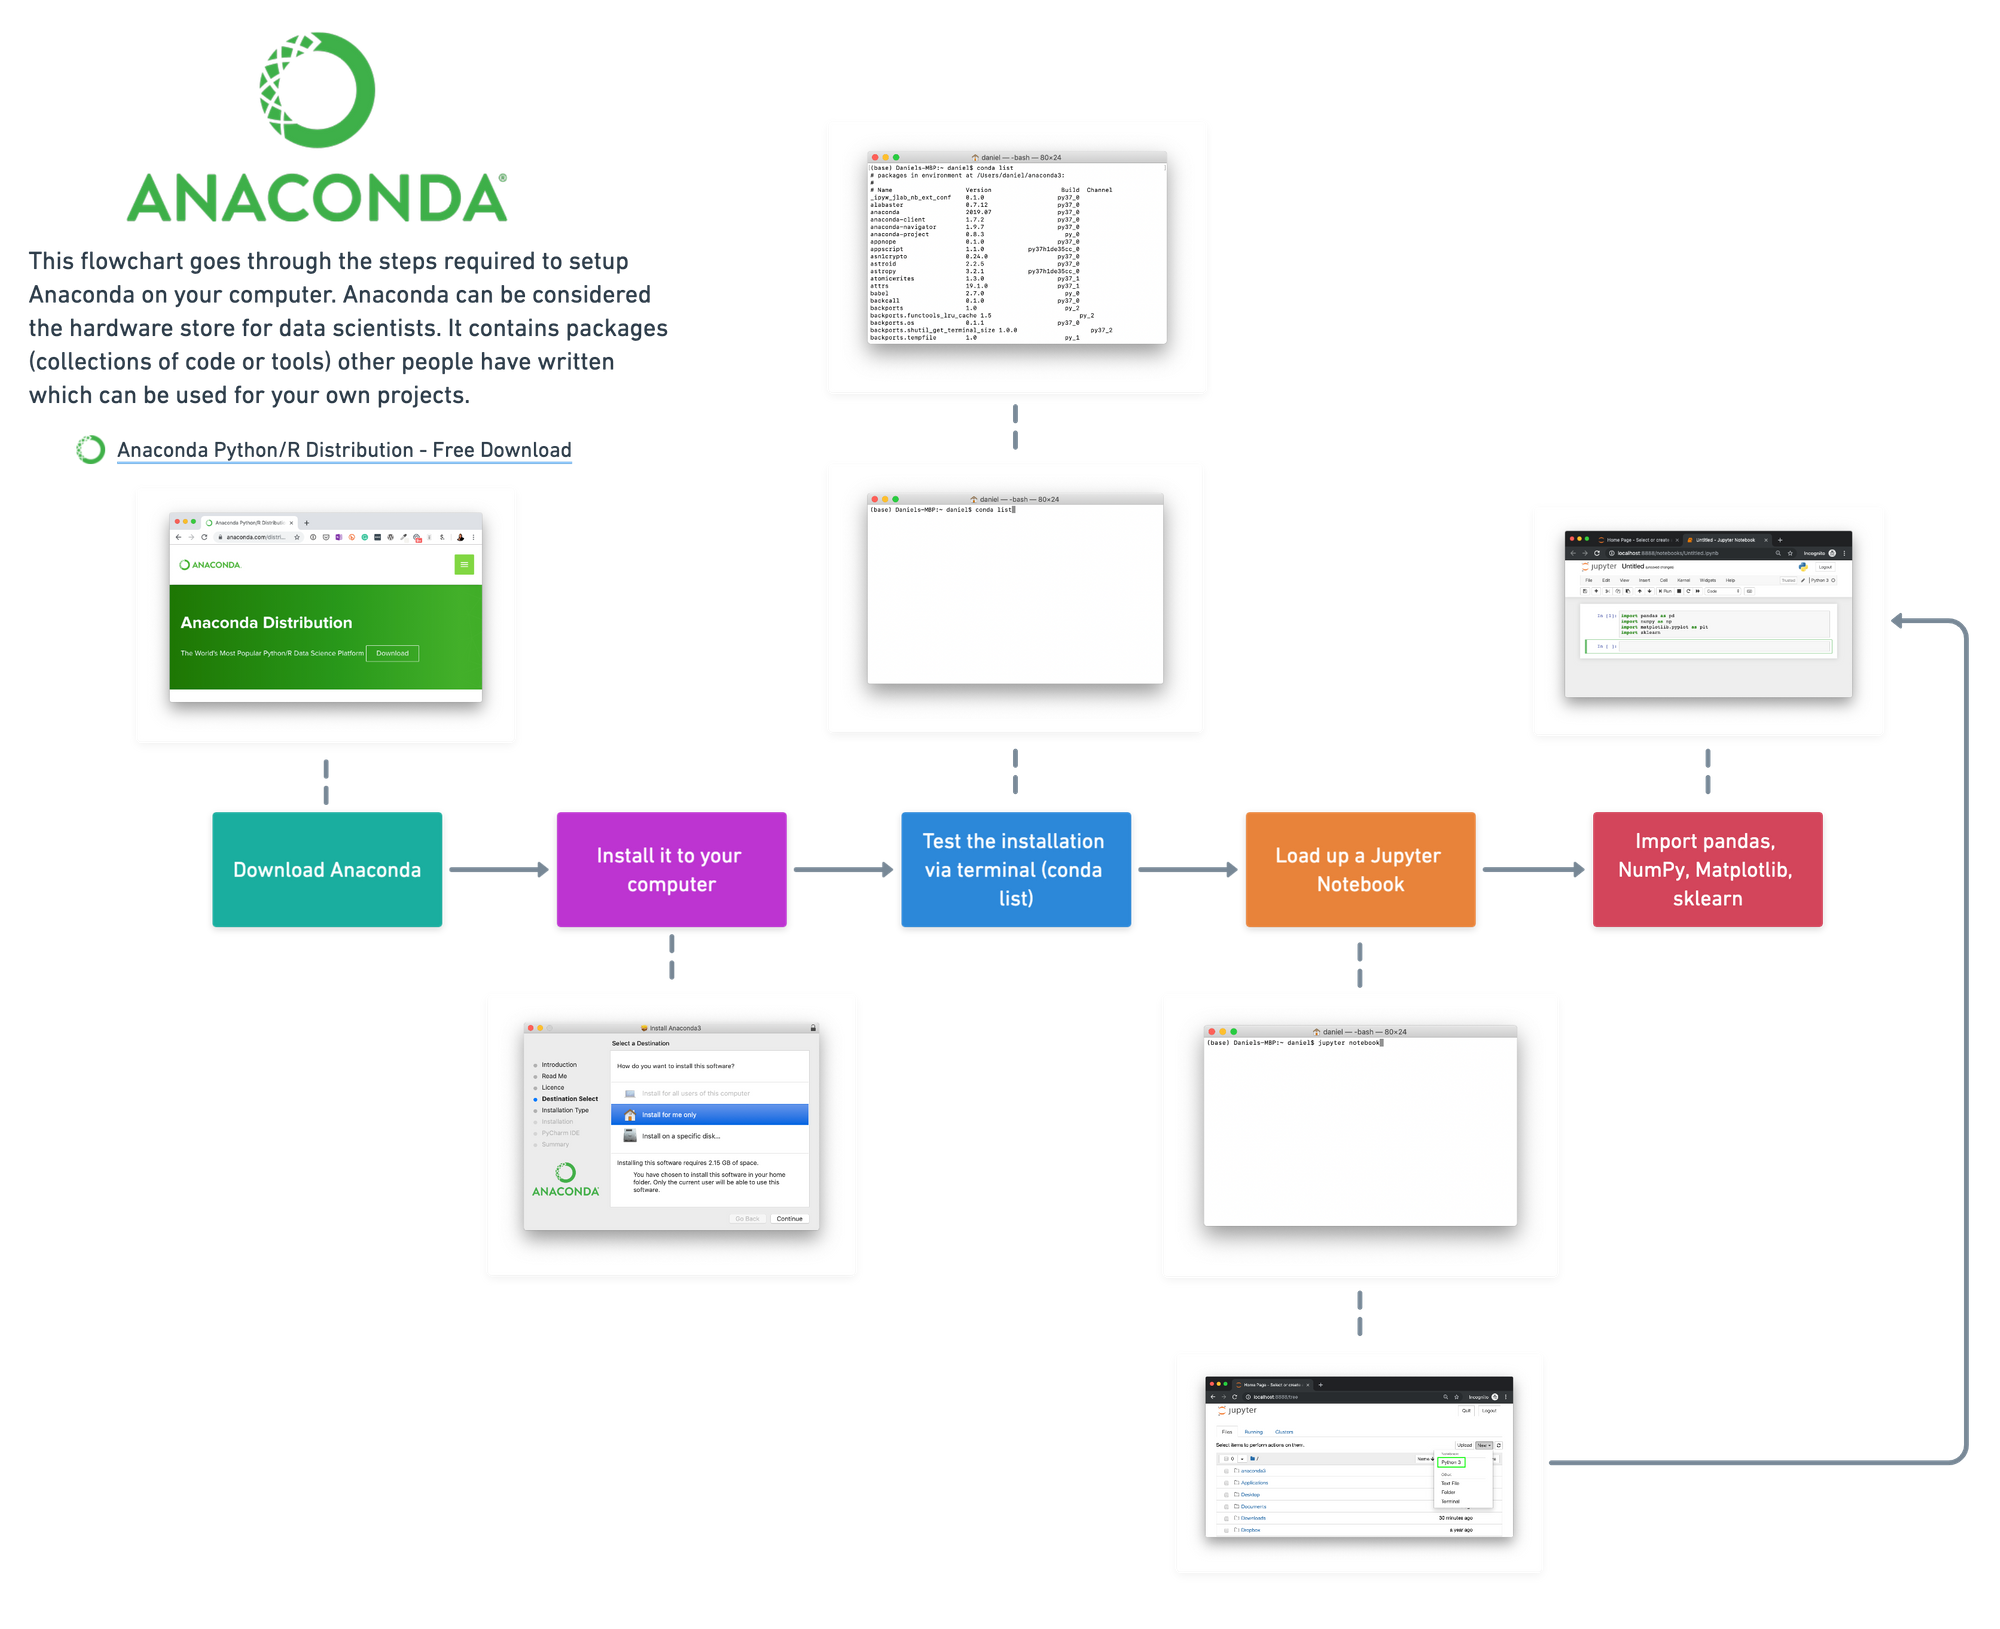
Now it's time to set up your environment. The process involves downloading the Anaconda installer, running it on your machine, and then launching Jupyter Notebook. The flowchart below provides a high-level overview of the steps we'll take.
To guide you through the installation, we'll use a step-by-step video. It's clear, concise, and walks you through every click.
Installing Jupyter Notebooks/Anaconda | Python for Beginners
This video by Alex The Analyst provides a complete, easy-to-follow guide for installing Anaconda and launching Jupyter Notebook for the first time.
Please watch the video from 00:48 to 04:11. Follow the on-screen instructions to download and install Anaconda on your computer. The presenter uses Windows, but the steps are very similar for macOS.
If you prefer written instructions or need to check a specific step for your operating system (Windows or macOS), the KukuCourses article from earlier also provides an excellent installation guide.
How to Install Anaconda: A Complete Guide for Beginners
You can use this guide as a supplement to the video. It has separate, clearly laid-out instructions for both Windows and macOS.
Refer to the section 'Installing Anaconda in Windows' or 'Installing Anaconda in macOS', depending on your system. Follow the step-by-step directions to complete the installation.
3. Your First Jupyter Notebook
With Anaconda installed, you are ready to launch Jupyter Notebook and explore the interface. The video you just watched continues with a great tour of the Jupyter environment.
Installing Jupyter Notebooks/Anaconda | Python for Beginners
Let's continue with the same video to get a tour of the Jupyter Notebook interface and learn how to perform basic actions.
Watch from 04:11 to 09:35. Pay close attention to how to: Create a new notebook. Differentiate between code cells and markdown cells. Write and run code (using Shift + Enter). Save and rename your notebook. Manage cells (add, delete, move).
To reinforce what you've learned, the Udacity article provides a great textual summary of the Jupyter interface.
Jupyter Notebook Tutorial: A Beginner's Guide for the Data Science Tool
This reading provides a written breakdown of the Jupyter Notebook interface, which can be a helpful reference.
Read the sections 'Navigating the Interface' and 'Writing and Executing Code'. This will help solidify your understanding of the dashboard, cells, kernel, and toolbar.
Practice Exercise: Create Your First Notebook
Now it's time to put it all together. Follow these steps to ensure your environment is working correctly and to practice the basic operations.
- Launch Anaconda Navigator from your computer's applications.
- From the Navigator home screen, launch Jupyter Notebook. This will open a new tab in your web browser.
- In the Jupyter dashboard, navigate to a folder where you'd like to save your work (e.g., Desktop or Documents).
- Create a new Python 3 notebook by clicking New > Python 3 (ipykernel).
- Rename your notebook. Click on "Untitled" at the top of the page and change the name to
Lesson 1 - My First Notebook. - The first cell is a code cell by default. Let's change it to a Markdown cell. Click on the cell, then go to the dropdown menu in the toolbar and select "Markdown".
- In this Markdown cell, type the following text:
# My First Data Analysis Notebook. - Run the cell by pressing Shift + Enter. You should see the text formatted as a large heading.
- A new code cell will appear below. In this cell, type the following Python code:
message = "My data analysis environment is ready!" print(message) - Run this cell by pressing Shift + Enter. You should see the text "My data analysis environment is ready!" printed below the cell.
- In the next code cell, type a simple calculation:
125 * 4 - Run this cell. The output
500should appear. - Save your notebook by clicking the floppy disk icon in the toolbar or by going to File > Save and Checkpoint.
- You can now close the browser tab. In the original terminal or command prompt window that opened with Jupyter, press
Ctrl + Cand confirm you want to shut down the server.
Congratulations! You have successfully set up your data analysis environment and created your very first Jupyter Notebook.
Conclusion
In this lesson, we took the critical first step in your data analysis journey. You've learned:
- What Anaconda is: A powerful distribution that packages Python and essential data science libraries into a single, easy-to-manage platform.
- What Jupyter Notebook is: An interactive environment ideal for writing code, exploring data, and documenting your analysis.
- How to install Anaconda and launch Jupyter Notebook.
- How to navigate the Jupyter interface to create, run, and save a basic notebook.
This setup is the foundation upon which we will build all of your technical skills. Having a stable, professional environment is non-negotiable for serious data work.
In our next lesson, we will dive into the Python language itself. You’ll learn about the fundamental building blocks of programming: variables, data types, and operators. We'll start writing code that does more than just print messages—we'll start manipulating data.