Hello! Welcome back to our course on AI video creation.
In our last lesson, you created your visual blueprint: a set of simple storyboard frames, or "anchor images," generated from a single reference. These static images define the key moments of your story and lock in the visual consistency of your character and world.
Today, we're going to breathe life into those static frames by annotating them. This lesson directly addresses the learning outcome: to annotate storyboards with notes on composition, action, and style for consistent AI prompting. Think of this as moving from an architect's blueprint to a builder's detailed instruction sheet. The notes you add aren't just for you; they are the precise ingredients for the AI prompts that will turn your still images into dynamic video clips.
From Static Image to Dynamic Instruction
Your storyboard frame tells the AI what the scene looks like at a key moment. Your annotations will tell the AI what to do with it—how the camera should move, what the character should do, and what the overall mood and sound should be.
A well-annotated storyboard bridges the gap between a picture and a story. Take a look at these examples.

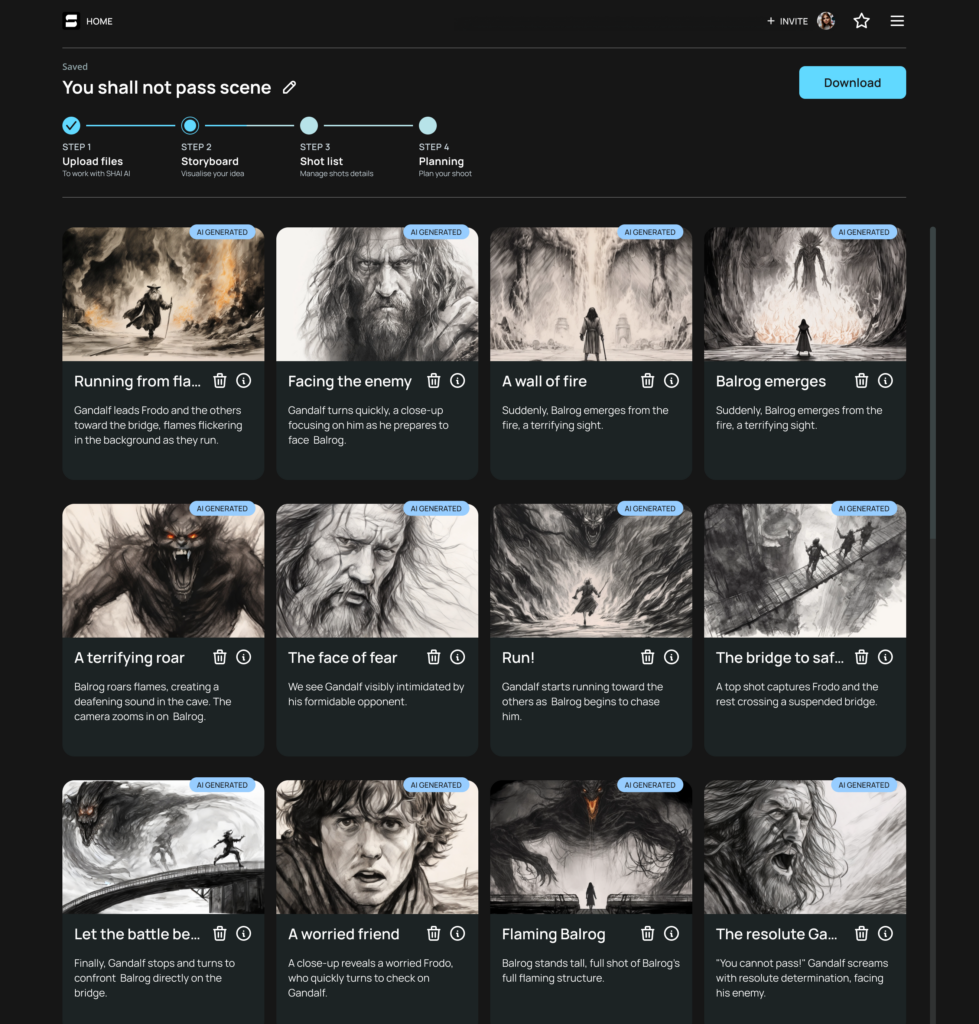
Our goal is to create this level of detail for your own storyboard frames.
The Anatomy of a Powerful Annotation
To ensure our notes are useful for AI, we need a structured approach. A random list of ideas won't work. Borrowing from professional prompting guides, we can use a simple but powerful five-part formula for our annotations.
This formula comes from Google's guide for their Veo video model, and it's a fantastic framework for organizing your thoughts.
Ultimate prompting guide for Veo 3.1
Let's read a short section from the 'Ultimate prompting guide for Veo 3.1' from the Google Cloud Blog. It introduces a five-part formula for effective prompts. This structure will be the backbone of our annotation process.
Please read the section titled 'A formula for effective prompts'. It's very short. Pay close attention to the five components: [Cinematography] + [Subject] + [Action] + [Context] + [Style & Ambiance].
Let's break down how to gather the information for each part of this formula.
1. Cinematography: Directing the Camera
This is where you define the camera work. Your keyframe image establishes the initial composition (e.g., a Medium Shot), but the annotation specifies the movement.
To learn the language, let's consult the Veo guide again.
Ultimate prompting guide for Veo 3.1
This section of the Veo guide provides a vocabulary list for cinematography and sound, which is exactly what we need for our annotations.
Read the sections 'The language of cinematography' and 'Directing the soundstage'. Make a note of the specific terms for camera movement (dolly, tracking, etc.), composition, and lens/focus. We will use these directly in our annotations.
For each storyboard frame, you'll add notes like:
- Camera Movement:
Slow dolly in,Tracking shot following subject,POV shot. - Lens & Focus:
Shallow depth of field,Rack focus from character to object.
2. Subject, Action & Context
Your keyframe image already defines the Subject (e.g., your robot, Bolt) and the Context (the junkyard). The most important annotation here is the Action.
Be specific and use a single, clear verb phrase.
- Instead of "He looks at it," write
"tilting his head down in curiosity". - Instead of "He's happy," write
"a small light on his chest begins to glow warmly".
3. Style & Ambiance: Finding Your Look
This is where you can infuse your video with a unique artistic identity. Beyond general terms like "moody" or "cinematic," you can give the AI incredibly specific stylistic instructions by referencing real-world filmmaking equipment.
Many AI models have been trained on vast datasets of images that are tagged with metadata, including the cameras and lenses used to capture them. By including these in your notes, you can steer the AI toward a specific look.
The SECRET to Stunning AI Video Prompts!
The video 'The SECRET to Stunning AI Video Prompts!' by Theoretically Media has a great segment on this. It demonstrates how adding specific camera and lens names to a prompt dramatically changes the visual output.
Watch the segment from 07:40 to 10:35. Notice the difference between the base prompt and the versions with 'Panavision Millennium DXL2', 'IMAX camera', and 'Sony DV cam with a fisheye'. This shows how specific technical terms can become powerful creative tools.
But how do you find these technical details? You can study the work of filmmakers you admire using a fantastic resource called Shot Deck.
The SECRET to Stunning AI Video Prompts!
Let's watch two more quick clips from the same video. The first introduces Shot Deck, a massive database of stills from thousands of films, packed with technical data. The second shows a clever trick for using this data.
Please watch these two parts: Introducing Shot Deck (10:35 - 11:44): See what information the site provides for any given shot (camera, lens, film stock, color palette). Using Shot Deck Data (12:16 - 13:58): Pay attention to the workflow: find a shot you like, give the technical info and the image to an LLM (like ChatGPT), and ask it to extract the key stylistic elements and color palette to add to your prompt. Notice the dramatic difference in the 'andorized' version.
Using Shot Deck, you can find a film with a visual style you love, grab the technical specs, and add them to your style annotations. For example: Style: Shot on Arri Alexa with Hawk V-Lite Anamorphic lenses, color palette inspired by 'Blade Runner 2049'.
4. Audio: Directing the Soundstage
As you saw in the Veo guide, you can also annotate for a complete soundtrack. For each shot, consider adding notes for:
- Dialogue:
Bolt's internal monologue (soft, robotic voice): "System query: what is this object?" - Sound Effects (SFX):
SFX: a soft, inquisitive 'whirr-click' sound as his head tilts. - Ambient Noise:
Ambient: distant wind howling through junk piles, a faint metallic creak.
Putting It All Together: The Shot Spec Card
To keep all this information organized, you can create a "Shot Spec Card" for each frame on your storyboard. This is a concept from a great workflow guide by Neolemon, and it serves as the ultimate instruction sheet for each shot.
Here is a template for your Shot Spec Card, which combines the Veo formula with practical production notes.
| Shot Spec Card | |
|---|---|
| Shot ID: | 01 |
| Duration: | 4 seconds |
| Reference Image: | s01_sh01_keyframe.png |
| Cinematography: | Medium Shot, slow dolly in. |
| Action: | Bolt walks into frame, stops abruptly. His head tilts down slowly, and a small blue light on his antenna begins to blink with curiosity. |
| Style & Ambiance: | Inspired by 'WALL-E'. Shot as if on Panavision Millennium DXL2 with Zeiss Prime lens. Gritty, dusty atmosphere. Late afternoon golden light. |
| Audio: | SFX: soft 'whirr-click' sound. Ambient: distant wind howling. |
| Continuity Notes: | Ensure Bolt's rust patterns match the reference. The blue antenna light must be the only new light source. |
The Continuity Notes field is crucial. It acts as a negative prompt, telling the AI what not to change, which is essential for maintaining consistency from shot to shot.
Test your understanding!
In the last lesson, your prompt for the initial reference image was: Cinematic medium shot of a small, lonely robot named Bolt... stopped in an aisle of scrap metal, his head tilted down as if looking at something interesting on the ground just out of frame...
Now, imagine the next shot in the sequence.
- Shot ID: 02
- Duration: 3 seconds
- Keyframe Image: A close-up of an old, dusty pot on the ground with a single, tiny green sprout growing out of it.
Using the Shot Spec Card template, write the annotations for this second shot. What camera movement, action, style, and audio would you specify to create a moment of discovery?
Show answer
Here is an example of a completed Shot Spec Card for Shot 02:
| Shot Spec Card | |
|---|---|
| Shot ID: | 02 |
| Duration: | 3 seconds |
| Reference Image: | s01_sh02_keyframe.png |
| Cinematography: | Extreme Close-Up (ECU), starting on the sprout and performing a slow rack focus to the dusty pot behind it. |
| Action: | A drop of water falls from off-screen (implied from Bolt) and lands on a leaf of the sprout, causing it to tremble slightly. |
| Style & Ambiance: | Maintain Panavision/Zeiss look. Very shallow depth of field. The green of the sprout should be vibrant against the muted, rusty background. |
| Audio: | SFX: A single, clear 'drip' sound as the water lands. A faint, gentle musical note begins to swell. |
| Continuity Notes: | The pot's texture and color must match any glimpses from the previous shot. The lighting angle should remain consistent. |
Conclusion
You have now completed the visual blueprint for your AI video. You have not only the keyframe images but also a detailed, structured set of instructions for each one. This methodical approach is the secret to moving beyond simple, disconnected clips and toward structured, compelling visual storytelling.
Here are your key takeaways:
- Annotations are instructions for the AI, turning static frames into dynamic shot plans.
- The [Cinematography] + [Subject] + [Action] + [Context] + [Style & Ambiance] formula provides a robust structure for your notes.
- You can use specific camera and lens names to guide the AI toward a professional cinematic style.
- Tools like Shot Deck are invaluable for researching the technical details of looks you want to emulate.
- The Shot Spec Card is a practical tool for organizing all your annotations for each shot, including crucial continuity notes.
In our next lesson, we will begin Module 3: AI Generation. We will take the Shot Spec Cards you've designed and learn how to write detailed, multi-part prompts specifying character, setting, style, and action. You'll finally be feeding these instructions to the AI and generating your first narrative video clips.