Introduction
In our last lesson, you learned how to define the boundaries between architectural layers using abstract interfaces—traits in Rust and Protocols in Python. We saw how these contracts are the key to enforcing the Dependency Inversion Principle and building pluggable systems.
Today, we're going to put that theory into practice. This lesson is a design-focused workshop where your objective is to apply a structural pattern, specifically Hexagonal Architecture, to a domain you're very familiar with: an image processing pipeline. We will move from individual components to architecting a complete, maintainable application. By the end, you'll have a concrete mental model for how to structure a real-world computer vision project from the ground up, separating its core logic from the complexities of external tools and hardware.
Step 1: Defining the Problem - A Typical Computer Vision Pipeline
Before we design the solution, let's establish a clear picture of the problem. Most computer vision applications can be conceptualized as a pipeline of distinct processing stages.
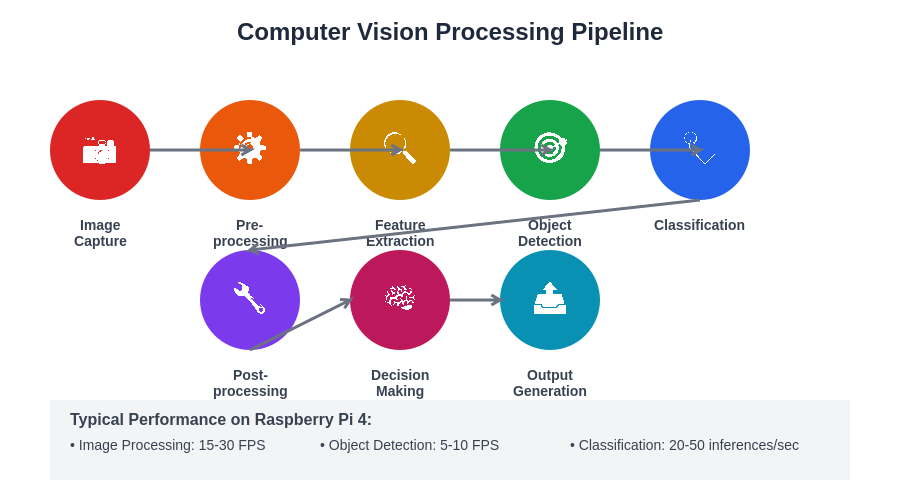
This diagram shows a common workflow:
- Image Capture: Acquiring an image from a source (like a camera or file).
- Pre-processing: Preparing the image for the main task (e.g., resizing, normalization, color space conversion).
- Feature Extraction / Object Detection / Classification: The core algorithmic step, often performed by a machine learning model.
- Post-processing: Refining the results (e.g., non-max suppression, filtering detections).
- Decision Making & Output Generation: Acting on the results (e.g., logging to a database, sending an alert, saving an annotated image).
Our architectural challenge is to build a system that can execute this pipeline in a way that is maintainable, testable, and flexible. We want to be able to swap out the camera, change the detection model, or alter the logging mechanism without rewriting the entire application. This is where Hexagonal Architecture comes in.
Step 2: Applying the Hexagonal (Ports and Adapters) Pattern
Hexagonal Architecture provides a clear mental model for this separation. At its center is your application's core logic (the pipeline orchestration), which is completely isolated from the outside world. This core communicates with external systems—like databases, cameras, and UI—through a set of well-defined Ports (interfaces). The concrete implementations that connect to these external systems are called Adapters.
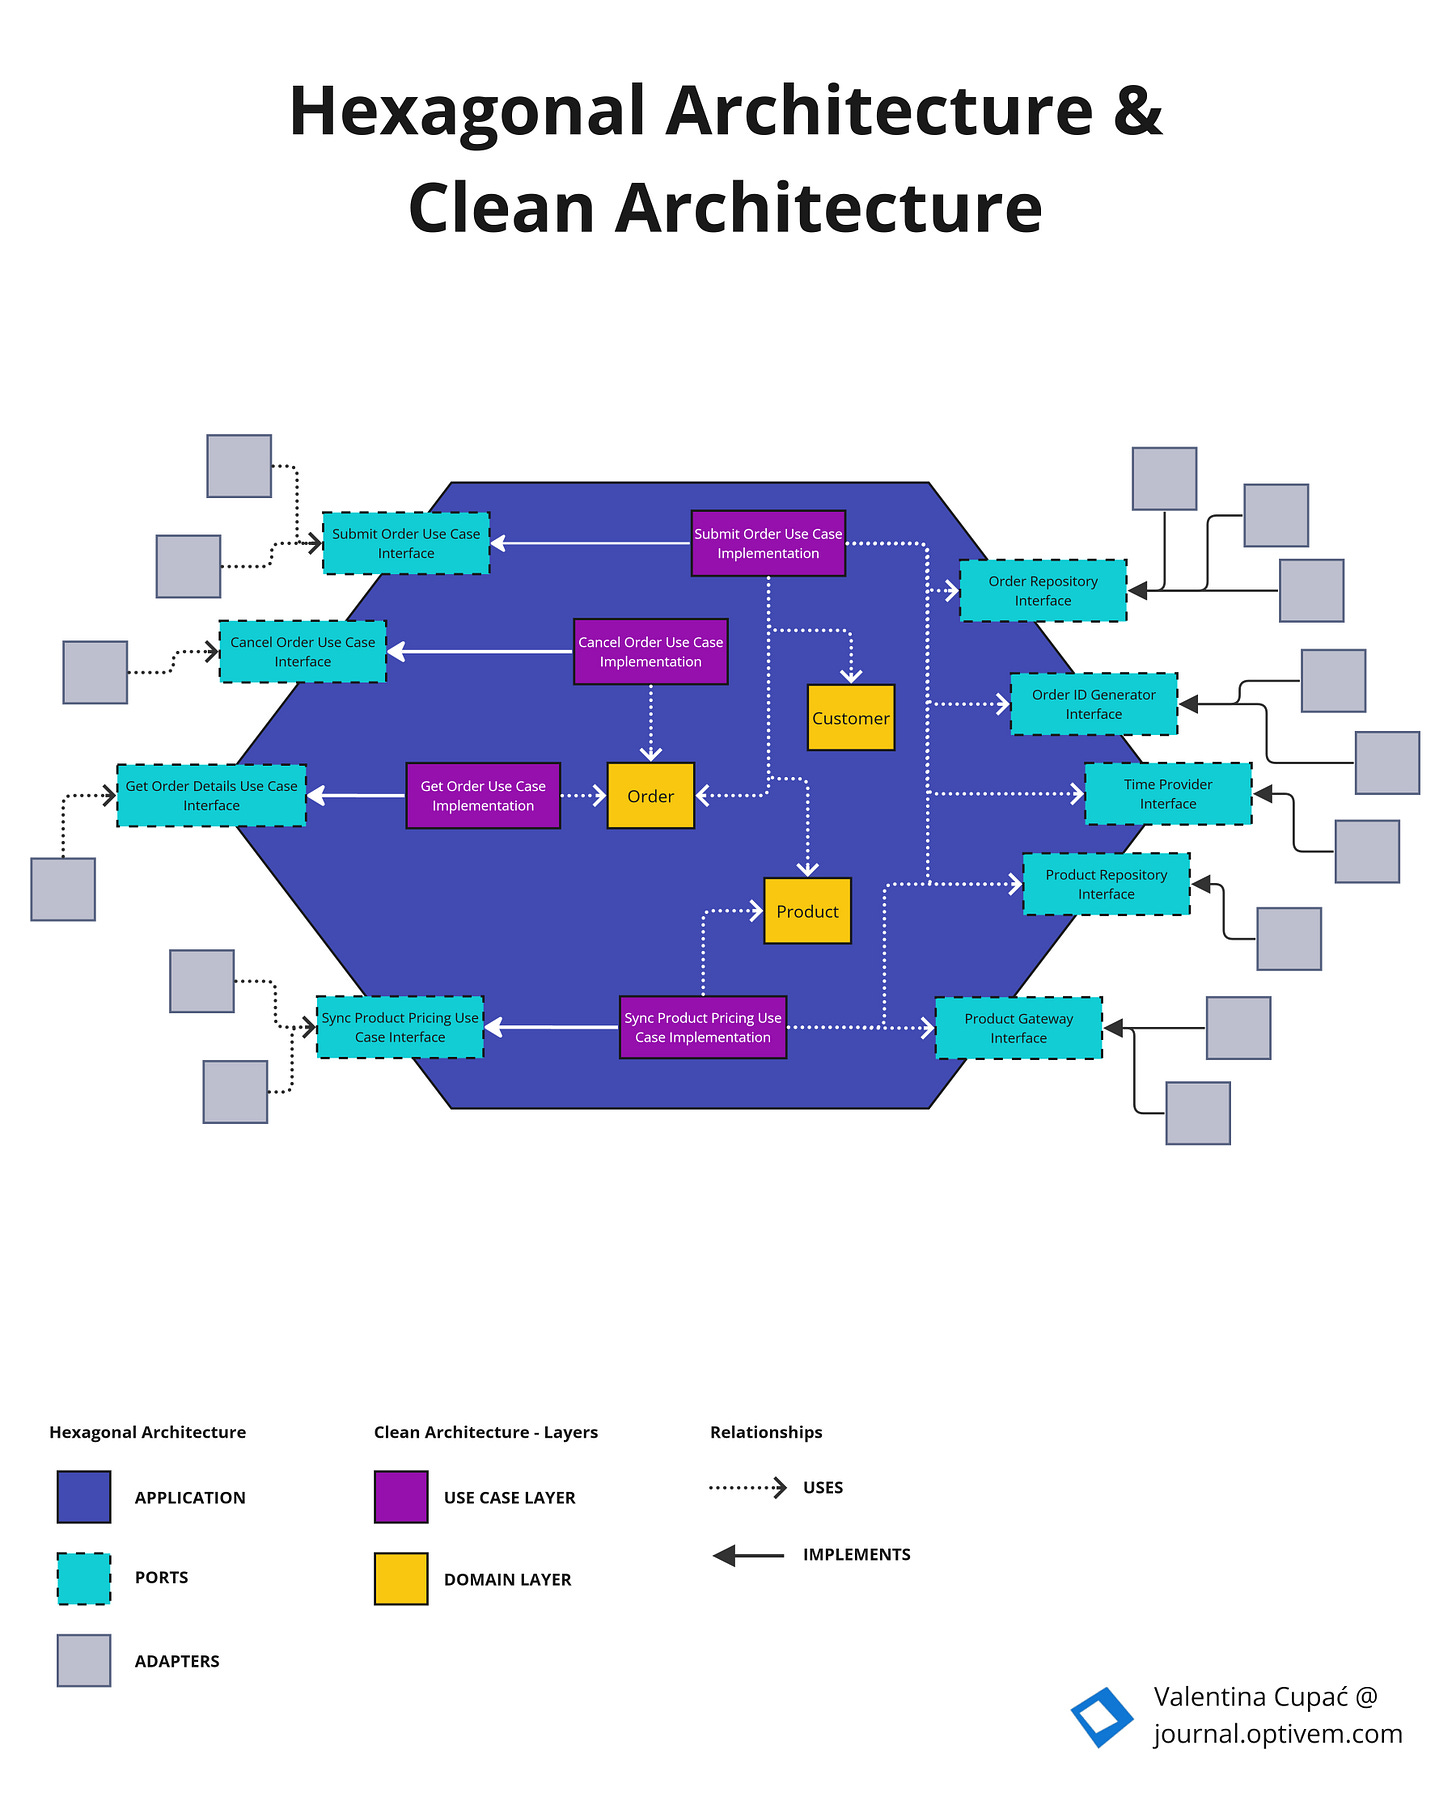
Let's map our CV pipeline to this structure:
- Application Core: This is the code that orchestrates the pipeline stages. For example, a
PipelineServicethat calls pre-processing, detection, and post-processing in sequence. - Domain Model: These are the core data structures that flow through our pipeline, such as
ImageFrame,BoundingBox, orDetectionResult. They contain no infrastructure-specific details. - Ports (Interfaces): These are the contracts our application core needs to interact with the outside world. Examples:
- An
ImageSourceport to get images. - An
ObjectDetectorport to run the model. - A
ResultSinkport to save the results.
- An
- Adapters (Implementations): These are the concrete implementations of our ports. Examples:
- For
ImageSource:USBCameraAdapter,RTSPStreamAdapter. - For
ObjectDetector:YOLOv5Adapter,TensorRTAdapter. - For
ResultSink:PostgresAdapter,CSVSinkAdapter.
- For
The fundamental rule is that dependencies only point inward. The application core depends on the abstract ports, and the adapters depend on (and implement) those same ports. The core knows nothing about USB cameras or YOLOv5.
Step 3: A Real-World Case Study
This architectural approach isn't just theoretical. It's actively used to solve complex problems in computer vision. The following article describes a "Unified Benchmarking Pipeline" built to handle the fragmentation of different CV tasks and data formats. It's a prime example of applying the Adapter pattern.
Building a Unified Benchmarking Pipeline for Computer Vision
This article from dev.to author Michal Segal is a masterclass in applying layered design and the adapter pattern to a real-world CV problem. It shows how to build a flexible system that can handle diverse data formats and models.
Please focus on the following sections to see how these architectural ideas are implemented in practice: First, read the section Dataset Adapters. Notice how the system uses adapters to provide a "uniform iteration interface" (for image, target in adapter:). This is the key benefit: the core logic doesn't need to know about COCO, YOLO, or any other specific format. Next, read about Task Runners. These runners are responsible for executing the models. While the article calls them "runners," you can think of them as another set of adapters—they adapt different model execution backends (like PyTorch or TensorFlow) to a single runner.run() API. Finally, review the high-level diagram and the list of Key Engineering Lessons Learned. The principles mentioned here—"clear boundaries," "declarative configuration," and "modularity"—are the direct outcomes of the architecture we are discussing.
The case study powerfully illustrates how defining clear interfaces (ports) and providing multiple implementations (adapters) allows a system to remain stable while accommodating a huge variety of external details.
Step 4: Designing Our Pipeline's Core and Ports
Let's now design the core of our own industrial inspection pipeline.
Domain Models
First, we define our technology-agnostic data structures. These will live at the heart of our application.
- In Python:
from dataclasses import dataclass import numpy as np @dataclass class BoundingBox: x_min: int y_min: int x_max: int y_max: int @dataclass class Detection: box: BoundingBox confidence: float class_id: int @dataclass class ImageFrame: image_data: np.ndarray timestamp: float source_id: str - In Rust:
#[derive(Debug, Clone)]
pub struct BoundingBox {
    pub x_min: u32,
    pub y_min: u32,
    pub x_max: u32,
    pub y_max: u32,
}


#[derive(Debug, Clone)]
pub struct Detection {
    pub bbox: BoundingBox,
    pub confidence: f32,
    pub class_id: u32,
}


#[derive(Debug, Clone)]
pub struct ImageFrame {
    pub image_data: Vec<u8>, // Or a more specific image type
    pub width: u32,
    pub height: u32,
    pub timestamp: f64,
    pub source_id: String,
}
Ports (Interfaces)
Next, we define the contracts for all external interactions. These ports are defined by the needs of our application core.
- In Python (
typing.Protocol):from typing import Protocol, List, Optional class ImageSource(Protocol): def get_frame(self) -> Optional[ImageFrame]: ... class DefectDetector(Protocol): def detect(self, frame: ImageFrame) -> List[Detection]: ... class ResultSink(Protocol): def save(self, detections: List[Detection]) -> None: ... - In Rust (
trait):use anyhow::Result; pub trait ImageSource: Send + Sync { fn get_frame(&self) -> Result<Option<ImageFrame>>; } pub trait DefectDetector: Send + Sync { fn detect(&self, frame: &ImageFrame) -> Result<Vec<Detection>>; } pub trait ResultSink: Send + Sync { fn save(&self, detections: &[Detection]) -> Result<()>; }
Application Service
Finally, the application service orchestrates the pipeline, depending only on the abstract ports.
- In Python:
class InspectionService: def __init__( self, source: ImageSource, detector: DefectDetector, sink: ResultSink, ): self._source = source self._detector = detector self._sink = sink def run_cycle(self): frame = self._source.get_frame() if frame: detections = self._detector.detect(frame) if detections: self._sink.save(detections) - In Rust:
use std::sync::Arc;

pub struct InspectionService {
    source: Arc<dyn ImageSource>,
    detector: Arc<dyn DefectDetector>,
    sink: Arc<dyn ResultSink>,
}

impl InspectionService {
    pub fn run_cycle(&self) -> Result<()> {
        if let Some(frame) = self.source.get_frame()? {
            let detections = self.detector.detect(&frame)?;
            if !detections.is_empty() {
                self.sink.save(&detections)?;
            }
        }
        Ok(())
    }
}
This core logic is now completely decoupled and testable in isolation. You can provide mock implementations of ImageSource, DefectDetector, and ResultSink to test every possible scenario without needing a real camera or model.
Step 5: A More Powerful Model - Node-Based Pipelines
Our linear pipeline is a great start. However, real-world image processing can be much more complex, resembling a directed acyclic graph (DAG) of operations rather than a simple line. For this, we can draw inspiration from modern graphics editors.
The Graphite editor, built in Rust, represents every user action not as a destructive change to an image, but as a node in a graph. Each node is a pure function that transforms data. This non-destructive, functional approach is incredibly powerful and directly applicable to designing advanced CV pipelines.
Rust-Powered Graphics Editor: How Graphite's Syntax Trees Revolutionize Image Editing
This interview with the creators of the Graphite editor provides a fascinating look at a highly sophisticated architecture for image processing.
Please watch the following two clips to understand this advanced model: First, watch the explanation of non-destructive editing. Pay close attention to how they describe user operations as a "node graph," where each node is a function. This is a powerful way to think about your pipeline stages. Next, watch the segment explaining Graphine, their underlying functional language. The core idea is that the user's visual node graph is compiled into a series of linked Rust functions at runtime. This shows the ultimate endpoint of our decoupling: a system where processing pipelines can be defined and composed dynamically, just like writing a program.
Thinking of your pipeline as a composable graph of functions, rather than a fixed sequence of steps, opens the door to much more flexible and extensible systems. You could, for instance, define a pipeline in a configuration file (like the YAML in the benchmarking article) that wires together different "node" adapters for pre-processing, detection, and filtering, allowing you to reconfigure the entire pipeline without a single line of code change.
Conclusion
In this lesson, we moved from theory to practice, outlining a complete design for a computer vision pipeline using Hexagonal Architecture. You learned how to apply this pattern to a familiar domain, ensuring your application core remains clean, testable, and independent of volatile infrastructure details.
Key Takeaways:
- Start with the Domain: Identify the core logic of your application (the pipeline stages) and the data that flows through it (
ImageFrame,Detection). - Define Ports: Create abstract contracts (
traits orProtocols) for every interaction with the outside world (ImageSource,DefectDetector). - Isolate Core Logic: Write your application service (
InspectionService) to depend only on these abstract ports. - Implement Adapters: Create concrete implementations for your ports that contain all the messy, infrastructure-specific code (
RTSPStreamAdapter,YOLOv5Adapter). - Think in Graphs: For advanced flexibility, consider modeling your pipeline as a composable graph of operations, drawing inspiration from modern functional approaches to graphics and image processing.
We have now seen how to design an application using a specific structural pattern. However, Hexagonal Architecture is not the only choice. In our next lesson, we will compare the trade-offs of Layered, Hexagonal, and Clean Architectures, learning how to evaluate and select the right pattern for different project requirements.