Hello! In our last lesson, we took a tour of the n8n interface, getting familiar with the canvas, the node panel, and the execution log. You now have the lay of the land.
Today, we're going to stop being tourists and start being builders. Your goal for this lesson is to build and execute your very first workflow. We'll keep it simple by using a manual trigger, which is the perfect way to start a workflow with the click of a button. This hands-on exercise will bring together everything we've discussed so far and give you your first taste of making an automation come to life.
Let's start building.
Step 1: Choosing Your Trigger
Every workflow in n8n needs to start with a trigger. A trigger is simply the event that kicks off your automation. While triggers can be complex (like a new email arriving or a webhook call from another app), we're going to start with the most straightforward one.
Complete Beginner's Guide to Building Your First Automation
This short guide from Magic.app, 'Complete Beginner's Guide to Building Your First Automation', explains the concept of triggers and why the Manual Trigger is a great starting point.
In the article, find the section titled 'Step 1: Adding Your First Node (The Trigger)'. Read just this section to understand what a Manual Trigger is and why it's useful for learning.
As the guide mentions, the Manual Trigger lets you run the workflow whenever you want by clicking a button right inside n8n. It's perfect for building and testing because you have full control.
Step 2: Building Your First Workflow
Now, let's put that knowledge into practice.
- From your n8n dashboard, create a new workflow by clicking Start from scratch.
- The first thing you'll see is a prompt to add a trigger. In the panel that appears, select Trigger manually.
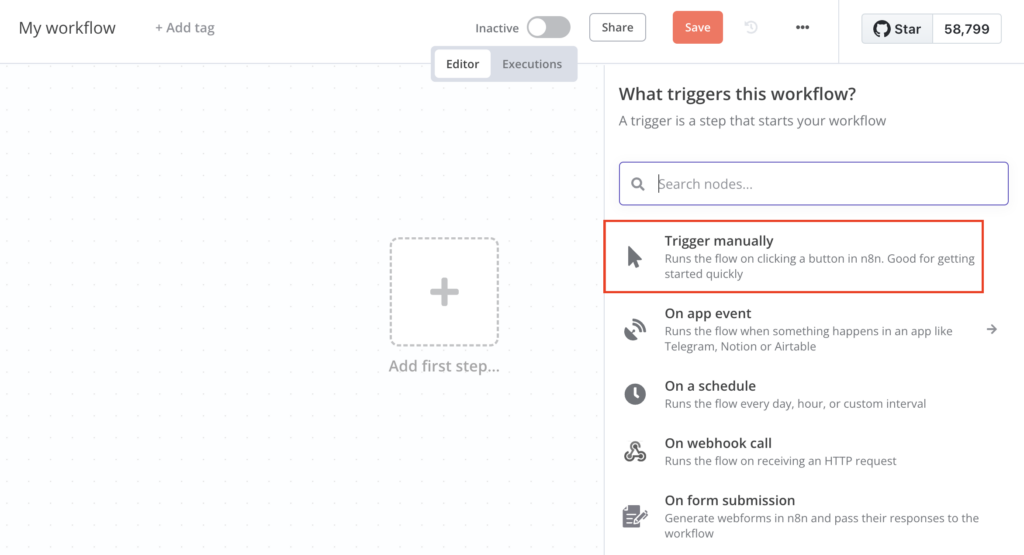
Your canvas will now have a single node on it, which is your trigger. In older versions of n8n, this was called "Manual Trigger" or "Start". Now, it's the default starting point.
Next, we need to add an action—something that happens after the trigger. We'll use a very simple but powerful node called Set. This node lets you create or change data within your workflow without connecting to any outside apps.
- Hover over your trigger node until a
+icon appears. Click it. - In the "Create Node" search bar that opens, type
Setand select the Set node from the list.
You should now have two nodes on your canvas, connected by a line (a "noodle"). This visual connection shows that after the workflow is triggered, the Set node will be the next step to run.
Your canvas should look like this, with a trigger node connected to a Set node.
Now, let's configure the Set node to do something.
- Click on the
Setnode to open its parameters on the right. - By default, it might be set to "Keep Only Set". Change the Mode to Append. This tells the node to add new data instead of replacing everything.
- Click Add Value.
- A new entry will appear. In the Name field, type
message. - In the Value field next to it, type
My first automation works!.
You've just told the workflow: "When I start you, create a piece of data called message with the text 'My first automation works!'".
Step 3: Executing the Workflow
With your simple workflow built, it's time to run it. In n8n, you can test your entire workflow by using the Test workflow button located at the bottom-left of the canvas.
- Click Test workflow.
- You will see n8n execute the steps. First, the trigger node will run, then the
Setnode. If everything is correct, both nodes will get a small green checkmark, and you'll see a success message.
Congratulations, you have officially built and executed an automation!
To see what this execution process looks like in a video, let's watch a short clip. The presenter is using a different kind of trigger (a form), but the core concept of executing a step and seeing the output is exactly the same.
n8n Quick Start Tutorial: Build Your First Workflow [2025]
This clip from the official 'n8n Quick Start Tutorial' demonstrates what happens when you execute a node and how the output data appears.
Watch from 00:02:55 to 00:03:51. Focus on how clicking 'execute' causes the node to run and then displays an 'Output' panel on the right with the data it generated. This is the result of a successful execution.
After you ran your test, you likely saw that same Output panel appear, showing the data from your Set node. This is a crucial part of n8n, and we'll dive deep into it in our next lesson.
Test your understanding!
You've just built a new, five-step workflow and want to see if it works from start to finish. Which button should you use to run the entire process once?
Show answer
You should use the Test workflow button. This executes the entire workflow from the trigger to the final node, allowing you to check the end-to-end result.
Conclusion
Fantastic work! You've successfully moved from navigating the interface to building and running a real workflow. This is a critical milestone.
Key Takeaways:
- Every workflow starts with a trigger.
- The Manual Trigger (or default Start node) is the simplest way to kick off a workflow for testing and development.
- Nodes are connected with "noodles" to define the order of operations.
- The Test workflow button allows you to run your entire automation once to see if it works as expected.
Next Lesson Preview:
In this lesson, you saw that a successful execution produces output data. But what is that data, and how does it move between nodes? In our next lesson, we will trace how data flows between nodes by inspecting the execution view, using the very workflow you just built as our example.