Hello! Welcome back to our module on Core UIKit Animations.
In our last lesson, we learned how to create basic property animations using UIView.animate(withDuration:). You now know how to animate properties like frame, alpha, and transform, and how to control timing with delays and easing curves. While these animations are powerful, their motion can sometimes feel a bit robotic because they follow predefined mathematical curves.
Today, we will elevate the quality of our animations by making them feel more physical and responsive. Our goal is to create spring animations using UIView.animate(usingSpringWithDamping:) for natural motion. This technique simulates the physics of a real-world spring, allowing views to overshoot their target and settle into place with a satisfying bounce. This is a key skill for creating the delightful, polished user interfaces found in top-tier iOS apps.
Why Use Spring Animations?
Before we dive into the code, let's understand why spring animations are often superior to traditional curve-based animations. They aren't just for creating "bouncy" effects; they provide a fundamentally more natural model for motion.
To get a deep appreciation for the principles behind springs, let's watch a segment from an excellent WWDC session on this topic.
WWDC23: Animate with springs | Apple
This video from Apple's developer channel explains why springs are a powerful tool for UI animation. It highlights how they maintain continuous velocity and can naturally incorporate initial motion from user gestures, making them feel more physical and believable.
Watch the segment from the beginning until the 8:09 mark. Pay close attention to the discussion on 'continuity of position and velocity' and how spring animations handle the transition from a user's gesture (like a swipe) to an animation.
As the video explains, the key benefits of spring animations are:
- Physical Realism: Their motion is based on a physical model (a mass attached to a spring), which our brains perceive as more natural and believable.
- Continuity: Unlike curve-based animations that must start from a velocity of zero, springs can seamlessly pick up an initial velocity. This is crucial for creating smooth transitions after a user interaction, like flinging a view across thescreen.
- Interruptibility: The physics-based model allows spring animations to be interrupted and redirected to a new target smoothly, without the jarring stops or jumps you might see with other animation types.
Implementing Spring Animations in UIKit
Now that we understand the "why," let's look at the "how." To create a spring animation, we use a variation of the UIView.animate method that includes two special parameters.
UIView.animate(withDuration:delay:usingSpringWithDamping:initialSpringVelocity:options:animations:completion:)
The two new parameters are the heart of the spring effect:
-
usingSpringWithDamping: This value controls how much the "spring" is dampened or restrained. It's aCGFloatbetween0.0and1.0.- A value of
1.0creates a critically damped spring, where the view animates to its final position without any oscillation or overshoot. The motion is smooth and settles quickly. - Values closer to
0.0create an underdamped spring with less damping, resulting in more oscillation and a bouncier effect.
- A value of
-
initialSpringVelocity: This value gives the animation an initial "push." It's aCGFloatwhere0.0means the animation starts from a standstill.- A positive value will give the animation initial momentum in the direction of the final state, making it feel faster at the start. For example, if you are animating a view's width from 100 to 200, a positive velocity will make it start that change more quickly.
- The value is relative to the total distance of the animation. A velocity of
1.0means the view will travel the entire animation distance in one second, as its initial speed.
To see how these parameters work in practice, let's review a clear explanation and code example.
Performing iOS Animations On Views With UIKit And UIView
This article from Smashing Magazine provides a concise breakdown of the spring animation method and its parameters.
In the article, find the subsection titled 'animateWithDuration'. Read through the explanation and code block for the spring animation example. Focus on the numbered list that explains each parameter, especially SpringWithDamping and velocity.
The article's example demonstrates animating a button's size with a springy effect. Here's what that looks like in a typical implementation:
let newButtonWidth: CGFloat = 200
let button = // ... your button instance

UIView.animate(withDuration: 0.8,              // The total duration of the animation.
               delay: 0.0,
               usingSpringWithDamping: 0.6,     // A bit of bounce.
               initialSpringVelocity: 0.2,      // A gentle initial push.
               options: .curveEaseOut,
               animations: {
    // Animate the button to its final state
    button.frame.size = CGSize(width: newButtonWidth, height: newButtonWidth)
    button.center = self.view.center
}, completion: nil)
Visualizing Damping and Velocity
Reading about these values is one thing, but seeing their effect is much more instructive. The GIF below shows how adjusting damping and initial speed affects an animation in real time.

Now let's watch a practical coding example to see how you might use this in a real app.
iOS Swift Tutorial: Simple and Cool UIView Animations
In this video, developer Brian Advent demonstrates how to apply a spring animation to a button to create a fun, interactive effect.
Watch the clip from 11:20 to 14:19. The presenter first introduces the spring animation method and then implements it to make a button expand with a bounce when tapped, and then shrink back in the completion handler.
This example shows a common pattern: applying a noticeable animation in response to a user tap to provide satisfying feedback. The use of the completion handler to chain a second animation is a great reminder of what we learned in the previous lesson.
Building an Intuition for Spring Parameters
The biggest challenge with spring animations is choosing the right values for damping and velocity to get the exact feel you want. This is more of an art than a science, and it requires building an intuition.
The parameters in the UIKit API (damping, velocity) are simplified representations of a more complex underlying physics model, which also includes concepts like mass and stiffness.
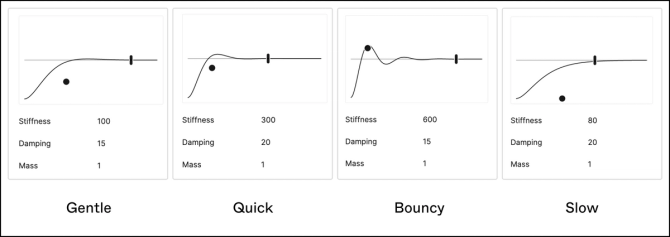
So, how do you choose the right values?
WWDC23: Animate with springs | Apple
Let's return to the Apple WWDC video for some excellent practical advice on how to choose spring parameters to achieve a specific character for your animations.
Watch the segment from 20:28 to 22:16. The speaker gives concrete advice on where to start (duration first, then bounce) and what different levels of bounce feel like. This guidance is directly applicable to tuning usingSpringWithDamping.
Here's a summary of the advice and some practical rules of thumb:
- Start with damping, then add velocity: A good starting point is a
usingSpringWithDampingvalue between 0.5 and 0.7 and aninitialSpringVelocityof 0.0. This will give you a gentle, non-aggressive spring. - For more bounce, lower the damping: If you want a more playful, bouncy effect, decrease the
usingSpringWithDampingvalue towards 0.3 or 0.4. Be careful with very low values, as they can feel exaggerated and unprofessional. - For a quicker start, increase velocity: If the animation needs to feel like it's launching into action, add a small positive
initialSpringVelocity(e.g., 0.1 to 0.5). - When in doubt, use less bounce: A critically damped spring (damping of
1.0) or a very slightly underdamped one (damping of0.8-0.9) is a safe, professional choice that still feels more natural than a simple ease-in/out curve.
A final note: As mentioned in the WWDC video, newer versions of SwiftUI and UIKit are moving towards a more intuitive model with duration and bounce (a value from -1.0 to 1.0) parameters. While our focus today is on the established usingSpringWithDamping method, it's good to be aware of this modern API as you'll see it more in the future.
Conclusion
You've now learned how to create fluid, natural, and physically believable animations using springs. This is a significant step up from basic curves and is essential for building modern, high-quality iOS user interfaces.
Key Takeaways:
- Spring animations feel more natural because they are based on a physical model and can seamlessly handle initial velocity.
- The primary method is
UIView.animate(withDuration:delay:usingSpringWithDamping:initialSpringVelocity:...). usingSpringWithDampingcontrols the oscillation:1.0is no bounce, while values closer to0.0are very bouncy.initialSpringVelocitygives the animation a starting "push."- Choosing the right parameters is an iterative process of tuning to achieve the desired animation character. Start with moderate damping and adjust from there.
Preview of the Next Lesson:
We've now animated single property changes with basic curves and springs. But what if you need to create a more complex sequence of events? In the next lesson, we will learn how to compose a sequence of animations using completion handlers or keyframe animations, allowing you to choreograph intricate visual effects.