Hello! Welcome back to our journey through Core UIKit Animations.
In our last couple of lessons, we've mastered creating single-step animations. We started with basic property changes using UIView.animate(withDuration:) and then added physical realism with UIView.animate(usingSpringWithDamping:). These are the fundamental building blocks, but many of the most engaging and informative UI effects are composed of multiple steps that happen in a carefully choreographed sequence.
Today, our goal is to compose a sequence of animations using completion handlers or keyframe animations. We'll explore two primary methods for telling a visual story over time, allowing you to create everything from a simple two-step feedback animation to a complex, multi-stage transition.
The Simple Chain: Completion Handlers
The most straightforward way to create a sequence is to chain animations together. The UIView.animate method includes a completion closure that executes after the animation finishes. We can simply start a new animation from within that closure.
For a simple, two-step sequence, this is perfectly fine. For example, let's say you want to move a view to the right, and once it arrives, move it down.
// Step 1: Move right
UIView.animate(withDuration: 0.5, animations: {
    myView.center.x += 100.0
}) { _ in
    // Step 2: Move down (in the completion handler of step 1)
    UIView.animate(withDuration: 0.5) {
        myView.center.y += 100.0
    }
}
This works, but what happens when you need a sequence of four, five, or six steps? The code structure quickly becomes deeply nested and difficult to read. This is often called the "Pyramid of Doom" or "Callback Hell," a pattern you may have encountered with nested network requests.
Let's look at an example of how quickly this can get out of hand.
iOS Animations by Tutorials, Chapter 7: Keyframe Animations
The following reading from Kodeco's "iOS Animations by Tutorials" perfectly illustrates the problem with nesting completion handlers to create a simple rectangular path animation.
Read the first part of the chapter, down to the image with the caption "There must be a better way...". Pay attention to the code block that creates a four-step animation and notice the nested structure.
As you can see, managing timing and logic in such a deeply nested structure is cumbersome. For anything beyond a simple two-step sequence, we need a more powerful and cleaner approach.
The Modern Solution: Keyframe Animations
Keyframe animations provide a far more elegant and powerful way to compose animation sequences. They were introduced in iOS 7 precisely to solve the "Pyramid of Doom" problem.
The core idea is to define an entire animation sequence within a single block. Instead of chaining animations, you break your sequence into distinct stages, or keyframes.
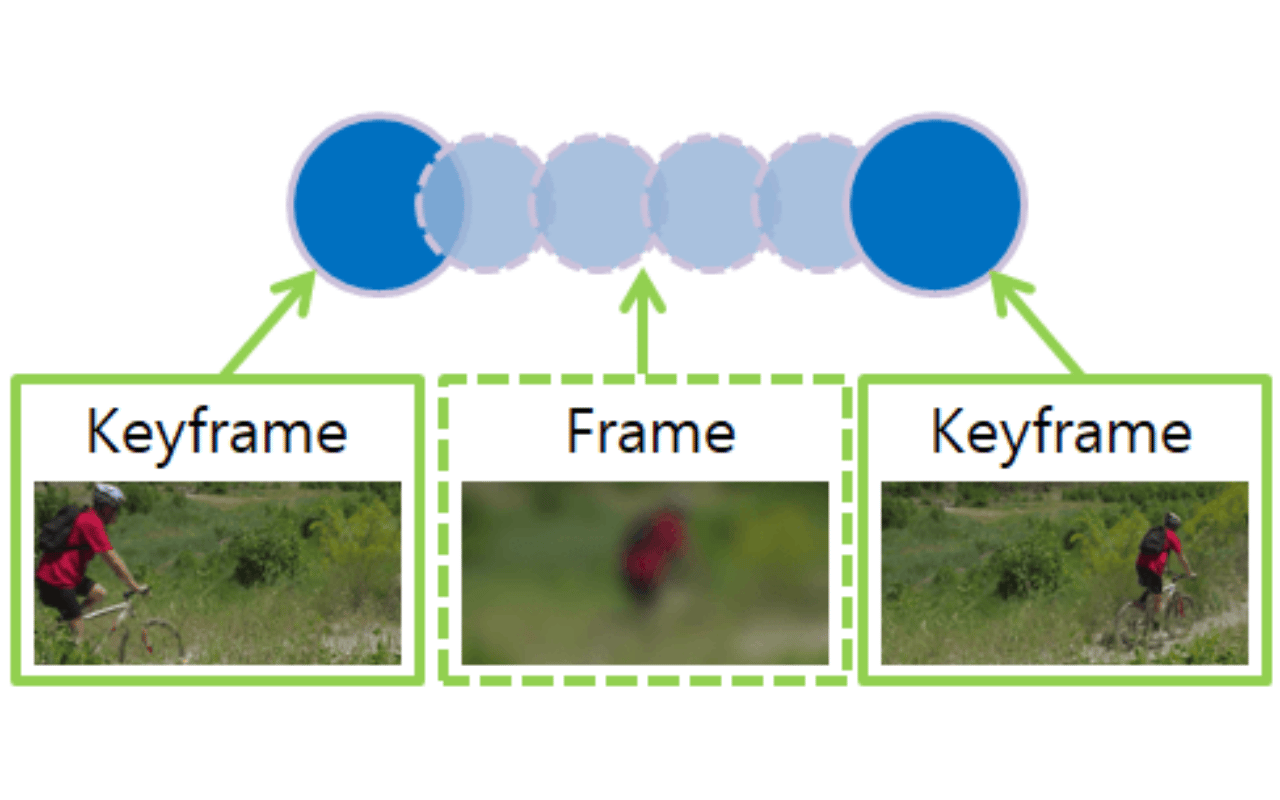
In UIKit, you use UIView.animateKeyframes to define the total duration of the entire sequence. Inside its animations closure, you add each individual keyframe.
UIView.animateKeyframes(withDuration: 4.0, delay: 0, options: [], animations: {
    // Add individual keyframes here
}, completion: nil)
Each keyframe is added with UIView.addKeyframe. The crucial parameters here are withRelativeStartTime and relativeDuration.
withRelativeStartTime: A value from0.0to1.0specifying when the keyframe should start, relative to the total duration.0.0is the beginning,0.5is halfway through.relativeDuration: A value from0.0to1.0specifying how long the keyframe should last, also relative to the total duration.
This relative timing system is incredibly powerful. It means you can change the total duration of your entire sequence, and UIKit automatically adjusts the timing of all the individual keyframes. It also allows keyframes to overlap, enabling you to start one animation before another has finished.
Building a Keyframe Sequence: A Practical Example
Let's walk through building a complex sequence step-by-step. The Kodeco chapter provides an excellent tutorial where a plane takes off, flies around, and lands.
iOS Animations by Tutorials, Chapter 7: Keyframe Animations
Continuing with the Kodeco chapter, let's see how to build a multi-stage animation for a departing airplane using keyframes.
Read the sections titled "Setting up your keyframe animation" and "Adding keyframes". Follow along as the author adds five distinct keyframes, paying close attention to how the withRelativeStartTime and relativeDuration values are used to choreograph the entire sequence. Notice how some keyframes are used for visible motion while others are used to reset the view's state while it's invisible (alpha = 0.0).
This airplane example demonstrates how you can compose a sophisticated animation sequence with clean, flat, and readable code. The ability to overlap animations (like rotating while moving) and perform off-screen resets is a significant advantage over simple completion handler chains.
Another Example: Creating a "Shake" Effect
Keyframe animations are not just for linear, A-to-B-to-C sequences. They are also perfect for creating more nuanced effects, like oscillations or shakes. A common use case is shaking a login form to indicate an incorrect password.
This next video demonstrates how to create a shaking bell effect using keyframe animations. It provides a very clear explanation of how to calculate the relative durations for each part of the shake.
How to animate shaking bell iOS / Swift / UIKit
This video from Swift Arcade shows a practical implementation of keyframe animations to create a shake effect, focusing on how to manage the timing of multiple small rotations.
Watch from 3:53 to 8:16. The presenter first introduces the concept (03:53), shows the animateKeyframes implementation (04:23), explains the critical concept of normalizing durations (05:02), and finally discusses how to control the rotation angle and pivot point (05:53). Pay special attention to the logic for calculating frameDuration based on the numberOfFrames.
A Note on CAKeyframeAnimation
It's worth noting that UIView.animateKeyframes is a high-level UIKit wrapper around a more fundamental concept in Core Animation: CAKeyframeAnimation. As an experienced developer, it's useful to know that this lower-level API exists.
CAKeyframeAnimation works on CALayer properties and gives you even more control. For example, you can provide an array of values for a property to pass through, or even a CGPath for an object to follow.
You don't need to master it for this lesson, but seeing it in action will help connect the dots and prepare you for our next lesson.
Introduction to Core Animation (iOS/Swift)
Let's watch a short segment that demonstrates the Core Animation equivalent, CAKeyframeAnimation, to create a similar shake effect. This will give you a glimpse of the power available at the layer level.
Watch from 14:04 to 15:52. The presenter builds a shake animation by providing an array of values (x-positions) and keyTimes to a CAKeyframeAnimation. Notice the conceptual similarity to UIView.animateKeyframes, but with slightly different parameters.
For most UI work, UIView.animateKeyframes is the right tool. It's simpler and manages view-level properties correctly. But when you need to animate along a complex path or require maximum performance, dropping down to CAKeyframeAnimation is a powerful option to have in your toolkit.
Conclusion
You now have two methods for creating animation sequences, and a clear understanding of when to use each one. Chaining with completion handlers is fine for very simple sequences, but keyframe animations offer a vastly superior approach for anything more complex, providing clean code, precise timing control, and the ability to overlap animations.
Key Takeaways:
- Chaining animations with completion handlers is simple for 2-3 steps but leads to nested, unreadable code (the "Pyramid of Doom").
UIView.animateKeyframesis the modern solution for composing complex animation sequences.- Within a keyframe animation, you add individual
UIView.addKeyframeblocks. - The timing of each keyframe is defined by
withRelativeStartTimeandrelativeDuration, which are fractional values of the total animation duration. - This relative timing system makes your sequences easy to adjust and allows for overlapping animations.
Preview of the Next Lesson:
We've just had a glimpse of Core Animation with CAKeyframeAnimation. In our next lesson, we'll dive deeper into this powerful framework by learning to animate layer properties directly using CABasicAnimation. This will give you fine-grained control over your animations and unlock effects that are difficult or impossible to achieve with UIView animations alone.