Hello! In our last lesson, we focused on writing tests for existing asynchronous code using XCTestExpectation and the modern async/await syntax. This is a vital skill for working with legacy code or any project where tests are added after the fact.
Today, we're going to flip that process on its head. Instead of writing tests for code that already exists, we will use tests to drive the development of new code. This powerful methodology is known as Test-Driven Development (TDD).
Our goal for this lesson is to learn how to apply the Test-Driven Development (TDD) workflow—Red, Green, Refactor—to implement a new function. Mastering TDD is a significant step toward the professional level of development you're aiming for, as it builds quality and confidence directly into your development process.
What is Test-Driven Development (TDD)?
Test-Driven Development is a software development process that relies on the repetition of a very short development cycle. Instead of writing production code first, you begin by writing a test that defines a desired improvement or new function.
This cycle consists of three distinct phases: Red, Green, and Refactor.
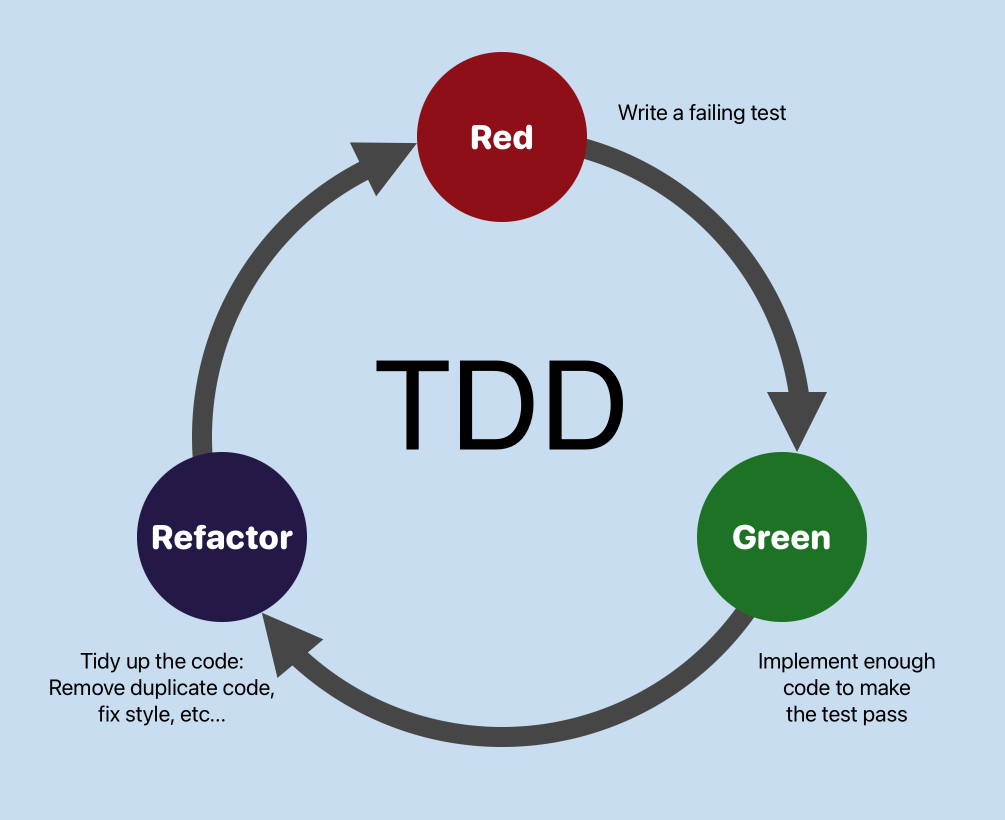
Let's break down these steps:
- Red: Write an automated test that fails. This is because the feature or function doesn't exist yet. A compilation error because the type or method doesn't exist counts as a failing test.
- Green: Write the absolute minimum amount of production code required to make the failing test pass. The goal here is not to write perfect code, but to get a "green" signal from your test suite as quickly as possible.
- Refactor: With the safety net of a passing test, you can now clean up your code. This includes improving the implementation, removing duplication, and enhancing the design, all while ensuring the tests continue to pass.
To understand the core principles and benefits of this approach, please read the first two sections of the following article.
Test-Driven Development (TDD) in Swift
The article 'Test-Driven Development (TDD) in Swift' by Khawer Khaliq provides a clear and concise introduction to the TDD philosophy and its benefits.
Please read the sections titled 'What is TDD' and 'Why TDD'. Focus on understanding the purpose of each step in the cycle and the key advantages this methodology provides, such as better design and easier refactoring.
As the article highlights, TDD forces you to think from the perspective of a consumer of your code, which often leads to cleaner interfaces. It also provides a comprehensive suite of tests that act as living documentation and give you the confidence to make changes without fear of introducing regressions.
TDD in Action: Building a MoneyFormatter
Theory is one thing, but TDD is a discipline that is best learned by doing. We'll now walk through a practical example of building a MoneyFormatter from scratch using the Red-Green-Refactor cycle.
The goal is to create a utility that takes a Decimal number and formats it into a currency string with two decimal places (e.g., 100 becomes "100.00").
Step 1: Red — Write a Failing Test
We start by imagining how we want to use our MoneyFormatter. We'll write a test for the simplest possible case: formatting a whole number. This test will fail because neither the MoneyFormatter type nor its formatting method exists yet.
The following video will guide you through setting up the test target and writing your very first failing test.
TDD and Unit Testing in iOS | Part 1 Stateless Objects
In this segment from 'TDD and Unit Testing in iOS' by Sam Meech-Ward, you'll see how to create a new test file and write the initial test that drives the creation of our production code.
Watch from 04:28 to 08:37. Notice how the process begins with writing a test for a MoneyFormatter struct that doesn't exist yet. The first 'failure' is a compile-time error, which is a key part of the 'Red' step.
As you saw, the TDD process forces you to make decisions about your API design (like naming the struct and its methods) from within the test, which is the perspective of the "caller." You'll also encounter the @testable import keyword, which is crucial for allowing your test target to access the internal types and methods from your main app target.
Step 2 & 3: Green and Refactor — Make it Pass, Then Make it Right
Now that we have a failing test, our next goal is to make it pass (Green). We'll write the barest minimum of code to satisfy the test. This might even involve hardcoding a return value. While it feels simplistic, this step confirms that our test is wired up correctly and can actually fail and pass.
Once the test is green, we immediately move to the Refactor step. We can now replace our simple implementation with a more robust one, using NumberFormatter for example, confident that our test will tell us if we've broken anything.
This next segment demonstrates this two-part process beautifully.
TDD and Unit Testing in iOS | Part 1 Stateless Objects
Let's continue with the same video to see the 'Green' and 'Refactor' steps in action. You'll see how to write just enough code to pass the test, and then how to refactor that naive implementation into something more robust.
Watch from 08:37 to 15:57. Pay close attention to the moment at 13:20 where the presenter returns a hardcoded string "0.00" just to make the test pass. This is the essence of the 'Green' step. Then, watch as he refactors the implementation to handle more cases.
The Cycle Continues: Driving Out the Full Implementation
With one test passing, we haven't finished. We've only handled one simple case. We now repeat the cycle to build out the full functionality:
- Red: Add a new test for another case (e.g., a number with one decimal place). Watch it fail.
- Green: Modify the implementation to make the new test (and all old tests) pass.
- Refactor: Clean up the code if necessary.
This iterative process allows you to handle increasing complexity one small, verifiable step at a time. The video below continues this process, adding tests for numbers with one, two, and multiple decimal places, including logic for rounding.
TDD and Unit Testing in iOS | Part 1 Stateless Objects
This segment demonstrates the iterative nature of TDD, where each new requirement is driven by a new failing test.
Watch from 15:57 to 24:46. Observe how new tests for different kinds of decimal numbers are added one by one, and how each failing test forces an improvement in the MoneyFormatter's logic.
A powerful benefit of TDD is the confidence it gives you to refactor. With a strong test suite, you can make significant changes to your code's design. In this final clip, the MoneyFormatter struct is completely refactored into an extension on the Decimal type—a major design change made safe by the tests.
TDD and Unit Testing in iOS | Part 1 Stateless Objects
To see the real power of TDD's safety net, watch this final segment where a major refactoring is performed with confidence.
Watch from 25:49 to 27:32. Notice how the tests are updated to reflect the new API, and once they all pass again, we know the new design works just as well as the old one.
TDD as a Design Process: Thinking Before You Code
The Red-Green-Refactor cycle is the core mechanic of TDD, but for any feature of meaningful size, the process starts even before you write the first line of a test. Professional developers use TDD not just as a testing technique, but as a design tool.
This involves:
- Clarifying Requirements: What exactly should this feature do? What are the edge cases?
- Breaking Down the Problem: Decompose the feature into the smallest possible, independent pieces of functionality.
- Sketching a Design: Think about the types and protocols you'll need. How will these small pieces communicate?
Only after this initial thinking phase do you pick the smallest piece and begin the Red-Green-Refactor cycle. This upfront planning prevents you from getting lost and ensures you're building a well-designed system, not just a collection of functions.
How to start with TDD to become a complete senior iOS developer | Live Dev Mentoring
The video 'How to start with TDD to become a complete senior iOS developer' from Essential Developer offers an excellent look at this crucial 'thinking' phase of TDD.
Watch from 02:02 to 19:57. This is a longer segment, but it's incredibly valuable. Focus on how the mentors guide the developer to break down a vague requirement into a concrete checklist and a high-level design diagram before any code is written. This is a key practice that separates junior and senior developers.
As a final point on professional practice, remember that the "Refactor" step applies to your test code as well. As your test suite grows, you should refactor it to remove duplication and improve clarity, often by creating helper methods. This makes your tests more maintainable in the long run.
Conclusion
Today you've learned about Test-Driven Development, a disciplined practice that puts testing at the heart of your development workflow. While it can feel slower at first, it pays significant dividends in code quality, maintainability, and your own confidence as a developer.
Key Takeaways:
- TDD is a cycle: The workflow consists of three repeating steps: Red (write a failing test), Green (write minimal code to pass), and Refactor (improve the code).
- Tests drive design: By writing the test first, you are forced to think about your API from a user's perspective, leading to cleaner and more intuitive interfaces.
- TDD provides a safety net: A comprehensive test suite allows you to refactor and change your code with confidence, knowing that the tests will immediately alert you to any regressions.
- It's a discipline: TDD is more than just a technique; it's a methodical process of breaking down problems and building solutions incrementally. It becomes much faster and more natural with practice.
Preview of the Next Lesson:
Now that you have a solid foundation in writing unit tests for both synchronous and asynchronous code, and you understand the TDD workflow, we're ready to tackle more complex, real-world scenarios. In our next lesson, we will focus on a cornerstone of modern iOS development: you will learn how to test Combine publishers and subscribers by mocking inputs and verifying outputs.