Hello! Welcome to our new module, "Advanced Architecture and Navigation."
In our last module, we did a deep dive into the MVVM architecture. You successfully refactored a legacy MVC feature, learning how to separate concerns within a single screen to create clean, testable, and maintainable code.
However, a professional app is more than a collection of well-architected screens. The flow between those screens—the app's navigation—is just as critical. In traditional MVC or even MVVM, this navigation logic often ends up back in the UIViewController, creating tight dependencies between screens and re-introducing some of the "Massive View Controller" problems we just worked so hard to solve.
Today's lesson addresses this head-on. Our goal is to explain the role of the Coordinator pattern in managing navigation and decoupling view controllers. We'll explore the "why" behind this pattern and understand the problem it solves, setting the foundation for implementing it in our next lesson.
The Problem: Tightly Coupled Navigation
When one view controller is responsible for creating and presenting another, they become tightly coupled. This means ViewControllerA has to know about the existence of ViewControllerB, how to create it, and what data to pass to it.
Mentee Question 5: What's the deal with coordinators?
To see what this coupling looks like in practice and why it's problematic, let's read a short article from Loopwerk.
Please read the first two sections, 'What does “decoupling” mean?' and 'Why does this matter?'. Pay close attention to the code examples showing direct presentation (navigationController?.pushViewController(...)) and the real-world consequences of this coupling, such as difficulties with refactoring, reuse, and testing.
As the article highlights, this tight coupling leads to several issues that you've likely encountered:
- Poor Reusability: A view controller designed to navigate to one specific screen is hard to reuse elsewhere in the app where the flow might be different.
- Difficult Refactoring: Changing the order of screens in a flow requires modifying the code in multiple view controllers, even if their own UI is unchanged.
- Untestable Flows: The navigation logic is a "UIKit side effect" embedded within a view controller, making it difficult to verify with unit tests.
This is precisely the kind of architectural challenge that separates stagnant code from professional, scalable code.
The Solution: A Dedicated Navigation Layer
The Coordinator pattern solves this problem by extracting all navigation responsibilities into a new, separate object: the Coordinator.
A coordinator is a plain Swift object (not a UIViewController) whose single responsibility is to manage the application's flow. It knows which screen to show when, how to present it, and what data it needs.
Let's watch a short video that explains this conceptual shift.
How to use the Coordinator pattern in iOS
In this clip from his 'How to use the Coordinator pattern in iOS' video, Paul Hudson from Hacking with Swift clearly illustrates how coordinators break the tight coupling between view controllers.
Watch from 03:04 to 05:08. Focus on the diagrams that show the link between ViewControllerA and ViewControllerB being broken. The key takeaway is that view controllers no longer talk to each other; they only talk to their coordinator.
By introducing this new layer, we achieve true decoupling.
ViewControllerAno longer knows thatViewControllerBexists.- When a navigation event occurs (e.g., a button tap),
ViewControllerAsimply notifies its coordinator. - The coordinator then decides what to do—it might create and show
ViewControllerB, orViewControllerC, or something else entirely. The view controller doesn't know or care.
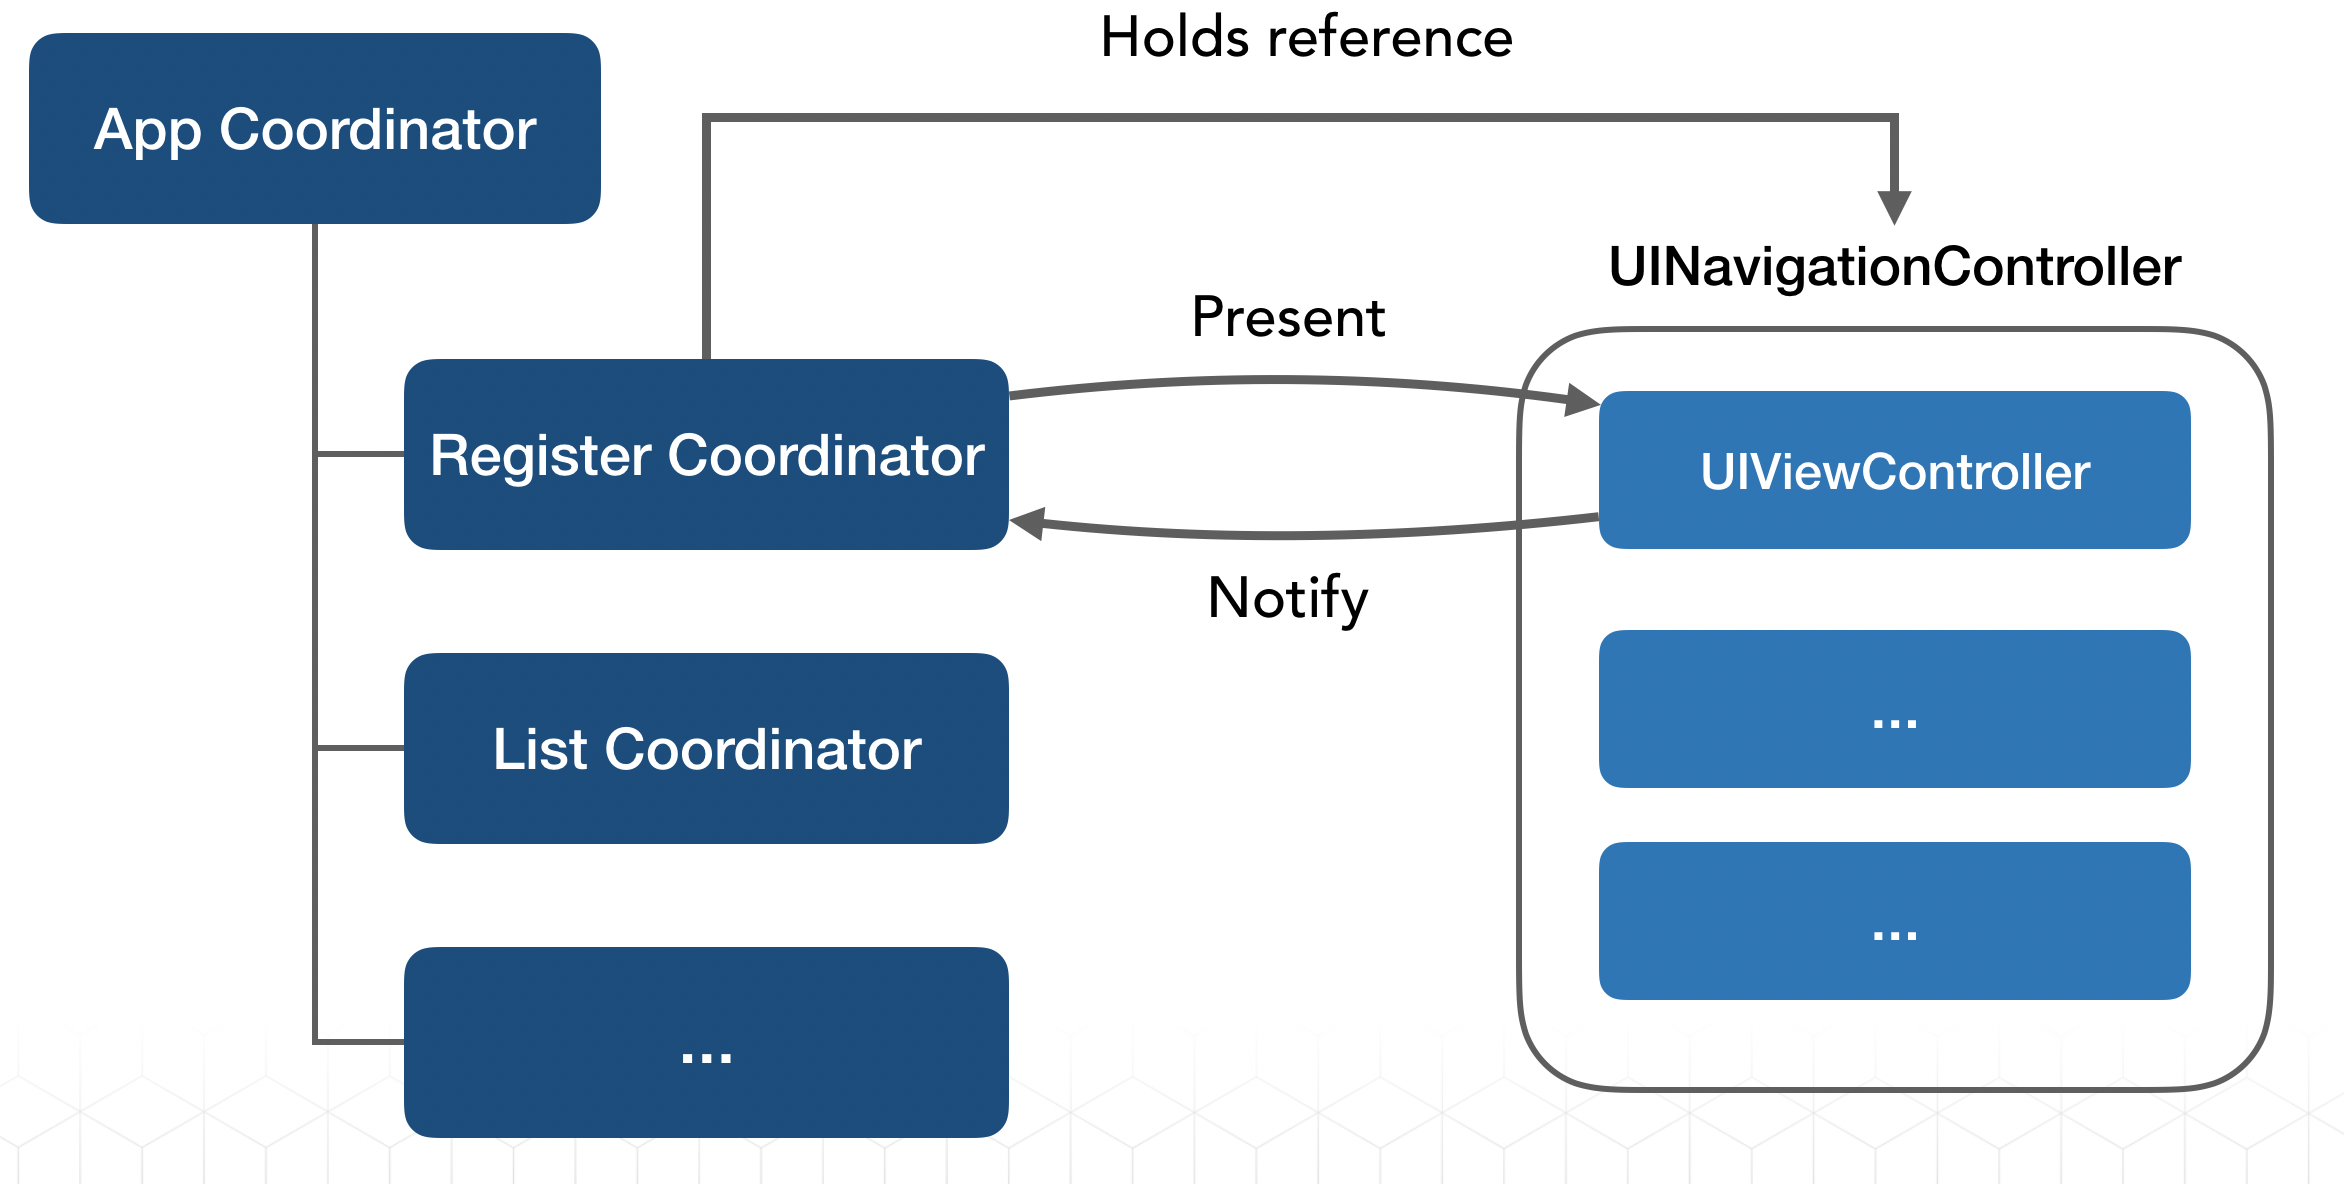
The Coordinator's Responsibilities
So, what does a coordinator actually do? Its core responsibilities include:
- Creating View Controllers: It instantiates the view controller to be displayed, often from a storyboard or programmatically.
- Injecting Dependencies: It passes any required data or services to the view controller, including a reference to itself so the view controller can communicate back.
- Managing Presentation: It handles the actual presentation logic (e.g.,
pushViewController,present,setViewControllers). - Responding to Events: It listens for navigation-related events from its view controllers and decides the next step in the flow.
Communicating Back to the Coordinator
A crucial part of the pattern is how a view controller communicates an event back to its coordinator. Since the view controller should be "dumb" about the app's flow, it shouldn't know it's talking to a MainCoordinator or a SettingsCoordinator.
This is typically solved using delegation or closures, just as we saw in the Loopwerk article.
Mentee Question 5: What's the deal with coordinators?
Let's revisit the Loopwerk article to see concrete examples of these communication patterns.
Read the section 'Doesn’t this just couple view controllers to coordinators?'. Notice how using a delegate protocol (ListViewControllerDelegate) or a closure (openDetail: ((Book) -> Void)?) allows the view controller to communicate its intent without being coupled to a specific coordinator implementation.
Using a delegate protocol is the most common approach. The coordinator creates the view controller, sets itself as the delegate, and then the view controller calls methods on its delegate when navigation actions are needed.
Integrating Coordinators with MVVM (MVVM-C)
You might be wondering how this new pattern fits with the MVVM architecture we just learned. They complement each other perfectly, leading to a powerful pattern often called MVVM-C (Model-View-ViewModel-Coordinator).
In MVVM, the ViewModel's job is to handle business and presentation logic. A logical extension of this is for the ViewModel to also decide when navigation should occur. The flow looks like this:
- A user interacts with the View.
- The View notifies the ViewModel of the user's action.
- The ViewModel performs some logic (e.g., validates input, makes an API call).
- Based on the result, the ViewModel tells the Coordinator to navigate to the next screen.
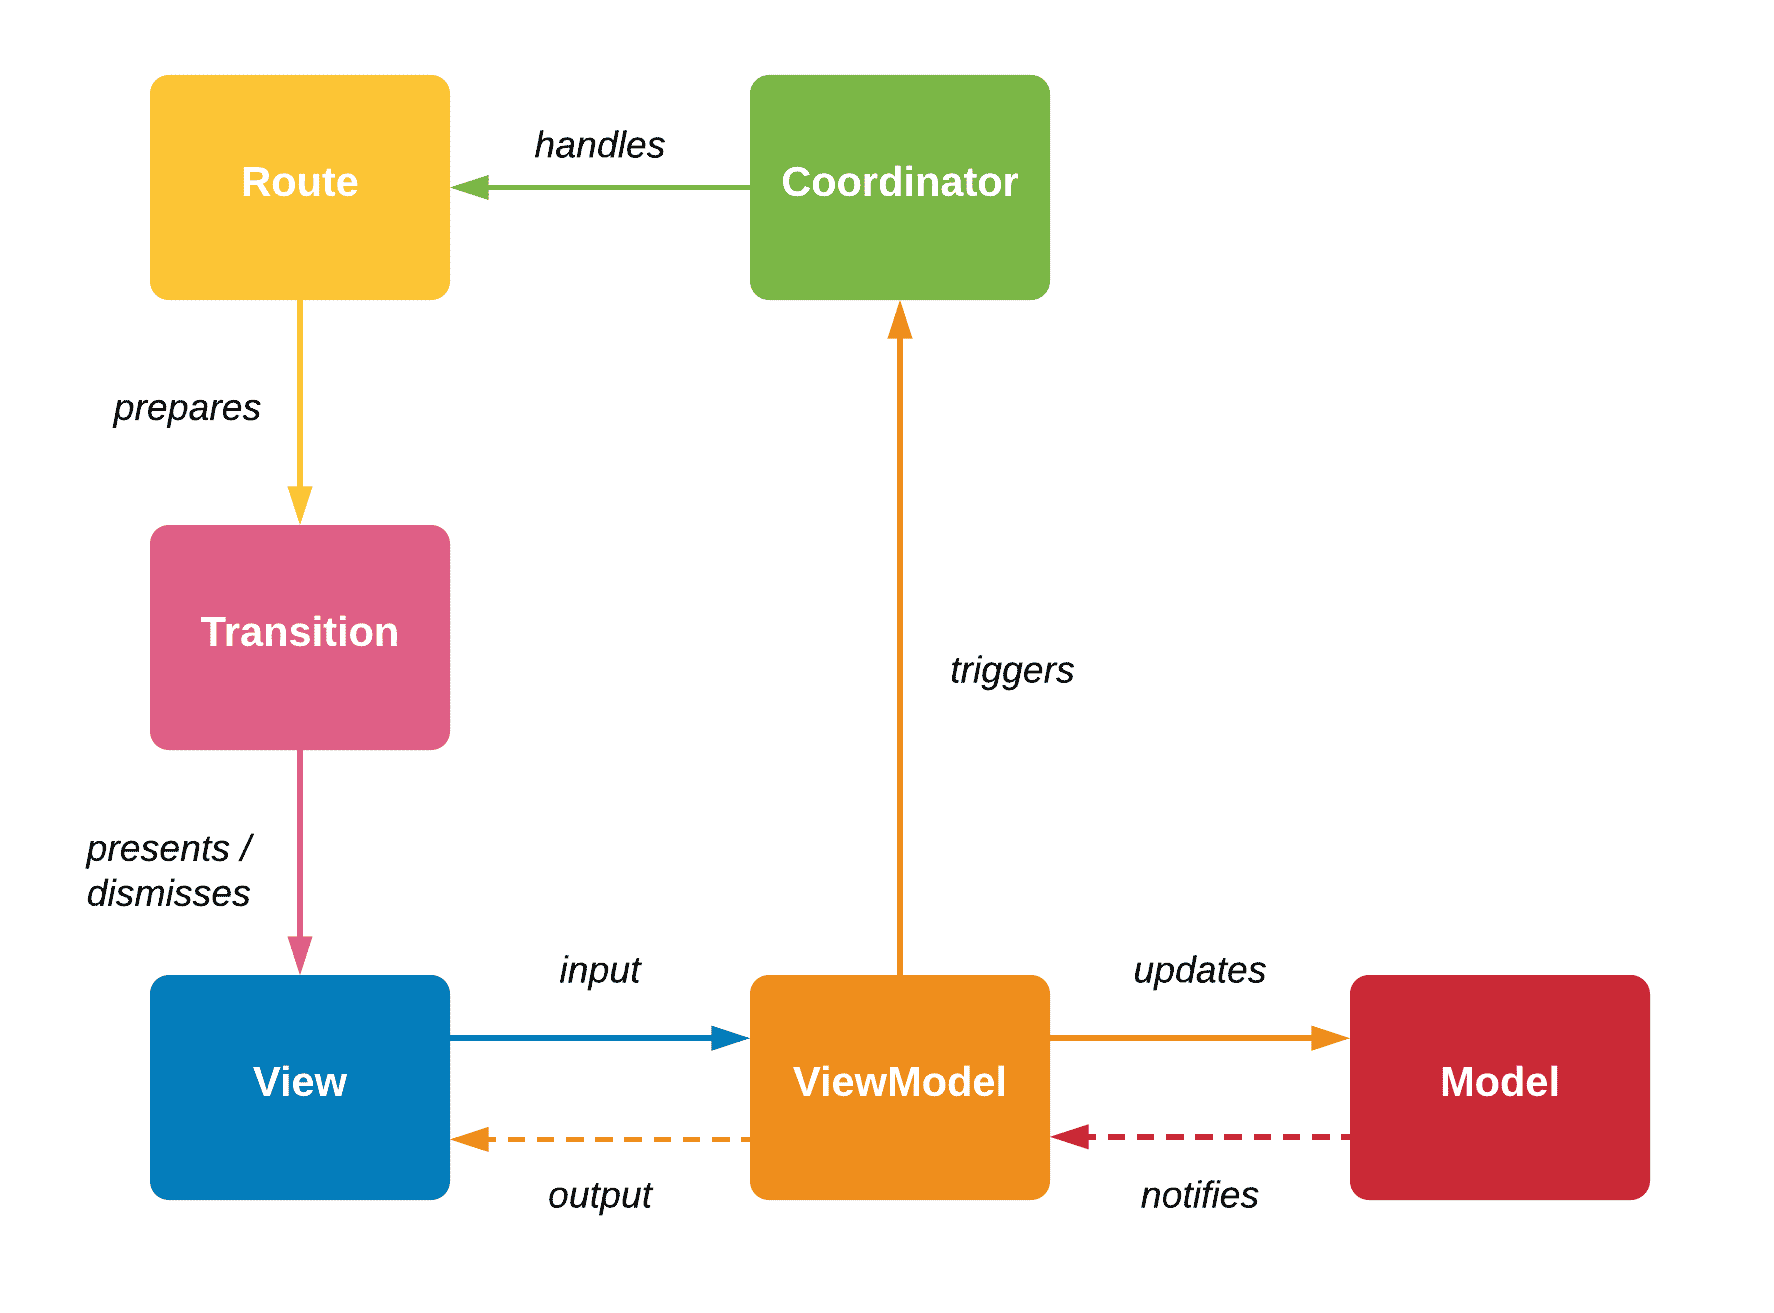
Let's watch a final clip that ties this all together.
Swift Tutorial: How to use Coordinator Pattern with MVVM - Advanced Navigation in UIKit & SwiftUI
Karin Prater provides a great explanation of the problem coordinators solve in the context of MVVM.
Watch from 05:37 to 12:38. She recaps the problems with MVC and MVVM navigation, and then introduces the Coordinator as the layer that sits 'above' the view controllers. Pay attention around 10:25 where she describes the Coordinator owning the ViewModels and states, which fits perfectly with the MVVM-C diagram we just saw.
As she explains, the coordinator becomes the owner of the application's state and flow, making the view controllers truly lightweight and focused only on presenting the UI.
Conclusion
In this lesson, we've established the theoretical foundation of the Coordinator pattern. You now understand its crucial role in building scalable and maintainable iOS applications by solving the problem of tightly coupled navigation.
Key Takeaways:
- Problem: Placing navigation logic inside view controllers creates tight coupling, making them difficult to reuse, refactor, and test.
- Solution: The Coordinator pattern introduces a dedicated navigation layer, a plain Swift object responsible for managing the application's flow.
- Decoupling: Coordinators break the direct links between view controllers. A view controller no longer knows what came before or what comes next; it only communicates its intent to its coordinator.
- Communication: View controllers communicate back to their coordinators using delegation (protocols) or closures, keeping them fully decoupled.
- MVVM-C: Coordinators integrate seamlessly with MVVM, where the ViewModel triggers navigation events and the Coordinator executes them.
We've covered the "what" and the "why." In our next lesson, we'll move on to the "how."
Preview of the Next Lesson:
We will roll up our sleeves and get practical. Our next goal will be to implement a basic Coordinator to manage the navigation flow between two screens, putting today's theory into action.