Hello! Welcome back to our series on SwiftUI animations.
In our last lesson, we established the fundamental difference between implicit animations (using the .animation() modifier) and explicit animations (using the withAnimation block). You learned that .animation() is a view-specific rule, while withAnimation is a broader instruction that applies to all consequences of a state change.
Today, we'll build directly on that knowledge. Now that you know how to trigger animations, we'll focus on customizing how they look and feel. Our goal is to learn how to customize animation timing and curves using the .animation() and withAnimation modifiers. This is where you move from making things move to making them move with style and purpose.
1. The Animation Struct: Defining the Rhythm
First, let's clarify a potentially confusing term. In SwiftUI, the Animation struct doesn't represent the animation itself, but rather the timing and characteristics of the transition from a start state to an end state. It's more accurately a timing curve function.
Demystifying SwiftUI Animation - A Comprehensive Guide
The article "Demystifying SwiftUI Animation" provides an excellent explanation of this concept. It helps to reframe your thinking about what Animation really means in the context of SwiftUI.
Read the introductory paragraphs and the subsection titled "Timing Curve Functions". Focus on understanding that the Animation struct's role is to define the rhythm (or curve) of how data changes over time. You can stop before the "VectorArithmetic" part.
As the article explains, the Animation struct simply tells SwiftUI how to interpolate values over a period. You provide this "recipe" to either the withAnimation block or the .animation() modifier. The default animation is a gentle ease-in, ease-out curve, but we can provide our own for much greater control.
The syntax looks like this:
Explicit:
// Instead of a bare withAnimation...
withAnimation(.linear(duration: 1)) {
    // ... state change
}
Implicit:
Text("Animate Me")
    .opacity(isShowing ? 1 : 0)
    // ... we pass the animation struct to the modifier.
    .animation(.spring(), value: isShowing)
Now, let's explore the two main categories of timing curves you can use.
2. Category 1: Timing Curve Animations
Timing curve animations are defined by a specific duration and a curve that dictates the rate of change over that time. You are likely familiar with these concepts from Core Animation, but SwiftUI provides a much simpler API.
Explore SwiftUI animation - WWDC23 - Videos - Apple Developer
This segment from a WWDC23 session provides a clear, official overview of the built-in timing curve presets.
Watch from 12:16 to 13:22. Pay attention to the four main presets: linear, easeIn, easeOut, and easeInOut, and how they are all based on a duration.
Here is a visual guide to what those curves look like in practice:
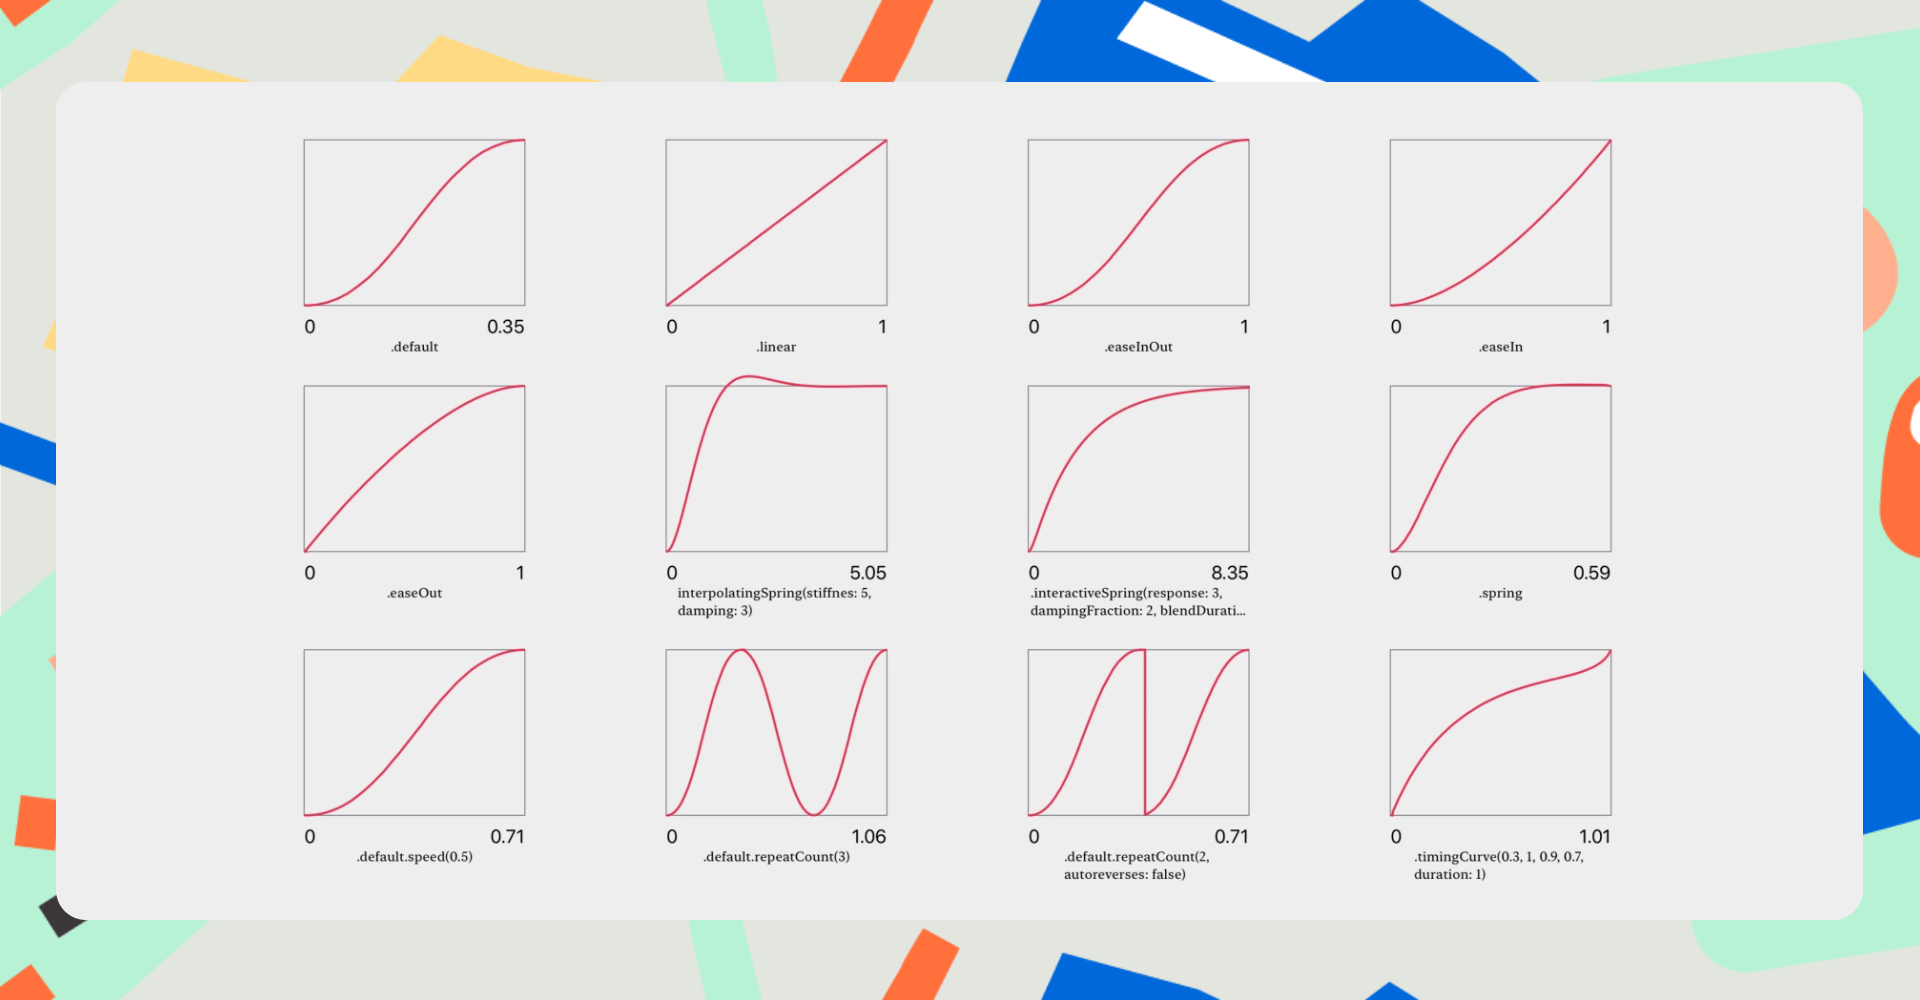
Let's break down the main types:
.linear: A constant rate of change from start to finish. It can feel robotic, but is useful for continuous effects like a spinning loader..easeIn: Starts slowly and accelerates. Good for views that are entering the screen..easeOut: Starts quickly and decelerates. Good for views that are moving to a final resting place..easeInOut: Starts slowly, speeds up in the middle, and slows down at the end. This is often the default and provides a natural-looking motion for many standard UI transitions.
All of these can be customized with a duration. For example: .easeInOut(duration: 0.5).
3. Category 2: Spring Animations
While timing curves are predictable, they don't always feel natural or physical. Spring animations simulate the physics of a real-world spring, creating motion that can overshoot its target and settle, giving your UI a more dynamic and organic feel.
In the past, defining springs required you to think in terms of physical properties like mass, stiffness, and damping. SwiftUI now offers a more intuitive model.
Explore SwiftUI animation - WWDC23 - Videos - Apple Developer
Let's return to the WWDC talk to see how modern spring animations work.
Watch from 13:22 to 15:04. Note the new, more intuitive parameters: duration and bounce. Also, pay close attention to the built-in presets (smooth, snappy, bouncy) and the important fact that a smooth spring is the new default for withAnimation in iOS 17.
The key takeaways on springs are:
- They are defined by perceived duration and bounciness, which is much easier to reason about.
- The presets are excellent starting points:
.smooth: No bounce, just a gentle, spring-driven ease..snappy: A small amount of bounce for a crisp, responsive feel..bouncy: A more pronounced overshoot for playful, attention-grabbing effects.
- You can customize them, for example:
.bouncy(duration: 0.8, extraBounce: 0.2).
Using a spring can make an interaction feel much more satisfying. Consider scaling a button on tap:
struct SpringButton: View {
    @State private var isPressed = false

    var body: some View {
        Image(systemName: "star.fill")
            .font(.largeTitle)
            .scaleEffect(isPressed ? 1.5 : 1.0)
            .foregroundStyle(.yellow)
            .onTapGesture {
                // The state change is wrapped in a spring animation
                withAnimation(.bouncy) {
                    isPressed.toggle()
                }
            }
    }
}
Tapping this star will cause it to "pop" in a much more engaging way than a simple .easeOut curve would.
4. Applying Different Animations to Different Changes
This is where the power of SwiftUI's animation system truly shines. The deprecated .animation() modifier applied one animation to any change on the view, causing chaos. The modern .animation(_:value:) modifier gives you precise control.
You can stack these modifiers to apply different animation styles to different properties, even if they are all driven by the same state change.
Explore SwiftUI animation - WWDC23 - Videos - Apple Developer
The WWDC session demonstrates this powerful technique of stacking animation modifiers.
Watch from 22:44 to 23:58. First, you'll see the basic .animation(value:) modifier. Then, you'll see how two modifiers are stacked to give the shadow a .smooth animation and the scaleEffect a .bouncy animation, all based on the same selected state.
Let's look at the code from the video. It's a fantastic example of professional-level animation control:
struct Avatar: View {
    @Binding var selected: Bool

    var body: some View {
        Image(pet.type)
            // The shadow animates smoothly...
            .shadow(radius: selected ? 12 : 8)
            .animation(.smooth, value: selected)
            // ...while the scale effect animates with a bounce.
            .scaleEffect(selected ? 1.5 : 1.0)
            .animation(.bouncy, value: selected)
            .onTapGesture {
                selected.toggle()
            }
    }
}
Because SwiftUI modifiers are applied sequentially, the .animation(.smooth, ...) only applies to the view as it exists at that point, which includes the .shadow() but not yet the .scaleEffect(). This positional logic is what enables such granular control.
Similarly, you can control which animation applies to which state change when you have multiple states.
How to use animation with value in SwiftUI (iOS 16+) | Bootcamp #67
The Swiftful Thinking channel has a great video that explains why the value parameter is so crucial for preventing unintended animations when multiple states are involved.
Watch from 02:50 to 09:42. The presenter sets up a scenario with two buttons controlling two different state variables (animate1 and animate2). See how the deprecated .animation() modifier fails to distinguish between them, and how using two separate .animation(value:) modifiers gives explicit control over each animation independently.
This ability to isolate animations to specific state changes (.animation(..., value: animate1)) and specific properties (by modifier order) is what allows for the creation of complex, yet predictable, animation sequences.
Conclusion
Today you've moved beyond simply triggering animations to art-directing them. By providing custom Animation structs, you can precisely control the timing, physics, and feel of every transition in your UI.
Key Takeaways:
- The
Animationstruct is a timing curve function that defines the rhythm of an animation. - Timing Curve Animations (
.linear,.easeInOut, etc.) are duration-based and offer predictable acceleration and deceleration. - Spring Animations (
.smooth,.bouncy, etc.) are physics-based, offering more natural and organic motion by simulating spring physics. - You customize an animation by passing an
Animationinstance towithAnimation(for explicit animations) or the.animation()modifier (for implicit animations). - You can achieve granular control by stacking
.animation(value:)modifiers. Their position in the modifier chain determines which properties they affect, allowing you to apply different animation styles to different visual changes.
Preview of the Next Lesson:
So far, we've focused on animating changes to a view's properties while it's on screen. But what about animating the appearance and disappearance of a view itself? In the next lesson, we will explore this by learning to create custom view transitions using the .transition() modifier, allowing you to control how views enter and exit the screen with effects like sliding, fading, and scaling.