Hello! Welcome back to our module on Modern Architecture with MVVM.
In our last lesson, we established the "why" behind MVVM, understanding how it promotes a clean separation of concerns to solve the "Massive View Controller" problem. We defined the distinct roles of the View (displaying data and capturing input) and the ViewModel (handling presentation logic and state).
This leaves us with a crucial question: if the ViewModel knows nothing about the View (UIKit), how does the View get updated when the data changes? The answer is data binding. This lesson will focus on implementing this communication channel. Our learning outcome is to implement data binding between a View and ViewModel using closures and property observers.
We will explore two fundamental, non-framework approaches that are essential for any professional iOS developer's toolkit. Understanding these manual techniques will give you a deep appreciation for the mechanics of reactivity before we move on to Apple's Combine framework.
1. What is Data Binding?
Data binding is a process that establishes a connection between the application's UI (the View) and its data source (the ViewModel). The goal is to create a system where changes in the ViewModel's state are automatically propagated to the View, ensuring the UI is always synchronized with the underlying data.
In the context of MVVM, this is a one-way flow of data from the ViewModel to the View.
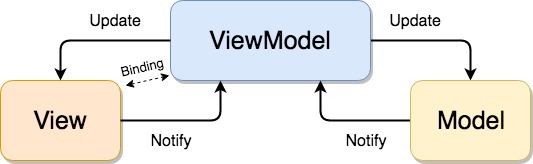
This "binding" is the glue that holds the pattern together, allowing the ViewModel to remain a simple, testable Swift object, completely decoupled from UIKit. Let's explore how to build this glue.
2. Method 1: Data Binding with Closures
The most direct way to create a binding is by using closures. The pattern is straightforward:
- The ViewModel exposes a closure property (e.g.,
onStateUpdate). This closure will be executed whenever the relevant data changes. - The View (typically a
UIViewController) sets this closure. Inside the closure, it updates its UI elements (labels, buttons, etc.) using the new data passed from the ViewModel. - When a property inside the ViewModel is updated (often using a
didSetproperty observer), it calls theonStateUpdateclosure, triggering the UI update in the View.
Let's watch a practical demonstration of this technique.
This video, 'Data Bindings in Swift' by AF Swift Tutorials, provides a concise and clear implementation of closure-based data binding.
Watch the segment from 03:13 to 07:43. Pay close attention to: How the didChangeData closure is defined in the CatViewModel. How this closure is called within the didSet of the name property. How the ViewController sets up the binding and updates nameLabel.text. The important use of unowned self to prevent a retain cycle.
As the video demonstrates, this approach is effective. However, there's a critical detail to manage: memory safety.
- The View Controller owns the ViewModel.
- The ViewModel holds a closure.
- When you set the closure in the View Controller, that closure captures
self(the View Controller) to update the UI.
This creates a strong reference cycle: ViewController -> ViewModel -> Closure -> ViewController. To break this cycle, you must use a capture list, typically [weak self] or [unowned self], within the closure. Given your experience, you'll recognize this as a classic scenario for retain cycles. Always be mindful of this when using closure-based bindings.
3. Method 2: A Reusable Observable Class
The closure method works well for one or two properties, but it can become repetitive if a ViewModel has many properties that need to be bound. You would need to declare a separate closure for each one.
A more scalable and elegant solution is to implement the Observer pattern. We can create a generic wrapper class, often called Observable or Dynamic, that encapsulates both the value and the logic for notifying observers of changes.
Here’s the concept:
- Create a generic class
Observable<T>. - This class holds the actual
valueof typeT. - It has a
didSetproperty observer on itsvalue. When the value changes, it calls a listener closure. - It exposes a
bind(listener:)method that allows an interested party (the View) to register its listener closure.
This pattern centralizes the binding logic into one reusable component.
Swift Tutorial: An Introduction to the MVVM Design Pattern
This Toptal article provides an excellent, in-depth tutorial on building a dynamic MVVM application. We'll focus on the section where they refactor a static ViewModel into a dynamic one using a custom binding class.
Please read the section titled 'Making the ViewModel Dynamic'. Follow these steps in the article: Start by examining the implementation of the generic Dynamic<T> class. This is the core of the binding mechanism. Observe how the PlayerScoreboardMoveEditorViewModel protocol is refactored. The String properties are replaced with Dynamic<String>. See how the concrete implementation, PlayerScoreboardMoveEditorViewModelFromPlayer, is updated to initialize and update the .value of these Dynamic properties. Finally, and most importantly, see how the PlayerScoreboardMoveEditorView uses bindAndFire to listen for changes and update its labels. This is the actual binding in action.
Let's break down the key takeaways from that reading:
- Encapsulation: The
Dynamic<T>class neatly encapsulates the observation logic. The ViewModel's properties becomelet onePointMoveCount: Dynamic<String>instead ofvar onePointMoveCount: String. TheDynamicobject itself is constant, but its internalvalueis mutable. - Binding in the View: The View is responsible for initiating the binding. The
bindAndFiremethod is a clever enhancement: it sets the listener and immediately calls it with the current value, which populates the UI on initial setup.// In the View viewModel.onePointMoveCount.bindAndFire { [unowned self] countText in self.onePointCountLabel.text = countText } - Updating in the ViewModel: The ViewModel's job is simplified to just updating the
.valueproperty of theDynamicobject. ThedidSetinside theDynamicclass handles the notification automatically.// In the ViewModel // When a move is made... onePointMoveCount.value = "\(game.playerMoveCount(for: player, move: .onePoint))"
This approach is highly favored in professional development because it creates clean, declarative bindings and scales well as your ViewModels grow in complexity.
Conclusion
In this lesson, we bridged the communication gap between the View and ViewModel that is central to the MVVM pattern. We've moved from the "what" and "why" of MVVM to the practical "how" of its implementation.
Key Takeaways:
- Data Binding is the mechanism that connects a View's UI to a ViewModel's data, allowing the UI to react to data changes.
- Closure-based binding is a simple, direct method where the ViewModel exposes a closure that the View uses to update its UI. It's effective but requires careful memory management (
[weak self]) to avoid retain cycles. - Using a generic
Observable/Dynamicclass is a more scalable and reusable approach. It encapsulates the observer pattern, allowing for clean, declarative bindings from the View to the ViewModel's properties.
These two techniques form the foundation of reactive programming in iOS. By understanding how to build them from scratch, you're now perfectly positioned to appreciate the power and convenience of Apple's built-in solution.
Preview of the Next Lesson:
While our custom Observable class is powerful, it's designed for simple property observation. What about handling complex asynchronous event streams, like network responses, user input over time, or multiple dependent operations? For that, we turn to a dedicated framework. In the next lesson, we will begin our journey with Apple's Combine framework, starting with its core concepts: Publishers, Subscribers, and Operators.