Hello! Welcome back to our course on professional iOS development.
In our last lesson, we explored the fundamental concepts of the Combine framework: Publishers, Subscribers, and Operators. We learned how to create a data pipeline, process values with operators like map, and manage the subscription's lifecycle using AnyCancellable.
Today, we'll put that theory into practice. Our goal is to refactor a view to use MVVM with Combine's @Published property wrapper for reactive data binding. We'll see how Combine provides a powerful, declarative way to connect our ViewModel's state to our View, moving beyond the manual closure-based binding we built earlier. By the end of this lesson, you'll be able to build a reactive data flow from user input, through your business logic, and back to the UI.
Introducing @Published
At the core of reactive MVVM with Combine is the @Published property wrapper. It's a convenient tool that instantly makes a property a publisher.
When you declare a property with @Published, two things happen:
- The property itself behaves like a normal variable.
- The compiler synthesizes a publisher for that property. You can access this publisher by prefixing the property name with a dollar sign (
$).
import Combine

class WeatherViewModel: ObservableObject {
    @Published var temperature: Double = 20.0
    // The publisher is accessible via $temperature
}
This publisher emits a new value whenever the property is about to change (specifically, in its willSet block).
Reactive Binding: SwiftUI vs. UIKit
How a view "listens" to these published changes differs significantly between SwiftUI and UIKit.
SwiftUI: The Reactive-First Approach
SwiftUI was designed from the ground up to work with Combine. When you mark your ViewModel as an ObservableObject and use @Published properties, SwiftUI can automatically subscribe to changes and update the view.
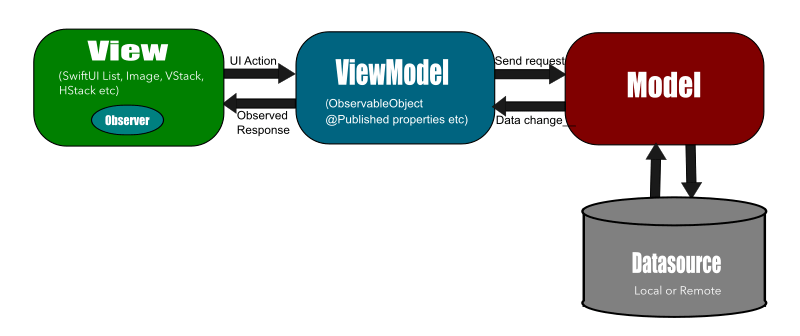
You connect the View to the ViewModel using property wrappers like @StateObject or @ObservedObject. The binding is largely implicit.
// ViewModel (as above)

// View
struct WeatherView: View {
    @StateObject private var viewModel = WeatherViewModel()

    var body: some View {
        // This Text view automatically updates when viewModel.temperature changes!
        Text("Current Temperature: \(viewModel.temperature)°C")
    }
}
UIKit: Explicit, Manual Binding
In UIKit, there is no automatic connection. You must explicitly subscribe to the ViewModel's publisher and update the UI yourself. This is where the sink and store(in:) pattern we learned in the last lesson becomes essential.
Modern MVVM Architecture in iOS
This article, 'Modern MVVM Architecture in iOS', provides a concise comparison of the binding code for SwiftUI and UIKit. Focus on the UIKit example to see our familiar sink pattern in action.
Read the section 'MVVM in UIKit'. Note how the CurrencyViewController creates a cancellables set and uses viewModel.$convertedAmount.sink to manually update the label.text property.
As the article shows, the UIViewController holds a strong reference to the ViewModel and sets up a subscription in viewDidLoad(). This subscription ties the publisher's output directly to a UI update.
A Professional's Note: @Published vs. CurrentValueSubject in UIKit
Here’s a crucial detail for professional practice. @Published emits its new value in willSet, meaning before the property's value has actually been updated. In SwiftUI, this is handled gracefully. In UIKit, this can lead to subtle bugs. For instance, if you reload a UITableView in response to a data array changing, the sink closure might fire before the array has its new value, causing a crash or displaying stale data.
For this reason, when working with UIKit, it's often more reliable to use a CurrentValueSubject. It gives you explicit control over when the new value is published.
Let's watch a video that refactors a UIKit project and clearly explains this distinction.
How to use Combine with MVVM for UIKit and SwiftUI - fetching tweets example project
Karin Prater's video 'How to use Combine with MVVM for UIKit and SwiftUI' is an excellent, practical guide. We'll start by focusing on her explanation of why CurrentValueSubject is often preferred over @Published for data sources in UIKit.
Watch the segment from 30:40 to 33:19. Pay close attention to the explanation of the timing difference (willSet vs. explicit send) and how it affects UI updates like reloading a table view.
Walkthrough: Refactoring a UIKit View with Combine
Now, let's put it all together by walking through a refactoring process, using the same project from the video as our guide. We'll transform a UIViewController that does everything into a clean MVVM-Combine architecture.
Step 1: Create the ViewModel and Move State
First, we separate concerns. We create a TweetViewModel class and move the state and business logic out of the TweetViewController. For our main data source, tweets, we'll use a CurrentValueSubject as recommended for UIKit.
How to use Combine with MVVM for UIKit and SwiftUI - fetching tweets example project
Let's see how to perform this initial refactoring. This part of the video covers moving properties and setting up the tweets publisher in the ViewModel.
Watch from 02:52 to 09:07. Focus on: How the TweetViewModel class is created. Moving the tweets array from the ViewController to the ViewModel. Creating the tweets property as a CurrentValueSubject<[Tweet], Never>. How the ViewController is updated to access the tweet data via viewModel.tweets.value.
Step 2: Build the Reactive Data Pipeline
Next, we'll build the core reactive logic inside the TweetViewModel. We will take user input from a search bar, process it through a series of operators, fetch data from the network, and finally update our tweets publisher. This pipeline is the "brain" of our view.
A common challenge is integrating existing asynchronous code (like a network API with completion handlers) into a Combine pipeline. We can solve this by wrapping the call in a Future publisher.
How to use Combine with MVVM for UIKit and SwiftUI - fetching tweets example project
This next segment is dense but incredibly valuable. It demonstrates how to wrap an old API in a Future, and then builds a full reactive pipeline using powerful operators like debounce, map, and switchLatest.
Watch from 10:35 to 26:45. This is a longer section, so focus on these key concepts: Creating a Future (10:35 - 18:11): Understand how a completion-handler based API call is wrapped in a Future to make it a Combine-compatible publisher. Building the Pipeline (18:11 - 26:45): Follow how the searchText publisher is transformed. debounce: Waits for the user to stop typing. map & switchLatest: Maps the search text to a new network publisher and automatically cancels the previous network request. catch: Handles errors gracefully. sink: Subscribes to the final result and updates the main tweets publisher using .send(). \nDon't worry about memorizing every line of code; focus on the flow and the purpose of each operator.
Step 3: Connect the ViewController to the ViewModel
The final step is to make the UI react to changes in the ViewModel. We'll subscribe the TweetViewController to the ViewModel's $tweets publisher and reload the table view whenever new data arrives.
How to use Combine with MVVM for UIKit and SwiftUI - fetching tweets example project
Let's complete the loop. This short clip shows how the ViewController subscribes to the ViewModel and updates the UI.
Watch from 26:45 to 28:03. Notice the familiar pattern: subscribing with sink in viewDidLoad, updating the tableView in the receiveValue closure, and storing the subscription in a cancellables set.
The Final Architecture
After the refactoring, our code is much cleaner. Here’s a summary of the final structure:
TweetViewModel.swift
import Combine

class TweetViewModel: ObservableObject {
    // Input: A subject to receive search text from the View
    let searchText = CurrentValueSubject<String, Never>("")

    // Output: Publishes the list of tweets for the View to display
    let tweets = CurrentValueSubject<[Tweet], Never>([])

    private var cancellables = Set<AnyCancellable>()
    private let twitterAPI = TwitterAPI() // In a real app, this would be injected

    init() {
        setupFetchTweets()
    }

    private func setupFetchTweets() {
        searchText
            .debounce(for: .seconds(0.5), scheduler: DispatchQueue.main)
            .removeDuplicates()
            .map { [unowned self] text -> AnyPublisher<[Tweet], Never> in
                // Map the search text to a network request publisher
                return self.twitterAPI.getSearchTweets(with: text)
                    .catch { _ in Just([]) } // Handle errors by returning an empty array
                    .eraseToAnyPublisher()
            }
            .switchToLatest() // Switch to the newest network request publisher
            .sink { [unowned self] receivedTweets in
                // Send the final result to our main tweets publisher
                self.tweets.send(receivedTweets)
            }
            .store(in: &cancellables)
    }
}
TweetViewController.swift
import UIKit
import Combine

class TweetViewController: UIViewController {
    private let viewModel = TweetViewModel()
    private var cancellables = Set<AnyCancellable>()

    @IBOutlet weak var searchBar: UISearchBar!
    @IBOutlet weak var tableView: UITableView!

    override func viewDidLoad() {
        super.viewDidLoad()

        // Bind ViewModel output to UI
        viewModel.tweets
            .receive(on: DispatchQueue.main) // Ensure UI updates are on the main thread
            .sink { [weak self] _ in
                self?.tableView.reloadData()
            }
            .store(in: &cancellables)

        // Bind UI input to ViewModel
        searchBar.delegate = self
    }
}

extension TweetViewController: UISearchBarDelegate {
    func searchBar(_ searchBar: UISearchBar, textDidChange searchText: String) {
        // Send user input to the ViewModel's input subject
        viewModel.searchText.send(searchText)
    }
}
This setup creates a clear, unidirectional data flow. The View sends user input to the ViewModel, the ViewModel processes it and updates its state, and the View reactively updates in response.
Conclusion
Congratulations! You've successfully refactored a complex view into a modern, reactive MVVM architecture using Combine. This pattern is highly scalable and makes asynchronous code much easier to read and maintain.
Key Takeaways:
@Publishedis a property wrapper that creates a publisher, simplifying state management in ViewModels.- In SwiftUI, views can subscribe to
@Publishedproperties automatically using@StateObjector@ObservedObject. - In UIKit, you must manually subscribe to a publisher using
.sinkand update the UI elements within the closure. - For data sources in UIKit,
CurrentValueSubjectis often a more robust choice than@Publishedbecause it gives you explicit control over when values are emitted. - A powerful reactive pipeline can be built by chaining operators like
debounce,map, andswitchToLatestto process user input and trigger asynchronous work.
Preview of the Next Lesson:
Our TweetViewModel currently creates its own TwitterAPI instance. This tight coupling makes the ViewModel difficult to test in isolation. In our next lesson, we will address this by learning how to apply dependency injection to ViewModels to enable testability and modularity.