Hello and welcome back!
In our last lesson, we successfully refactored a view controller into a reactive MVVM architecture using Combine. We saw how this separated our concerns, but we also identified a key weakness: our TweetViewModel was creating its own TwitterAPI instance, like this:
class TweetViewModel {
    private let twitterAPI = TwitterAPI()
    // ...
}
This direct creation of a dependency tightly couples the TweetViewModel to a specific, concrete implementation of the TwitterAPI. This makes it nearly impossible to test the ViewModel's logic without making actual network calls, which is slow, unreliable, and undesirable for unit testing.
Today, we'll solve this problem. Our goal is to apply dependency injection to ViewModels to enable testability and modularity. Dependency Injection (DI) is a foundational pattern in modern software engineering that allows us to write flexible, loosely coupled, and highly testable code—all hallmarks of a professional iOS developer.
What is Dependency Injection and Why Does it Matter?
Dependency Injection is a design pattern where an object's dependencies (other objects it needs to do its job) are provided to it, rather than being created by the object itself.
The core benefits of this approach are profound:
- Testability: This is the most immediate and significant advantage. By "injecting" dependencies, we can substitute a real dependency (like a network service) with a mock or fake version during unit tests. This allows us to test a component, like a ViewModel, in complete isolation.
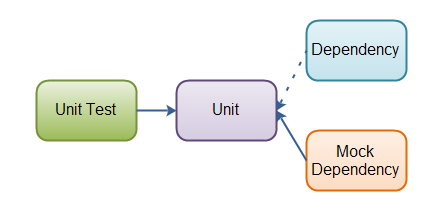
-
Modularity and Decoupling: Components no longer depend on concrete implementations, but rather on abstractions (in Swift, this means protocols). Your ViewModel doesn't need to know how data is fetched; it only cares that it's talking to something that can fetch data. This makes components more reusable and easier to maintain.
-
Flexibility: Need to swap out a networking library or change from a real database to an in-memory cache? With DI, these changes are often localized to a single place in your app, without requiring modifications to the ViewModels that use them.
The "How": DI Patterns in Swift
There are a few ways to inject dependencies. Let's look at the most common patterns.
Dependency injection patterns in Swift
The article 'Dependency injection patterns in Swift' by Michał Cichoń provides a clear and practical overview of the main DI patterns. We'll use it to understand our options.
Please read the sections titled 'A basic example of how to use initializer-based dependency injection', 'Property injection', and 'Method injection'. As you read, focus on the code examples and the pros and cons described for each pattern.
To summarize the key patterns from the article:
-
Initializer (Constructor) Injection: Dependencies are passed into the
initmethod. This is the preferred and most robust pattern for ViewModels. It guarantees that the ViewModel has all its required dependencies from the moment it's created. The dependencies can be stored inletconstants, ensuring they don't change during the ViewModel's lifetime. -
Property Injection: Dependencies are settable
varproperties. This is more flexible but riskier, as the dependency might benilwhen a method is called. It's often seen in UIKit when dealing with Storyboards (IBOutlets), but should generally be avoided for required dependencies in your own classes. -
Method Injection: A dependency is passed as a parameter directly to the method that needs it. This is useful for dependencies that are only needed for a single operation, but it's not suitable for dependencies that the ViewModel needs to access throughout its lifecycle.
Walkthrough: Applying DI to a ViewModel for Testability
Now, let's see how to apply initializer injection to make a ViewModel testable. We'll follow a practical example from a video that refactors a flight booking app.
The core idea is to break the tight coupling by introducing a protocol.
- Define a Protocol: Create a protocol that defines the contract for the dependency.
- Update the ViewModel: The ViewModel will now depend on the protocol, not the concrete class.
- Inject the Dependency: Pass an object conforming to the protocol into the ViewModel's initializer.
- Create a Mock for Testing: In your test target, create a "mock" class that also conforms to the protocol but returns hardcoded data.
Let's watch how this is done.
MVVM + Dependency Injection in Swift | Unit Testing | iOS
The video 'MVVM + Dependency Injection in Swift' by iCode provides an excellent demonstration. The presenter faces the exact problem we're trying to solve: a ViewModel has a dependency that makes it hard to test.
Watch the segment from 19:40 to 25:11. Pay close attention to these steps: The ViewModel (FlightDetailViewModel) depends on an external component (DiscountEligibilityCalculator). The presenter explains why creating a concrete instance of this calculator inside the ViewModel would be bad for testing. A protocol (DiscountEligibilityCalculator) is created to define the dependency's contract. The ViewModel's initializer is updated to accept an object of the protocol type.
The Payoff: Writing the Unit Test
With the dependency abstracted behind a protocol and injected via the initializer, the ViewModel is now fully testable. We can create a lightweight mock object that fulfills the protocol's contract and inject that during our test.
MVVM + Dependency Injection in Swift | Unit Testing | iOS
Now for the payoff. Let's see how this DI setup enables simple and effective unit testing.
Continue watching from 25:11 to 28:02. Notice how: A DummyEligibilityCalculator class is created that conforms to the protocol and simply returns a predictable value (true). When setting up the test, this dummy object is injected into the ViewModel. The test can now assert the ViewModel's logic without any real web service calls or complex dependencies.
This process is fundamental to professional iOS development. The following article provides another clear, step-by-step example using MapKit, reinforcing the pattern of Protocol -> Concrete & Mock Implementations -> Injection -> Test.
To solidify your understanding, let's review the 'Dependency Injection Tutorial' from DEV Community. It walks through the same pattern with a different example.
Read the sections 'Setup Core Components', 'Inject the Dependency into a ViewModel', and 'Unit Testing with Dependency Injection'. This will give you another complete, concise example of the entire workflow.
The Big Picture: The Composition Root
A natural question arises: if the ViewModel doesn't create its dependencies, who does? The answer lies in a concept called the Composition Root.
The Composition Root is a single, logical location in your application—as close to the app's entry point as possible (e.g., in your SceneDelegate or AppDelegate)—where modules and dependencies are composed together.

The Composition Root is the only part of your application that should have knowledge of concrete types. The rest of your app should only depend on abstractions (protocols).
S03E05: Dependency Injection Patterns Applied in iOS apps | Professional iOS Engineering Series
The 'Essential Developer' channel offers a fantastic explanation of the Composition Root and its importance for building truly modular applications.
Watch the segment from 18:12 to 26:19. The key takeaways are: The Composition Root is a concept, not a specific class. It's the single logical place where you wire everything up. This approach keeps your feature modules (UI, domain logic, etc.) completely decoupled from each other. The Composition Root is application-specific and not meant to be reusable, unlike the modules it assembles.
Conclusion
Today we've demystified Dependency Injection, a critical pattern for professional iOS development. By applying DI, you elevate your code from being merely functional to being modular, flexible, and, most importantly, testable.
Key Takeaways:
- Dependency Injection (DI) means providing an object's dependencies from an external source rather than having the object create them itself.
- The primary benefits are improved testability, modularity, and flexibility.
- Initializer Injection is the preferred pattern for ViewModels, as it ensures all required dependencies are present upon creation.
- To achieve true decoupling and testability, your ViewModels should depend on protocols (abstractions), not concrete classes.
- The Composition Root is the single logical place in your app (like the
SceneDelegate) where you assemble your object graph, creating concrete instances and injecting them into the components that need them.
Preview of the Next Lesson:
In our next lesson, we will refactor a feature from a legacy MVC project into the MVVM architecture. This will be a fantastic opportunity to apply everything we've learned in this module—MVVM principles, reactive data binding with Combine, and Dependency Injection—in a larger, more realistic scenario.