Hello! Welcome to your second lesson.
In our last session, you mastered the crucial first step of holding the ukulele with proper posture. With that foundation in place, you're now ready to prepare the instrument to make music. This lesson is dedicated to achieving a single, vital outcome: tuning your ukulele to standard GCEA tuning.
An instrument that isn't in tune will always sound incorrect, no matter how well you play it. Learning to tune accurately and making it a consistent habit is a hallmark of a serious musician. For someone aiming for a professional level of proficiency, this skill is non-negotiable.
Given your past experience with guitar, you're already familiar with the concept of tuning. We'll build on that by highlighting the unique aspects of ukulele tuning, ensuring you have a clear and practical method to get your instrument sounding great every time you play.
1. Understanding Standard Ukulele Tuning: G-C-E-A
The vast majority of soprano, concert, and tenor ukuleles use a standard tuning. The notes for the four strings, from the top string (closest to your chin) to the bottom string (closest to the floor), are:
- G
- C
- E
- A
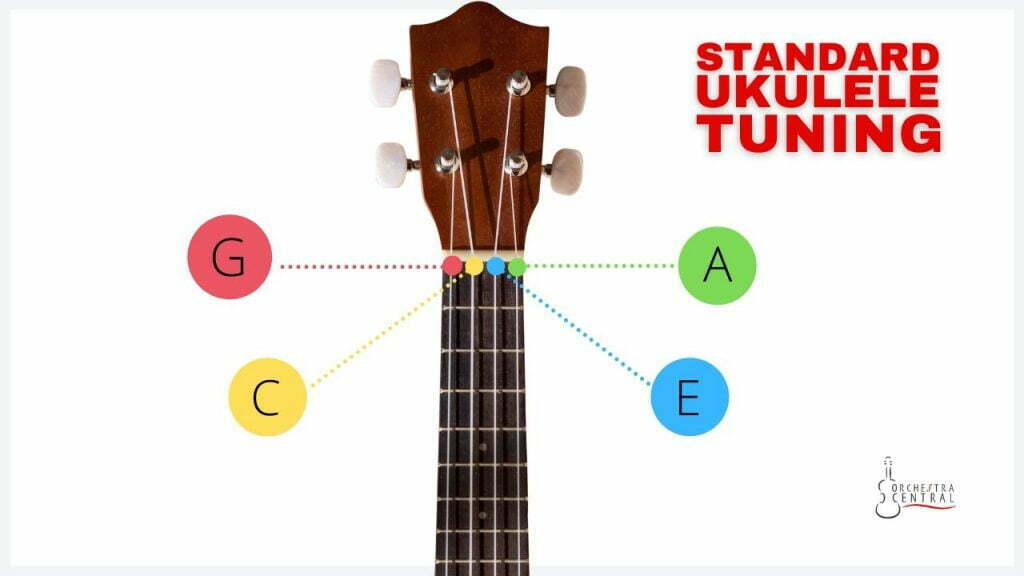
A common mnemonic to remember this is "Goats Can Eat Anything."
It's also standard practice to number the strings from the bottom up:
- A-string = 1st string
- E-string = 2nd string
- C-string = 3rd string
- G-string = 4th string
The "Re-entrant" High G: A Key Difference from Guitar
Here's where your guitar background is important. Unlike a guitar, where strings are tuned linearly from thickest/lowest to thinnest/highest (E-A-D-G-B-E), a standard ukulele has re-entrant tuning. This means the top G-string is actually a higher pitch than the C-string below it.
To understand this and other key points, please read the following brief article.
How Does Ukulele Tuning Really Compare to Guitar?
The article 'How Does Ukulele Tuning Really Compare to Guitar?' provides an excellent summary of the differences that are especially relevant for a former guitar player. It explains the concept of re-entrant tuning and offers a useful mnemonic.
Please read the two sections titled 'Standard ukulele tuning is G-C-E-A' and the table under 'Understanding Standard Ukulele Tuning vs. Guitar Tuning.' Focus on the explanation of re-entrant tuning and the G4-C4-E4-A4 note specification.
This high G-string is what gives the ukulele its classic, bright, and cheerful sound.
2. Your Tuning Toolkit: Electronic Tuners
While it's possible to tune by ear, the most accurate and efficient method, especially as you develop your skills, is to use an electronic tuner. The two most common types are:
- Clip-on Tuners: These attach to the headstock of your ukulele and sense the vibrations of the strings. They are very convenient and work well even in noisy environments.
- Smartphone Apps: Many free and paid apps (like GuitarTuna or the Boss Tuner app) use your phone's microphone to listen to the pitch.
A crucial tip: Most tuners have different modes (e.g., "Guitar," "Ukulele," "Chromatic"). It is highly recommended that you set your tuner to Chromatic mode.
- A "Ukulele" mode will only show you if you are close to the target notes (G, C, E, A).
- Chromatic mode will show you the actual note you are playing. This is far more informative, as it tells you exactly where you are and which direction you need to go, which is invaluable if a string is very out of tune.
3. Practical Guide: Let's Tune Your Ukulele
Now it's time for the hands-on part. Grab your ukulele and your tuner. We will walk through the process step-by-step.
The following video provides an excellent, clear demonstration using a clip-on tuner. Please watch it and follow along with your own instrument.
HOW TO TUNE YOUR UKULELE & USE A CLIP-ON TUNER
This video, 'HOW TO TUNE YOUR UKULELE & USE A CLIP-ON TUNER' by Bernadette Teaches Music, will guide you through the entire process. It covers setting up the tuner, tuning each string, and the very important step of stretching new strings.
Watch from the beginning to 05:27. Follow her instructions to tune each of your four strings: G, C, E, and A. Pay close attention to her advice on identifying the correct tuning peg for each string and her demonstration of how to stretch the strings.
To summarize the key steps you just practiced:
- Attach and set up your tuner: Clip it to the headstock and set it to Chromatic mode.
- Pluck and adjust one string at a time:
- G-string (4th): Pluck the string and read the tuner. Turn the corresponding tuning peg until the tuner indicates the note is a 'G' and the needle is centered (or the light turns green).
- C-string (3rd): Repeat for the C string.
- E-string (2nd): Repeat for the E string.
- A-string (1st): Repeat for the A string.
- Always tune UP to the note: As you turn the peg, try to approach the correct pitch from below (flat). This helps the string stay in tune better by seating it properly in the nut.
- Stretch the strings: Gently pull each string away from the fretboard to help it settle. New strings stretch a lot!
- Re-check the tuning: After tuning all four strings and stretching them, go back and check them all again. Adjusting the tension on one string can slightly affect the others. Repeat until all four strings are stable.
Test your understanding!
You pluck the second string from the bottom (the E string) and your chromatic tuner displays "D#". Do you need to tighten or loosen the string, and why?
Show answer
You need to tighten the string. The musical alphabet goes ... D, D#, E, F ... . Since D# is lower in pitch than E, you need to increase the string's tension to raise the pitch up to E.
4. Developing Professional Habits
Your goal is not just to tune the ukulele once, but to keep it in tune.
-
"Why won't it stay in tune?" This is the most common frustration for beginners. The reason is almost always that nylon ukulele strings stretch. This is especially true for new ukuleles or when you've just put on new strings. It can take several days of playing and re-tuning for them to become stable. The stretching technique shown in the video will speed this up. Be patient; it's a normal part of the process.
-
The Golden Rule: Tune your ukulele every single time you pick it up. Even stable strings are affected by changes in temperature and humidity. A quick 30-second tune-up before you practice ensures that your ears are always hearing the correct pitches and that your practice time is effective.
For more detail on these good habits, refer to the following guide.
Ukulele Tuning Tips: How to Tune a Uke
The article 'Ukulele Tuning Tips' provides a fantastic written summary of the tuning process and common issues.
Read the sections titled 'Why Won’t My Ukulele Stay in Tune?' and 'Proper Tuning Technique'. This will reinforce why strings go out of tune and the importance of tuning up to the note.
Conclusion
Excellent work. You have now learned the second fundamental skill of playing the ukulele. Combining correct posture with an in-tune instrument is the proper starting point for every practice session.
Key Takeaways:
- Standard ukulele tuning is G-C-E-A, featuring a high-G re-entrant tuning.
- Using a chromatic tuner (clip-on or app) is the most reliable method.
- The tuning process is: pluck a string, read the tuner, adjust the peg, and repeat.
- Always tune up to the target pitch to ensure stability.
- New strings stretch significantly; be patient and re-tune often. Make tuning a pre-practice ritual.
In our next lesson, "Fret single notes cleanly with the left hand without buzzing," we will finally combine the skills from our first two lessons. With a well-held and perfectly tuned ukulele, you'll be ready to start pressing down on the frets and creating distinct musical notes.