Hello! Welcome to your first lesson. I'm excited to guide you on your journey to mastering the ukulele.
This lesson focuses on the absolute foundation of your playing: how to hold the ukulele correctly and maintain proper posture. While it may seem basic, getting this right from day one is crucial for achieving the professional-level proficiency you're aiming for. Think of it like setting up a proper development environment before you start coding; a solid foundation prevents countless issues down the line and allows for efficient, scalable progress.
Your previous experience with guitar will be helpful, as the core principles of relaxed posture are similar. However, the ukulele's small size demands specific techniques to hold it securely while allowing both your hands the freedom they need for the complex strumming and fingerpicking patterns you'll be learning.
Let's get started on building that solid foundation.
1. Your Core Posture: The Starting Point
Whether you choose to sit or stand, the first rule is to maintain good posture. This prevents strain and allows you to play for longer, more focused sessions.
- Sit or stand up straight.
- Keep your shoulders relaxed and back, not hunched forward.
- Position the back of the ukulele's body against your chest or belly.
This initial contact point is your anchor. The goal is to keep the instrument stable without using your hands to grip it.

2. The Strumming Arm: Your Main Support
Your right arm (assuming you're right-handed) does most of the work of holding the ukulele. Your left (fretting) hand should be free to move along the neck.
The technique is to cradle the ukulele with your right forearm. Press your forearm gently but firmly across the top edge of the ukulele's lower body (the lower bout). This pressure pins the instrument against your torso.
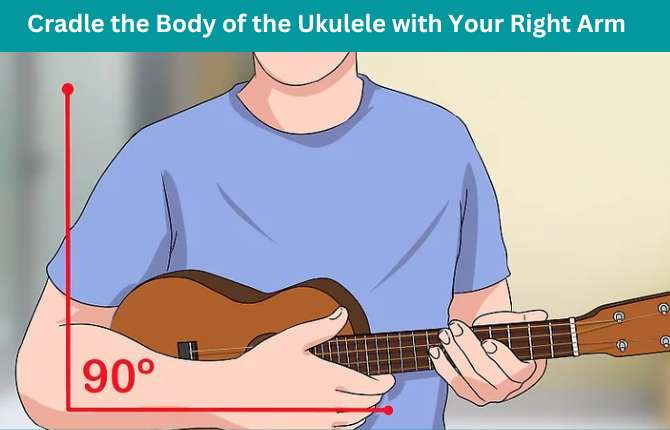
Your grip should be relaxed. You're not squeezing the life out of the ukulele, just holding it securely. A good test is to see if you can briefly let go with your fretting hand without the ukulele slipping.
3. Angling the Ukulele for Comfort and Access
The ukulele should not be held perfectly horizontal like a guitar, nor should it be vertical. Finding the right upward angle is key for both wrist comfort and easy access to the fretboard.
A fantastic way to visualize this is the "clock analogy."
How To Hold The Ukulele - Ukulele School
To understand the best angle for your ukulele, watch this short segment from the video 'How To Hold The Ukulele' by Bernadette Teaches Music. She provides a simple and effective 'clock analogy'.
Watch from 01:04 to 01:58. Pay attention to how she uses the clock face to find a comfortable angle, typically around '10 o'clock'.
This angled position does two important things:
- It keeps your fretting hand's wrist in a more neutral, straight position.
- It makes it easier for your fingers to approach the frets correctly.
A Critical Habit to Avoid: Many beginners are tempted to tilt the face of the ukulele up towards them so they can see their fingers. Do not do this. This forces your fretting wrist into a sharp, unnatural angle, leading to strain and limiting your finger movement. Trust the fret markers on the side of the neck to guide you.
How To Hold Your Ukulele - Beginner Lesson On Form And Posture
This next clip, from 'How To Hold Your Ukulele' by Lara Markowitz, clearly explains why you should keep the instrument facing outward and how to use the fret dots as your guide.
Watch from 02:54 to 04:02. Notice the comparison between the incorrect, upward-tilted position and the correct, outward-facing position.
4. The Fretting Hand: Light Support and Mobility
With your right arm securing the instrument, your left hand is now free to focus on its main job: fretting notes. It should only provide light, secondary support to the neck.
For an in-depth look at the correct fretting hand position, please read the following article.
How to Hold an Ukulele: Posture Tips
The article 'How to Hold an Ukulele: Posture Tips' from Live Ukulele provides excellent details on fretting hand technique, complete with helpful photos.
Read the section titled 'Fretting Arm/Hand:'. Focus on the advice regarding thumb placement, wrist alignment, and the importance of trimmed fingernails.
Key points for your fretting hand:
- Thumb Position: Place the pad of your thumb on the back of the neck, roughly behind your index or middle finger. This acts as a pivot and anchor, maximizing your fingers' reach. Avoid wrapping your thumb over the top of the neck.
- Wrist: Keep your wrist as straight as possible, in line with your forearm.
- Fingers: Your fingers should arch over the fretboard, ready to press down with the fingertips.
- Fingernails: Keep the nails on your fretting hand trimmed short. Long nails will prevent you from pressing the strings down cleanly.
Test your understanding!
You're trying to play a chord, but you hear a buzzing sound. You notice your fretting hand is getting tired very quickly. Based on this lesson, what are two likely posture-related causes for this problem?
Show answer
- Gripping the neck too hard: Your fretting hand might be trying to hold the weight of the ukulele instead of letting your strumming arm do the work. This creates tension, reduces mobility, and causes fatigue.
- Improper finger/nail position: If your fingers are too flat or your nails are too long, you won't be able to press the string firmly against the fret, resulting in a buzz. The solution is to arch your fingers and use your fingertips, ensuring your nails are short.
5. Using a Strap for Ultimate Stability
For anyone serious about developing advanced technique, a strap is highly recommended, even when sitting. A strap completely removes the burden of supporting the instrument from your arms, allowing both hands to move with maximum freedom and relaxation. This will be invaluable as you progress to faster and more intricate fingerpicking and strumming.
How To Hold Your Ukulele - Beginner Lesson On Form And Posture
This final clip, also from Lara Markowitz, explains the benefits of using a strap and shows the common types.
Watch from 00:57 to 02:12. Consider this an investment in your long-term progress.
Practice Drill: Building Muscle Memory
Your goal is to make this correct posture second nature. Spend about 10-15 minutes on this drill.
- Sit or stand in front of a mirror to check your form.
- Get into position:
- Back straight, shoulders relaxed.
- Place the ukulele against your body.
- Cradle the body with your right forearm, finding a firm but relaxed pressure.
- Angle the neck up to about "10 o'clock."
- The Support Test: Slowly take your left hand completely away from the neck. The ukulele should remain securely in place. If it slips, adjust the pressure and position of your right forearm.
- Fretting Hand Placement: Bring your left hand back to the neck. Place your thumb on the center of the back of the neck. Let your fingers curve naturally over the fretboard. Check your wrist—is it straight?
- Hold and Relax: Hold this position for 30 seconds. Feel the points of contact and consciously relax any tension in your shoulders, arms, or hands.
- Reset: Put the ukulele down for a moment, shake out your arms, and then repeat the process 5-10 times.
This exercise isn't about playing notes; it's about programming the correct physical posture into your muscle memory.
Conclusion
Congratulations on completing your first lesson! You've established the physical foundation upon which all your future skills will be built.
Key Takeaways:
- Good posture (straight back, relaxed shoulders) is non-negotiable.
- The strumming arm (right arm) is the primary support, cradling the body of the ukulele.
- The fretting hand (left hand) should be relaxed, with the thumb behind the neck, to ensure mobility.
- Angle the ukulele upwards (to about 10 o'clock) and resist the urge to tilt it towards you to see your fingers.
- A strap is a powerful tool for stability and freedom of movement.
In our next lesson, we'll get your instrument ready to play by learning how to tune the ukulele using a tuner to standard GCEA tuning. Once it's in tune, we'll be ready to start making music.