Introduction
Hello! In our last lesson, we saw how to leverage the compiler's auto-vectorizer to generate high-performance code. We learned that by using the right flags, like -O3 and -march=native, we can often get significant speedups automatically. However, we also saw that auto-vectorization has its limits. Compilers can be conservative and may fail to vectorize loops with complex dependencies, pointer aliasing, or non-obvious patterns.
This is where you, the programmer, take back control. Today, we move from guiding the compiler to instructing it directly. Our learning outcome is to rewrite a simple C++ loop using SIMD intrinsics to perform manual vectorization.
Intrinsics are special functions provided by the compiler that map almost one-to-one with the CPU's assembly instructions. They allow you to harness the full power of SIMD from within your C++ code, giving you fine-grained control without the complexity of writing raw assembly. The performance gains can be substantial, as shown in this real-world example of a HyperLogLog merge operation.
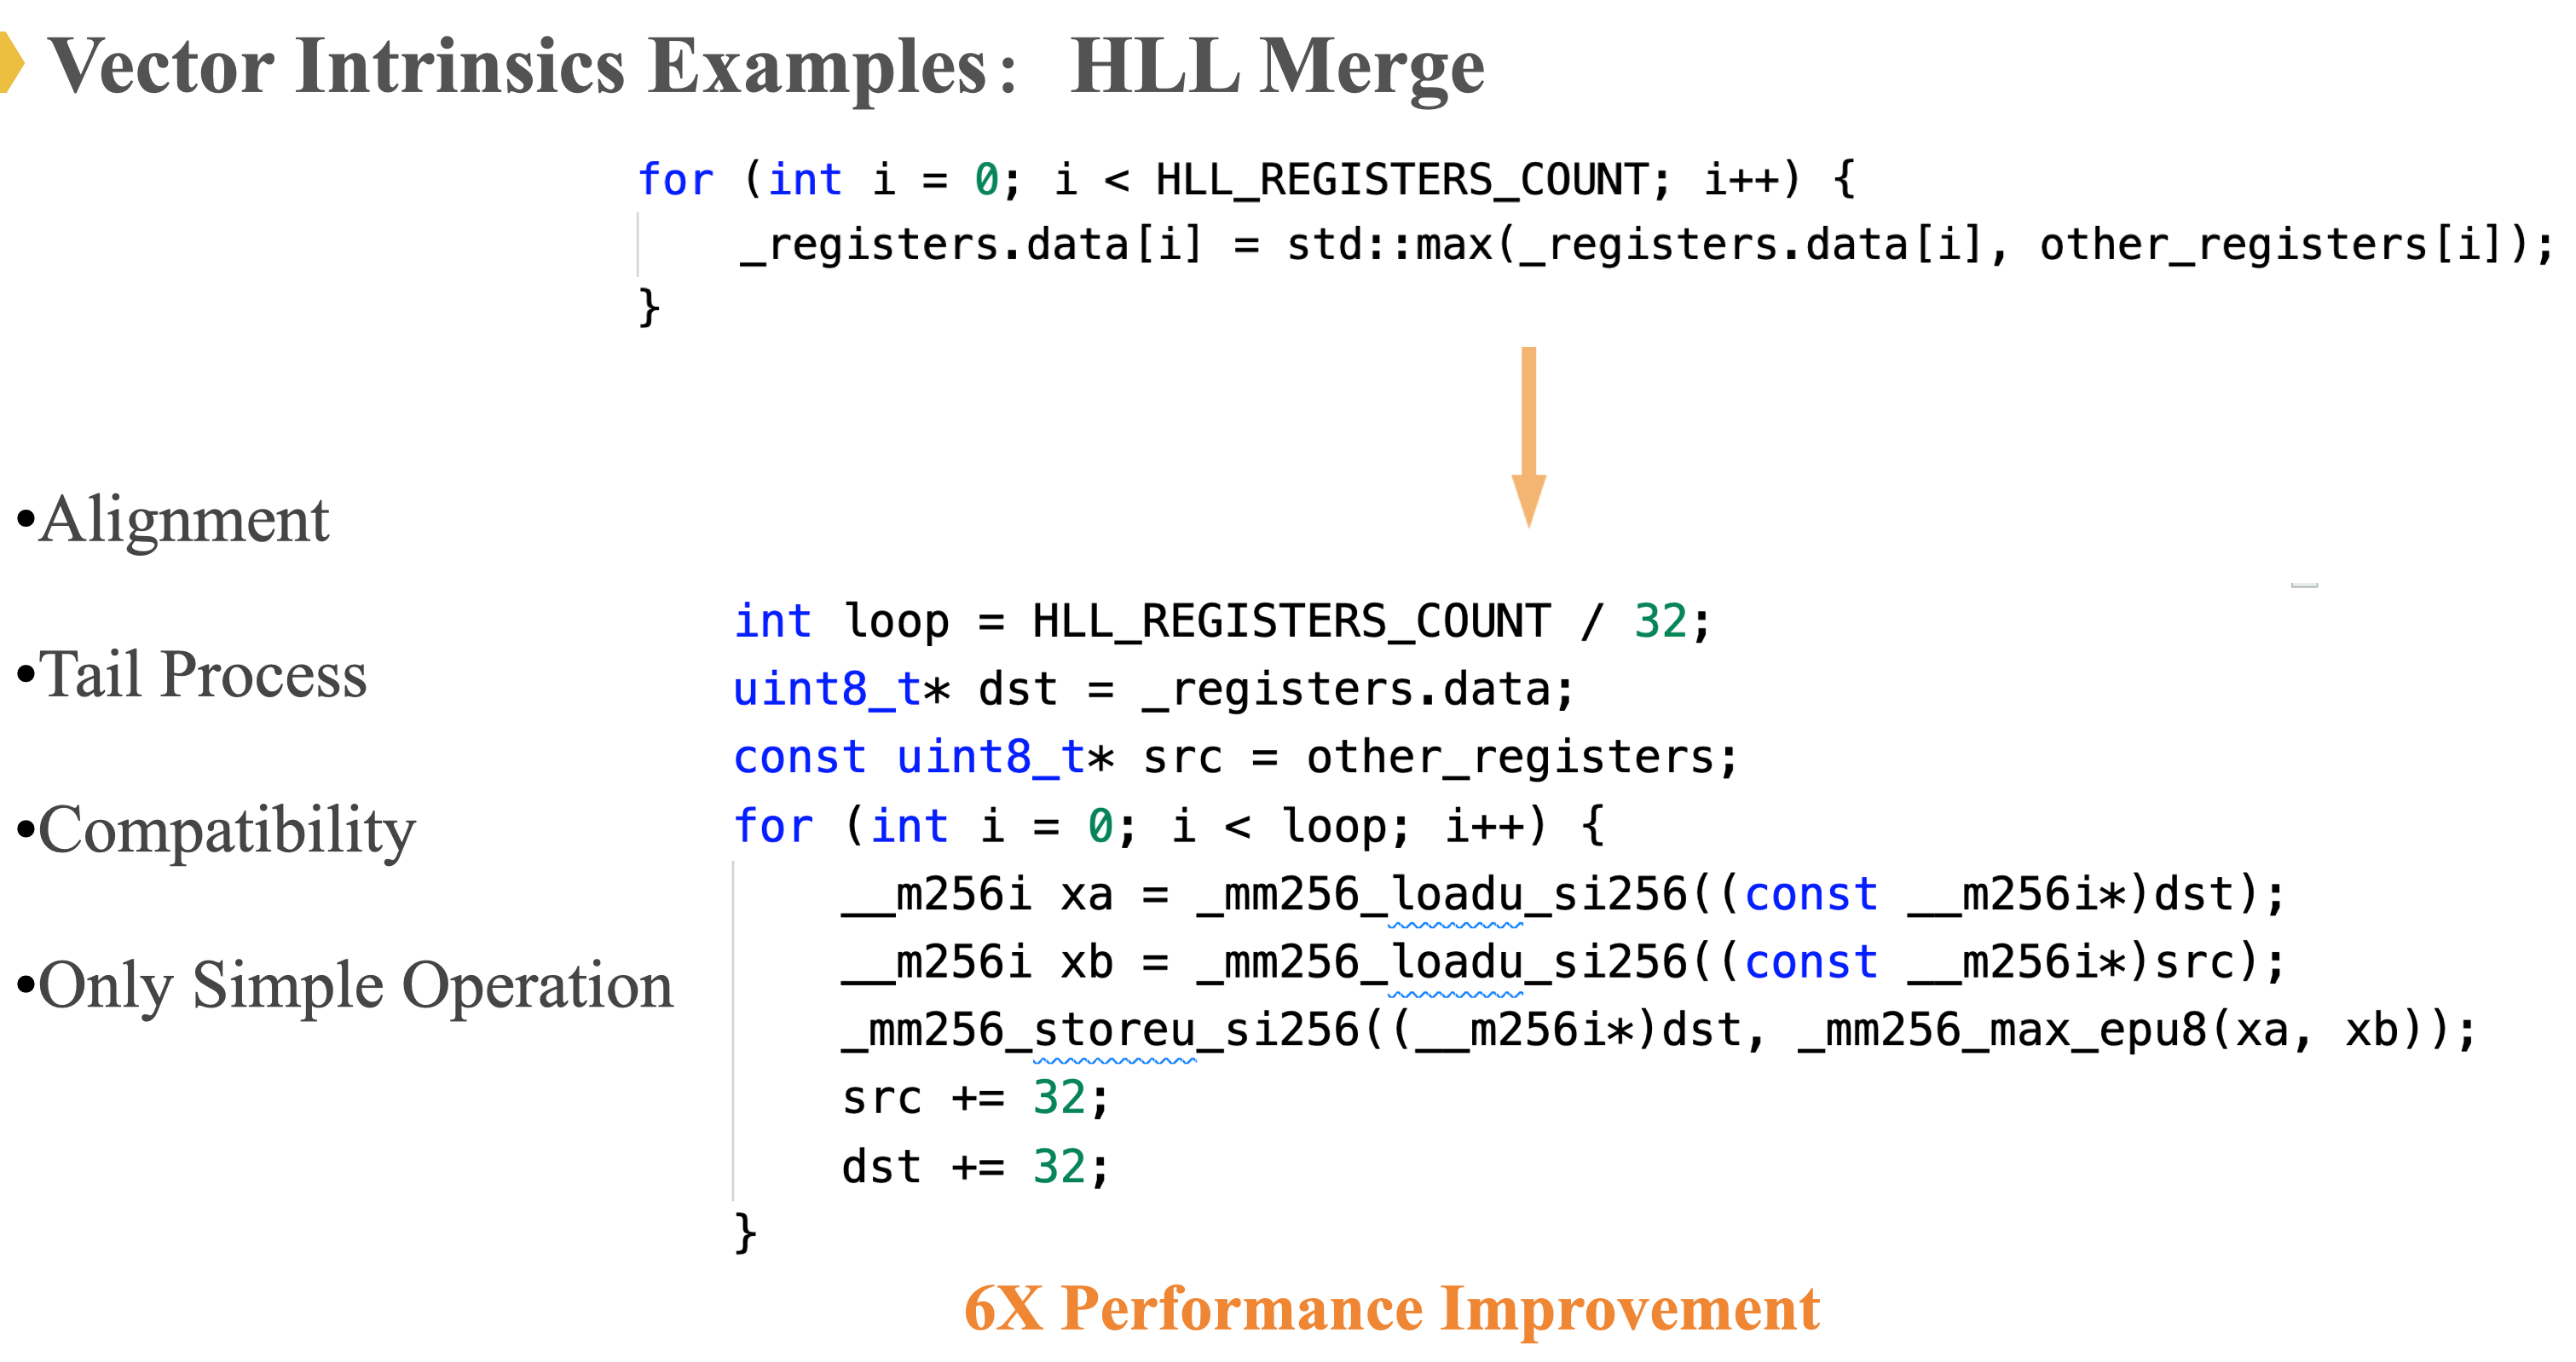
This lesson will equip you with the fundamental skills to start writing such high-performance code yourself.
The World of SIMD Intrinsics
Before we write any code, let's clarify what intrinsics are and the hardware they control. Modern x86 CPUs include several generations of SIMD instruction sets, each with progressively wider registers and more powerful operations.
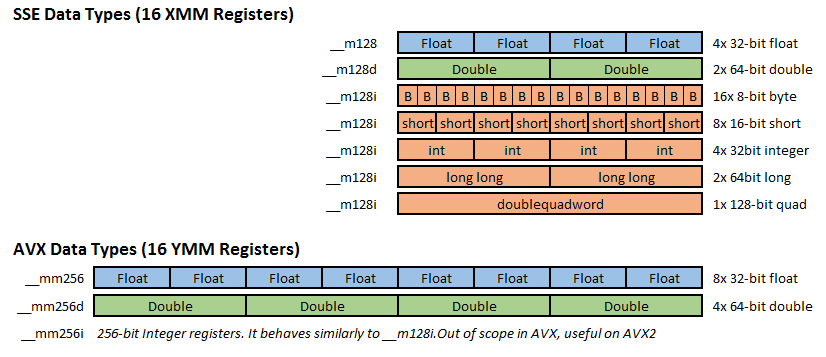
As you can see, the key is to pack multiple data elements into these wide registers and process them in parallel. While there are many instruction sets (MMX, SSE, AVX, AVX-512), we will focus on AVX (Advanced Vector Extensions), which uses 256-bit registers and is widely supported on modern processors.
The following video gives an excellent overview of SIMD, the different ways to use it, and why intrinsics offer a great balance of performance and programmability.
SIMD and vectorization using AVX intrinsic functions (Tutorial)
This video provides a conceptual introduction to SIMD, contrasts it with multithreading, and explains the role of intrinsics as a middle ground between compiler auto-vectorization and raw assembly.
Please watch from the beginning to 05:14 and then from 08:43 to 12:55. You'll get a solid foundation on what SIMD is and a clear explanation of how intrinsics work.
Your SIMD Toolbox: Headers, Data Types, and Naming
To start using intrinsics, you need three things: the right header, special data types for the vector registers, and an understanding of the function naming convention.
-
Header File: Nearly all x86 intrinsics can be accessed by including a single header.
#include <immintrin.h> -
Data Types: You'll use special data types that represent the SIMD registers. For AVX (256-bit), the most common are:
__m256: Holds eight 32-bit single-precision floats.__m256d: Holds four 64-bit double-precision floats.__m256i: Holds integer data (e.g., eight 32-bit integers or thirty-two 8-bit chars).
-
Naming Convention: Intrinsic function names can look intimidating, but they follow a logical pattern. Let's decode
_mm256_add_ps:_mm<width>: The prefix indicates the register width._mm_for 128-bit (SSE) and_mm256_for 256-bit (AVX).<operation>: A descriptive name for the instruction, likeadd,mul,load,store._<data_type_suffix>: A suffix indicating the data type being operated on.ps: Packed Single-precision (vectors offloat).pd: Packed Double-precision (vectors ofdouble).epi*,epu*: Extended Packed Integers (e.g.,epi32for 32-bit signed integers).
This video section provides a great breakdown of these naming conventions.
SIMD and vectorization using AVX intrinsic functions (Tutorial)
Understanding the naming convention is key to finding the right intrinsic for your task. This segment breaks it down clearly.
Watch from 21:12 to 23:54. The presenter explains the prefix, function description, and data type suffix that make up an intrinsic's name.
From Scalar to Vector: A Practical Example
Let's apply these concepts by rewriting a simple loop that adds two arrays. This is the same "hello world" of vectorization we used in the last lesson.
The Scalar Code:
void add_arrays_scalar(float* A, float* B, float* C, size_t count) {
    for (size_t i = 0; i < count; i++) {
        C[i] = A[i] + B[i];
    }
}
This loop performs one addition per iteration. Our goal is to perform eight additions at once using AVX.
The process involves three main steps inside the loop:
- Load a chunk of data from the input arrays into 256-bit registers.
- Operate on the data in the registers (in this case, add them).
- Store the result from the register back into the output array.
A crucial fourth step is handling the "tail"—the elements at the end of the array if the count is not a perfect multiple of 8.
The following video provides a fantastic, step-by-step walkthrough of how to implement exactly this.
What Are SIMD Instructions? (With a Code Example) [DSP #14]
This is a practical coding demonstration that will guide you through vectorizing an array addition loop, including the critical step of handling leftover elements.
Watch from 13:18 to 21:04. The video shows how to: Include the header. Calculate how many elements can be processed with SIMD. Write the main vectorized loop using load, add, and store intrinsics. Write a second, scalar loop to process the remaining elements.
Here is the complete C++ code for an AVX implementation, which reflects the logic you just saw in the video.
#include <immintrin.h> // Include for intrinsics
#include <vector>

void add_arrays_avx(float* C, const float* A, const float* B, size_t count) {
    size_t i = 0;

    // AVX handles 8 floats at a time
    const size_t vector_width = 8;

    // Vectorized part: process chunks of 8
    for (; i + vector_width <= count; i += vector_width) {
        // Load 8 floats from A and B into YMM registers
        __m256 vA = _mm256_loadu_ps(A + i);
        __m256 vB = _mm256_loadu_ps(B + i);

        // Add the two vectors of 8 floats
        __m256 vC = _mm256_add_ps(vA, vB);

        // Store the 8 resulting floats into C
        _mm256_storeu_ps(C + i, vC);
    }

    // Scalar part: process the remaining elements one by one
    for (; i < count; i++) {
        C[i] = A[i] + B[i];
    }
}
Notice the use of _mm256_loadu_ps and _mm256_storeu_ps. The u stands for "unaligned". These versions do not require the memory address to be aligned to a specific boundary (e.g., 32 bytes for AVX), making them more general but potentially slightly slower on older hardware. For most modern CPUs, the performance difference is negligible, making them a safe default.
A Glimpse of Other Operations
Addition is just the beginning. The intrinsics library provides a rich set of functions for all kinds of computations. You don't need to memorize them all, but it's useful to know what's available.
Here are some key categories:
- Arithmetic:
_mm256_add_ps,_mm256_sub_ps,_mm256_mul_ps,_mm256_div_ps. - Fused Multiply-Add (FMA): A very powerful instruction like
_mm256_fmadd_ps(a, b, c)calculates(a * b) + cin a single step, effectively doubling throughput for operations like dot products. - Initialization:
_mm256_setzero_ps()creates a vector of all zeros._mm256_set1_ps(value)creates a vector where all elements arevalue. - Comparisons:
_mm256_cmp_ps(a, b, predicate)compares elements and produces a mask of all ones (true) or all zeros (false). - Logical Operations:
_mm256_and_ps,_mm256_or_ps,_mm256_xor_psare often used to combine masks from comparisons to implement conditional logic without branching. - Data Rearrangement:
permuteandshuffleintrinsics let you reorder elements within a vector. These are essential for more advanced algorithms like matrix multiplication.
Being aware of these categories will help you recognize opportunities for vectorization in your own code. The Intel Intrinsics Guide is the definitive interactive reference for all available instructions.
Conclusion
Congratulations! You have taken a significant step from being a user of compiler optimizations to being an active director of the CPU's hardware. Manual vectorization with intrinsics is a powerful technique that gives you the performance of low-level programming with the convenience of C++.
Key Takeaways:
- Intrinsics are C++ functions that map to SIMD assembly instructions, providing direct control over vector processing.
- The basic workflow for vectorizing a loop is Load -> Operate -> Store.
- To get started, you need the
<immintrin.h>header and special data types like__m256. - Intrinsic names follow a predictable pattern:
_mm<width>_<op>_<type>. - Handling the remainder (tail) with a scalar loop is essential for creating correct, general-purpose vectorized functions.
Preview of the Next Lesson
You now have two powerful optimization tools in your arsenal: auto-vectorization and manual vectorization. But with great power comes the need for great precision. How do you find the parts of a large, complex application that would benefit most from these techniques? Applying optimizations blindly is inefficient.
In our next lesson, we will address this by learning how to profile C++ code to identify performance bottlenecks using tools like gprof or perf. This will enable you to focus your optimization efforts where they will have the greatest impact.