Introduction
Hello! In our last lesson, we explored the "what" and "why" of SIMD and vector processing, understanding how modern CPUs can perform the same operation on multiple pieces of data simultaneously to boost performance. We identified three ways to leverage this power: compiler auto-vectorization, intrinsics, and direct assembly programming.
Today, we're diving into the most accessible of these methods: auto-vectorization. Our goal is to learn how to use compiler flags and diagnostic reports to enable and verify auto-vectorization of a C++ loop. You'll learn how to tell the compiler not just to optimize your code, but to specifically target your machine's hardware capabilities. More importantly, you'll learn how to check the compiler's work to confirm that vectorization actually happened and see the performance benefits.
This lesson is very hands-on and bridges the gap between the architectural theory we've discussed and the practical code optimization you'll perform in your work.
Enabling Auto-Vectorization with Compiler Flags
Compilers are incredibly sophisticated tools, but they don't always enable their most aggressive optimizations by default. Often, we need to guide them with specific instructions, known as compiler flags.
Let's consider a simple C++ program that adds two vectors. We will use this as our running example.
// vector_add.cpp


#include <vector>
#include <iostream>
#include <chrono>

void vector_add(std::vector<float>& c, const std::vector<float>& a, const std::vector<float>& b) {
    for (size_t i = 0; i < a.size(); ++i) {
        c[i] = a[i] + b[i];
    }
}

int main() {
    const int N = 10000000; // 10 million elements
    std::vector<float> a(N, 1.0f);
    std::vector<float> b(N, 2.0f);
    std::vector<float> c(N, 0.0f);

    auto start = std::chrono::high_resolution_clock::now();
    vector_add(c, a, b);
    auto end = std::chrono::high_resolution_clock::now();

    std::chrono::duration<double, std::milli> elapsed = end - start;
    std::cout << "Time: " << elapsed.count() << " ms\n";

    // A small check to prevent the loop from being optimized away
    std::cout << "Result check: c[0]=" << c[0] << ", c[end]=" << c[N-1] << std::endl;

    return 0;
}
Optimization Levels and Vectorization
Compilers like GCC and Clang have standard optimization levels, specified with flags like -O0 (no optimization), -O1, -O2, and -O3. While -O2 is a common default for release builds, -O3 enables more aggressive optimizations, including, traditionally, auto-vectorization. More recent versions of GCC (12+) and Clang enable auto-vectorization at -O2.
However, simply using -O3 might not be enough. By default, compilers generate code that will run on a wide range of processors, which means they can only use older, more common SIMD instruction sets (like SSE2). To unlock the full potential of your CPU, you need to tell the compiler what specific architecture it can target.
The -march=native flag instructs the compiler to detect the CPU of the machine you are compiling on and generate code optimized for it, using the most advanced instruction sets available (e.g., AVX2, AVX-512).
The following video provides an excellent walkthrough of this process. It demonstrates compiling a dot product example, first without vectorization, then with a basic vectorization flag, and finally with architecture-specific tuning.
This video will show you the practical steps of enabling auto-vectorization and the dramatic performance impact of using the right compiler flags.
Please watch from 06:20 to 11:55. The first part (06:20-08:48) shows how to enable vectorization using the -ftree-vectorize flag in g++ and the resulting performance boost. The second part (08:48-11:55) introduces the -march=native flag and demonstrates an even greater performance gain by allowing the compiler to use wider, more modern SIMD registers (ymm).
As you saw, the combination of a high optimization level (-O2 or -O3) and architecture-specific tuning (-march=native) is key to getting the compiler to generate highly efficient vectorized code.
Verifying Auto-Vectorization
Enabling the flags is the first step, but how do we know if the compiler was successful? A loop might have data dependencies or a structure that prevents vectorization. We need to get feedback from the compiler. There are two main ways to do this:
- Compiler Diagnostic Reports: Asking the compiler to tell us what it did.
- Inspecting the Assembly Code: Looking at the generated machine code for proof.
1. Using Diagnostic Reports
This is the most direct method. You can ask the compiler to report on its optimization decisions. The flags differ between GCC and Clang.
For GCC:
You can use the -fopt-info-vec flag. To see what failed to vectorize and why, use -fopt-info-vec-missed.
# Compile with GCC and ask for vectorization reports
g++ -O3 -march=native -fopt-info-vec vector_add.cpp -o vector_add_gcc
When you compile, GCC will print messages to your console, indicating which loops were vectorized. For our vector_add.cpp example, you would see something like:
vector_add.cpp:6:9: note: loop vectorized
This tells you that the loop at line 6, column 9 was successfully vectorized.
For Clang:
Clang uses a different set of flags, prefixed with -Rpass.
-Rpass=loop-vectorize: Reports on successfully vectorized loops.-Rpass-missed=loop-vectorize: Reports on loops that failed to vectorize.-Rpass-analysis=loop-vectorize: Provides an analysis of why a loop could not be vectorized.
# Compile with Clang and ask for vectorization reports
clang++ -O3 -march=native -Rpass=loop-vectorize vector_add.cpp -o vector_add_clang
Clang's output will look like this:
vector_add.cpp:6:5: remark: vectorized loop (vectorization width: 8, interleaved count: 2) [-Rpass=loop-vectorize]
This confirms vectorization and gives you extra details like the vectorization width (how many elements are processed in parallel).
These diagnostic reports are your first and most important tool for verification. To learn more about the flags and reasons for vectorization failure, the official documentation is invaluable.
For Clang users, this documentation from LLVM is the definitive guide to its vectorizer flags and diagnostics. For GCC, the Red Hat article provides a similar overview.
Please read the section 'Diagnostics'. It details the -Rpass flags we just discussed and shows an example of a message for a failed vectorization attempt. This will take about 5 minutes.
The Red Hat article "Vectorization optimization in GCC" (resource LINK), particularly the "Conclusion" section, also mentions the -fopt-info-missed and -fdump-tree-vect-details flags for GCC.
2. Inspecting the Assembly Code
Diagnostic reports are great, but the ultimate proof is in the assembly code. While you don't need to be an assembly expert, learning to recognize the difference between scalar and vector instructions is a powerful skill.
- Scalar Code: Operates on general-purpose registers (like
eax,rdi) and uses scalar instructions (e.g.,addss- Add Scalar Single-precision float). - Vectorized Code: Operates on wide SIMD registers (
xmm,ymm,zmm) and uses "packed" instructions (e.g.,vaddps- Vector Add Packed Single-precision floats).
The Parallel C++: Vectorization video you watched earlier provided a great visual demonstration of this. Let's revisit it, this time focusing specifically on the assembly output.
This video segment contrasts the assembly code generated with and without vectorization. Pay close attention to the registers and instruction names.
Rewatch from 05:07 to 11:55, but this time, pause and examine the assembly code shown by the perf report tool. In the non-vectorized version (05:07), notice the scalar mulsd and addsd instructions. In the first vectorized version (07:35), see the switch to xmm registers and packed instructions (mulpd, addpd). In the -march=native version (10:18), notice the change to even wider ymm registers, processing eight integers at once.
This pattern—the appearance of xmm/ymm/zmm registers and instructions ending in ps (packed single) or pd (packed double)—is the smoking gun for vectorization.
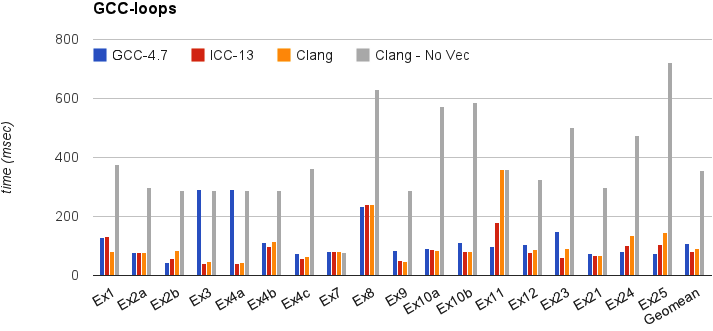
This chart visually reinforces the performance gains you get when the compiler successfully generates this vectorized code.
When Auto-Vectorization Fails
The compiler can only vectorize a loop if it can prove there are no loop-carried dependencies. This means that one iteration of the loop must not depend on the result of a previous iteration.
Consider this loop:
// This loop has a dependency and CANNOT be vectorized
for (int i = 1; i < N; ++i) {
    A[i] = A[i-1] + B[i];
}
The calculation for A[i] depends on A[i-1], which was calculated in the previous iteration. This sequential dependency breaks the parallel nature of SIMD, and the compiler will refuse to vectorize it.
Another common issue is pointer aliasing. If a function takes two pointers, the compiler can't be sure they don't point to overlapping memory regions, which could create a hidden dependency.
Vectorization optimization in GCC
This article provides excellent, simple C++ examples of loops that can and cannot be vectorized, explaining the reasoning behind each case.
Read the section 'Other examples'. Pay special attention to function f3, which demonstrates the pointer aliasing problem, and function f9, which shows a loop-carried dependency. This will help you build an intuition for what makes a loop difficult for a compiler to vectorize.
If you compile code with these kinds of issues using the diagnostic flags, the compiler will tell you exactly why it gave up. For the dependency example above, GCC might say:note: dependence present.
This feedback is invaluable for refactoring your code into a more vectorization-friendly form.
Conclusion
You've now learned the essential skills to control and verify compiler auto-vectorization, a fundamental technique for single-core performance optimization.
Key Takeaways:
- Enable with Flags: Use high optimization levels (e.g.,
-O3) combined with-march=nativeto allow the compiler to generate the best possible code for your specific machine. - Verify with Diagnostics: Use compiler-specific flags (
-fopt-info-vecfor GCC,-Rpass=loop-vectorizefor Clang) to get direct feedback on which loops were vectorized and which were not. - Check the Assembly: For definitive proof, inspect the generated assembly code. Look for the use of SIMD registers (
xmm,ymm,zmm) and packed instructions. - Beware of Dependencies: Auto-vectorization can fail if the compiler cannot prove that loop iterations are independent. Loop-carried dependencies and potential pointer aliasing are common culprits.
Preview of the Next Lesson
Auto-vectorization is powerful, but it's not foolproof. What do you do when the compiler fails to vectorize a critical loop, or when you want more fine-grained control over the generated instructions? In our next lesson, we will answer that question by learning how to rewrite a simple C++ loop using SIMD intrinsics to perform manual vectorization. This will give you direct access to the CPU's vector instructions from within your C++ code.