Hello! Welcome back to our CUDA module.
In our last lesson, we focused on the crucial task of managing memory in a CUDA application. You learned how to allocate memory on the GPU using cudaMalloc, free it with cudaFree, and transfer data between the host and device using cudaMemcpy. We established the complete data lifecycle, but left a gap in the middle: the actual computation.
Today, we fill that gap. This lesson covers how to write the function that runs on the GPU—the kernel—and how to launch it from the host. We will bring together all the pieces to create our first complete, parallel program: an element-wise vector addition.
By the end of this lesson, you will be able to write a basic CUDA kernel, configure its launch parameters, and execute it on the GPU to perform a simple parallel computation.
1. Writing a CUDA Kernel
A kernel is a C++ function that is executed by many GPU threads in parallel. To distinguish it from regular C++ functions that run on the host (CPU), we use a special CUDA keyword.
The __global__ Keyword
You declare a function as a CUDA kernel by using the __global__ specifier before its return type. This tells the CUDA compiler (nvcc) two things:
- This function will be executed on the device (GPU).
- It can be called from the host (CPU).
Here is the skeleton of our vector addition kernel:
__global__ void vectorAdd(float *A, float *B, float *C, int N) {
    // Kernel code goes here
}
Notice that the parameters are pointers to device memory (which you allocated with cudaMalloc) and a simple integer passed by value.
Unique Identification: The Core of Parallelism
Imagine you've hired thousands of workers to assemble a product, where each product has a unique serial number. To work efficiently, the first thing each worker needs to know is which serial number they are responsible for.
It's the same for GPU threads. When we launch our kernel, thousands of threads will execute the exact same code. To ensure each thread operates on a different element of our vectors, it must calculate its own unique, global ID.
CUDA provides built-in variables for this purpose:
threadIdx: Adim3variable containing the index of the thread within its block.blockIdx: Adim3variable containing the index of the block within the grid.blockDim: Adim3variable containing the dimensions of the block (i.e., the number of threads per block).
For a 1D problem like vector addition, we can use the .x component of these variables to compute a unique global index for each thread:
This formula is fundamental to CUDA programming. It works like this: blockIdx.x * blockDim.x calculates the starting index for the current block, and threadIdx.x provides the offset within that block.
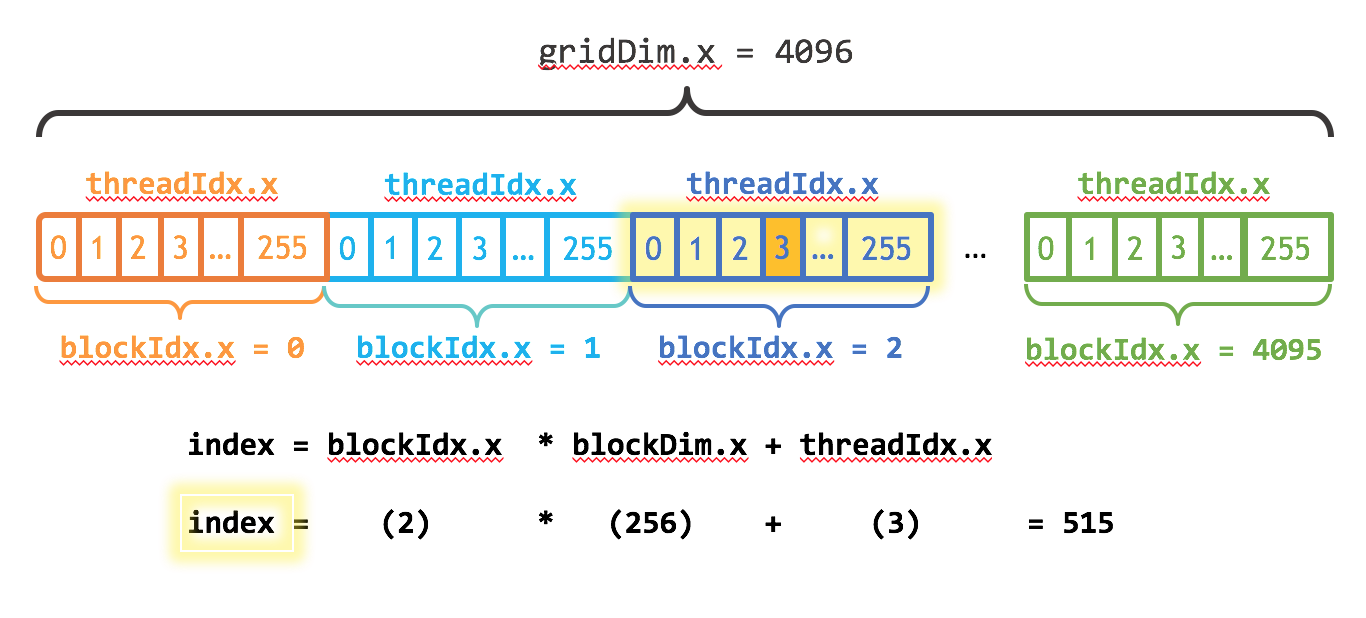
For a more detailed visual explanation of this critical concept, please watch the following video.
Intro to CUDA (part 4): Indexing Threads within Grids and Blocks
This video from Josh Holloway provides a clear, step-by-step breakdown of how the global thread index is calculated, reinforcing the formula with examples.
Watch from the beginning to 04:09. The video explains why a unique index is needed and then systematically deconstructs the indexing formula with visual aids.
The vectorAdd Kernel, Complete
Now we can write the full kernel. Each thread will calculate its unique index i, check if that index is within the bounds of our arrays, and if so, perform the addition for that element.
__global__ void vectorAdd(const float *A, const float *B, float *C, int numElements) {
    // Calculate the unique global thread index
    int i = blockIdx.x * blockDim.x + threadIdx.x;

    // Boundary check: Make sure we don't access memory out of bounds
    if (i < numElements) {
        C[i] = A[i] + B[i];
    }
}
The boundary check if (i < numElements) is essential. We often launch slightly more threads than elements for convenience (e.g., rounding up to a full block). This if statement ensures that those extra threads do nothing, preventing them from accessing invalid memory, which would cause a crash or undefined behavior. Your C++ experience with array bounds will make the importance of this check immediately clear.
2. Launching a Kernel
With the kernel written, we now need to launch it from our host code. This is done by calling the kernel function, but with a special execution configuration syntax: the triple angle brackets <<<...>>>.
kernel_name<<<blocksPerGrid, threadsPerBlock>>>(argument1, argument2, ...);
You need to specify two parameters:
blocksPerGrid: The number of thread blocks to launch in the grid.threadsPerBlock: The number of threads to launch in each block.
The total number of threads launched will be blocksPerGrid * threadsPerBlock.
How do we choose these values?
threadsPerBlock: A good starting point is a multiple of 32 (the size of a "warp," the fundamental unit of execution scheduling on NVIDIA GPUs). Common choices are 128, 256, or 512. There is a hardware limit, typically 1024 threads per block. Let's pick 256 for our example.blocksPerGrid: This is calculated to ensure we have enough threads to cover allnumElements. A standard way to do this is with integer arithmetic that performs a ceiling division:
(numElements + threadsPerBlock - 1) / threadsPerBlock
So, the host code to launch our vectorAdd kernel would look like this:
// Define the vector size
int numElements = 50000;

// Set the number of threads per block
int threadsPerBlock = 256;

// Calculate the number of blocks in the grid
int blocksPerGrid = (numElements + threadsPerBlock - 1) / threadsPerBlock;

// Launch the kernel!
vectorAdd<<<blocksPerGrid, threadsPerBlock>>>(d_A, d_B, d_C, numElements);
With numElements = 50000 and threadsPerBlock = 256, this would launch (50000 + 255) / 256 = 196 blocks. The total number of threads is 196 * 256 = 50176, which is why the boundary check inside the kernel is so important.
3. The Complete CUDA Program
We've now covered all the individual steps. Let's put them together to see the full picture of a CUDA program, from memory setup to final cleanup.
The following text-based tutorial provides an excellent walkthrough of a complete vector addition program. It reinforces the concepts we've just discussed and places them in the context of a full, working example.
Tutorial: Your First CUDA Program - Vector Addition
This tutorial, 'Your First CUDA Program', will guide you through a complete vector addition example, explaining each part of the code.
Please read the following sections from the article: 'The CUDA Programming Model': This gives a high-level overview of the workflow. 'Dissecting the Kernel Function': This covers the __global__ function and thread indexing, reinforcing what we just discussed. 'Launching the Kernel': This details the <<<...>>> syntax and execution configuration.
Now, let's tie everything from this lesson and the previous one into a single, cohesive code structure.
The Full Workflow:
- Host: Allocate memory for vectors
h_A,h_B,h_Con the CPU usingmalloc. Initializeh_Aandh_B. - Device: Allocate memory for vectors
d_A,d_B,d_Con the GPU usingcudaMalloc. - H -> D Copy: Copy input data from
h_Aandh_Btod_Aandd_BusingcudaMemcpywithcudaMemcpyHostToDevice. - Execute: Define launch parameters (
threadsPerBlock,blocksPerGrid) and launch thevectorAddkernel:vectorAdd<<<...>>>(d_A, d_B, d_C, N). - D -> H Copy: Copy the result from
d_Cback toh_CusingcudaMemcpywithcudaMemcpyDeviceToHost. - Cleanup: Free all device memory using
cudaFreeand all host memory usingfree. - Verify: (Optional but recommended) Check that the results in
h_Care correct.
The video below walks through this entire process from start to finish. Watching it will help solidify your understanding of how all these pieces fit together.
CUDA Crash Course: Vector Addition
This 'CUDA Crash Course' video by Nick provides a practical demonstration of the entire vector addition program.
Please watch from 04:53 to 12:10. This segment covers: cudaMalloc and cudaMemcpy (a quick review). Calculating grid and block sizes. The kernel launch syntax. The kernel implementation with thread indexing and boundary check.
For reference, the gpuVectorSum.cu file detailed in the "Summation of Arrays on GPUs" section of the MolSSI Education resource (LINK) is a complete, runnable example that you can also study to see these concepts applied in a full program.
Conclusion
Congratulations! You have now learned how to write and launch a simple parallel algorithm on the GPU. We've bridged the gap between managing data and performing computations, giving you a complete end-to-end framework for CUDA programming.
Key Takeaways:
- Kernels: Functions marked with
__global__run in parallel on the GPU and are called from the host. - Thread Indexing: The formula
blockIdx.x * blockDim.x + threadIdx.xis the standard way for a thread to compute its unique global ID in a 1D grid. - Kernel Launch: The
<<<grid, block>>>syntax specifies the execution configuration, defining the total number of threads to be launched. - Boundary Checks: Always include a check like
if (thread_id < num_elements)inside your kernel to ensure you don't access memory out of bounds.
In this lesson, our kernel accessed memory from a single pool on the GPU called "global memory." However, the GPU provides several different types of memory with different characteristics (size, speed, scope). In our next lesson, we will describe the different GPU memory spaces (global, shared, constant, registers) and their use cases, which is the first step toward optimizing the performance of your kernels.