Welcome back. In the previous lesson, you practiced treating Xcode’s diagnostics, breakpoints, and console output as evidence rather than guessing at a bug. Now you will give the PlantIdentifier app something meaningful to work with: a clearly shaped representation of a plant.
A plant name, scientific name, light requirement, and watering guidance belong together. Rather than passing several unrelated strings and numbers around, Swift lets you define one custom type that holds those related values. Over roughly 40 minutes, you will define a Plant struct, create plant instances, read their stored properties, and understand the practical consequences of structs being value types.
A struct gives related data a name and shape
A struct is a custom Swift type. It defines which pieces of information belong to one value and what type each piece has.
In Python, you might start with a dictionary such as:
plant = {
    "commonName": "Swiss cheese plant",
    "wateringIntervalDays": 7
}
That is flexible, but it is also easy to misspell a key or forget what kind of value belongs there. A Swift struct makes the expected shape explicit, and the compiler can check that code uses it correctly.
For this app, a Plant value can represent one coherent plant record:
struct Plant {
    let commonName: String
    let scientificName: String
    let lightRequirement: String
    var wateringIntervalDays: Int
}
Read this from top to bottom:
struct Plantcreates a new type namedPlant.- Each line inside the braces is a stored property: data actually held by every
Plantinstance. commonName,scientificName, andlightRequirementhold text, so their type isString.wateringIntervalDaysholds a whole number, so its type isInt.letmeans a property cannot change after initialization.varmeans a property is allowed to change, subject to a second rule we will cover shortly.
Swift naming conventions make declarations easier to scan:
| What you name | Convention | Examples |
|---|---|---|
| Type | UpperCamelCase | Plant, PlantResult, IdentificationHistory |
| Property or variable | lowerCamelCase | commonName, wateringIntervalDays |
If your C# experience included structs, the basic idea of a value type will be familiar. In Swift, structs are especially central: they are the usual starting point for app data models, including SwiftUI views themselves.
Watch Paul Hudson’s concise introduction before adding the model to the app. It establishes the terms property, instance, and initializer that you will use throughout the course.
How to create your own structs – Swift for Complete Beginners
Watch “How to create your own structs – Swift for Complete Beginners” by Paul Hudson. It introduces struct definitions, instance creation, and the vocabulary needed to read Swift models confidently.
Watch structs and instances to see a type defined and then used to create distinct values. Then skip to key terminology for the distinction between properties, methods, instances, and initializers. Focus on how values supplied during initialization become the properties stored in each instance.
The official Swift book provides a useful reference for the same ideas, including the value-copy behavior that will matter later in the lesson.
Structures and Classes | Documentation
Read the relevant parts of “Structures and Classes” from The Swift Programming Language. It is the primary reference for struct syntax, memberwise initialization, property access, and value semantics.
In “Definition Syntax,” read the naming and syntax guidance, then focus on the stored-property definition. In “Structure and Class Instances” and “Accessing Properties,” read instance creation and the dot-syntax examples that follow. In “Memberwise Initializers for Structure Types,” read the memberwise-initializer explanation. Finally, in “Structures and Enumerations Are Value Types,” read the complete hd and cinema example; the discussion of copy behavior explains an important implementation detail without changing what your code observes.
Define the app’s first data model
Create a separate source file for the model rather than putting every type into ContentView.swift.
In Xcode:
- Choose File > New > File.
- Choose Swift File and select Next.
- Name the file
Plant.swift. - Confirm that the
PlantIdentifierapp target is checked, then create the file. - Add this code:
struct Plant {
    let commonName: String
    let scientificName: String
    let lightRequirement: String
    var wateringIntervalDays: Int
}
This declaration creates a type, but not a particular plant yet. Think of Plant as the definition of what every plant record must contain.
Swift automatically creates a memberwise initializer for a struct whose stored properties have not been given custom initialization rules. That is why you can create a specific Plant like this:
let monstera = Plant(
    commonName: "Swiss cheese plant",
    scientificName: "Monstera deliciosa",
    lightRequirement: "Bright, indirect light",
    wateringIntervalDays: 7
)
This is an instance of Plant: one concrete value with its own stored data.
Notice a few details:
Plant(...)calls the initializer for thePlanttype.- The labels such as
commonName:make each supplied value clear. - Every property without a default value must receive an initial value.
- The values must match their declared types. For example,
"7"is text and cannot be used where Swift expects anInt.
The initializer does not determine whether a recommendation is botanically correct. It ensures only that the model has all required pieces of data and that they have compatible types. Domain validation will become important later when data comes from users, models, or web services.
Once a plant exists, use dot syntax to read its properties:
print(monstera.commonName)
// Swiss cheese plant

print(monstera.wateringIntervalDays)
// 7
The expression monstera.commonName means “read the commonName stored inside this particular monstera value.”
If you write monstera.commonname by mistake, Xcode reports a compiler error because Swift is case-sensitive. The debugging workflow from the previous lesson applies directly: inspect the first error, compare the unknown name with the declared property, correct the focused mistake, and build again.
Show the model in the current SwiftUI app
At this point, the model exists, but it is not yet visible. Use it to replace the temporary counter interface from the debugging lesson.
In ContentView.swift, keep import SwiftUI at the top and replace the rest of the file with:
import SwiftUI

struct ContentView: View {
    private let featuredPlant = Plant(
        commonName: "Swiss cheese plant",
        scientificName: "Monstera deliciosa",
        lightRequirement: "Bright, indirect light",
        wateringIntervalDays: 7
    )

    var body: some View {
        VStack(alignment: .leading, spacing: 8) {
            Text(featuredPlant.commonName)
                .font(.title)

            Text(featuredPlant.scientificName)

            Text("Light: \(featuredPlant.lightRequirement)")

            Text("Check soil about every \(featuredPlant.wateringIntervalDays) days.")
        }
        .padding()
    }
}

#Preview {
    ContentView()
}
Build and run with Command-R. You should see the plant details in the simulator.
There are two different uses of stored properties here:
Plantstores data about a plant: its name, light requirement, and care interval.ContentViewstores onePlantvalue infeaturedPlant.
For now, featuredPlant is declared with let because this screen is only displaying fixed sample content. It is not interactive state. In the SwiftUI module, you will learn @State for values that a view must change in response to user actions.
The visual formatting is not today’s subject; the important path is:
featuredPlant → featuredPlant.commonName → Text(...)
A view reads a property from a model and uses it to construct the interface. This simple pattern will continue when the app later displays a classification result, detailed care information, and identification history.
let, var, and what “mutable” really means
The choice between let and var appears in two places:
- Inside the struct definition, where it describes an individual property.
- When creating an instance, where it describes whether the entire struct value can change.
These are related but not interchangeable.
struct Plant {
    let commonName: String
    var wateringIntervalDays: Int
}
Here, commonName is permanently fixed after a Plant is created. By contrast, wateringIntervalDays is declared as a variable property, so it can represent user-adjustable care guidance.
However, changing a property of a struct also requires the instance itself to be stored in a variable:
var carePlan = Plant(
    commonName: "Swiss cheese plant",
    scientificName: "Monstera deliciosa",
    lightRequirement: "Bright, indirect light",
    wateringIntervalDays: 7
)

carePlan.wateringIntervalDays = 5
The new value of carePlan.wateringIntervalDays is now 5.
Contrast that with this:
let catalogPlant = Plant(
    commonName: "Swiss cheese plant",
    scientificName: "Monstera deliciosa",
    lightRequirement: "Bright, indirect light",
    wateringIntervalDays: 7
)

// catalogPlant.wateringIntervalDays = 5
// Error: catalogPlant is a constant.
Even though wateringIntervalDays is declared with var, the catalogPlant instance is a constant. A struct held by let is wholly immutable from that variable name.
Use this practical rule:
| Property declaration | Instance declaration | Can that property be changed? |
|---|---|---|
let |
let or var |
No |
var |
let |
No, because the entire struct instance is constant |
var |
var |
Yes |
This is why let is a strong default for data that should not change: scientific names and original classifier labels, for example. Use var when the property has a genuine reason to be edited, such as a user-specific care interval. Do not make every property a var just because it is available.
Structs are values: assigning makes an independent copy
The Plant model is a struct, and structs are value types. When you assign a struct to another variable, Swift gives the new variable an independent value.
let catalogPlant = Plant(
    commonName: "Swiss cheese plant",
    scientificName: "Monstera deliciosa",
    lightRequirement: "Bright, indirect light",
    wateringIntervalDays: 7
)

var personalCarePlan = catalogPlant
personalCarePlan.wateringIntervalDays = 5

print(catalogPlant.wateringIntervalDays)     // 7
print(personalCarePlan.wateringIntervalDays) // 5
personalCarePlan begins with the same data as catalogPlant, but changing the personal plan does not alter the catalog entry. This gives a model such as Plant a useful property: passing it through different parts of an app does not accidentally create shared mutable data.
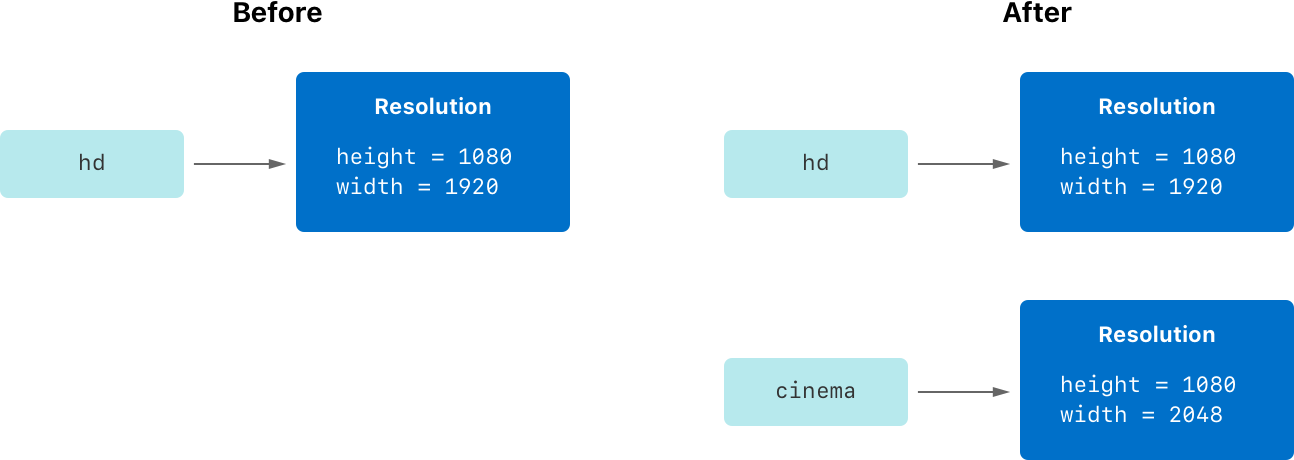
Conceptually, act as though a complete copy occurs at assignment. Swift may use performance optimizations internally, especially for collections such as strings and arrays, but the observable behavior remains value semantics: modifying one struct value does not modify another assigned from it.
This is distinct from saying that every change automatically updates a SwiftUI screen. A normal var is just data. SwiftUI needs an appropriate state-management mechanism to know that a view should redraw, which is the focus of a later lesson.
For now, retain the simpler model:
- A struct definition describes a kind of value.
- Its stored properties are the data every value contains.
- An instance is one actual value made with an initializer.
- Dot syntax reads a property from that instance.
- Struct assignment creates an independent value.
Takeaways
You can now represent a plant as a coherent Swift data model rather than a loose set of strings and numbers:
struct Plant {
    let commonName: String
    let scientificName: String
    let lightRequirement: String
    var wateringIntervalDays: Int
}
The essential decisions are:
- Use a struct to group data that belongs to one concept.
- Use stored properties for values the model directly holds.
- Create instances through the synthesized memberwise initializer.
- Read properties with dot syntax.
- Use
letby default; choosevaronly where change is meaningful. - Remember that structs are value types, so assignment produces an independent value.
Next, you will model a different kind of information: finite app states. Swift enums, including associated values, will let the PlantIdentifier app represent cases such as “no image selected,” “identifying,” “identified,” and “failed” without relying on fragile combinations of booleans and optional values.