Hello! Welcome to your first lesson in our Kubernetes course. We're kicking things off by exploring the very core of Kubernetes: the Control Plane.
This lesson is designed to give you a solid, CKA-level understanding of the components that act as the "brain" of a Kubernetes cluster. You'll learn about the four key processes that make all the decisions, manage the cluster's state, and ensure your applications run as you intend.
Understanding this architecture is the bedrock upon which all other Kubernetes knowledge is built. For someone with your background in deploying and managing infrastructure, grasping how these distributed components interact will be key to mastering production-grade Kubernetes administration.
Today, we will cover the following control plane components and their responsibilities:
- kube-apiserver: The central gateway to the cluster.
- etcd: The cluster's database and source of truth.
- kube-scheduler: The intelligent matchmaker for your applications.
- kube-controller-manager: The watchdog that enforces the desired state.
Let's get started.
The Big Picture: Control Plane Architecture
At a high level, a Kubernetes cluster consists of two main parts:
- The Control Plane: Makes all the global decisions about the cluster (e.g., scheduling applications, detecting and responding to events).
- The Worker Nodes: The machines that run your actual containerized applications.
Today, our entire focus is on the control plane. Think of it as the management headquarters. The components of the control plane work together to maintain the cluster in a desired state, which you, the administrator, define.
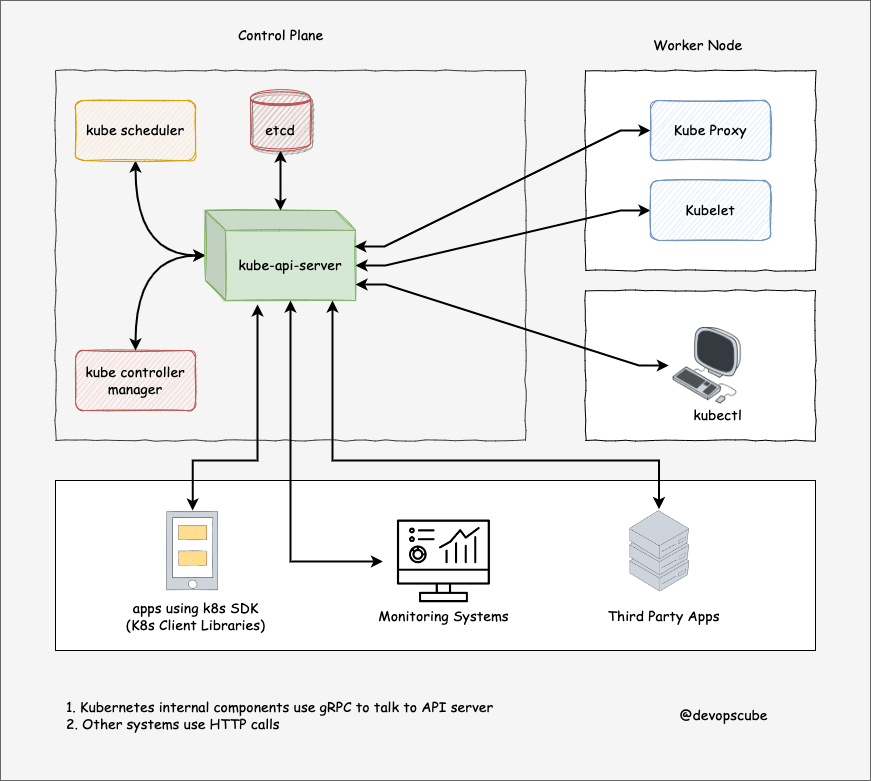
A fundamental rule in Kubernetes architecture is that all communication flows through the API Server. No component talks directly to another; they all use the API Server as a central hub. This design is crucial for consistency, security, and extensibility.
The following diagram provides a great visual overview of this architecture, placing the kube-apiserver at the very center of all interactions.
Now, let's break down each of these components in detail.
1. kube-apiserver: The Gateway and Gatekeeper
The kube-apiserver is the heart of the control plane. It exposes the Kubernetes API, making it the front end for all cluster operations. Whether you're using kubectl from your command line, or another component is operating within the cluster, every request to query or modify the cluster's state goes through the API Server.
The API Server is responsible for three critical steps for every incoming request:
- Authentication: Who are you? It validates the identity of the user or component making the request.
- Authorization: What can you do? It checks if the authenticated identity has permission to perform the requested action (e.g., create a Pod, delete a Service). This is typically handled by Role-Based Access Control (RBAC), which we will cover in a later module.
- Admission Control: Is this request valid and allowed? After a request is authenticated and authorized, special plugins called Admission Controllers can intercept it to validate or even modify it before it's persisted. For example, a
LimitRangeradmission controller ensures a Pod's resource requests don't exceed namespace quotas.
To get a deep, technical understanding of these functions, watch the following segment of the video "Kubernetes Architecture In-Depth". It provides an excellent breakdown of the API server's role, including the communication protocols used within the cluster.
Day 2 | Kubernetes Architecture In-Depth - ApiServer, etcd, Admssion Controllers, Scheduling
This video from Tech With Prerit provides a detailed walk-through of the kube-apiserver, including its role in authentication, authorization, and the powerful concept of admission controllers.
Watch the segment from 00:12:42 to 00:33:08. Pay close attention to the explanation of the request lifecycle (Authn -> Authz -> Admission Control) and how admission controllers can mutate or validate objects before they are stored.
Key Takeaway: The kube-apiserver is the only component that talks to etcd. It validates and processes all requests, then persists the resulting state of the Kubernetes object into the etcd database.
CKA Scenario: If the kube-apiserver fails, you cannot modify the cluster state (e.g., deploy new apps, scale existing ones). The cluster effectively becomes "read-only," though existing workloads will continue to run.
2. etcd: The Source of Truth
etcd is a consistent and highly-available distributed key-value store used as Kubernetes' backing store for all cluster data. It stores the complete state of the cluster at any given point in time, including configuration data, specifications, and the status of running objects.
Think of it as the cluster's "brain" or single source of truth.
- Distributed and Consistent:
etcdis designed to be run as a cluster (ideally with an odd number of members, like 3, 5, or 7) to ensure high availability and prevent "split-brain" scenarios. It uses the Raft consensus algorithm to ensure that all members of theetcdcluster agree on the state of the data. As a DevOps engineer, you're likely familiar with the challenges of maintaining state in a distributed system; Raft is the solutionetcdemploys to solve this. - Stores State, Doesn't Act:
etcdsimply stores data. It does not interpret or act on it. Its job is to provide a reliable place for thekube-apiserverto persist state and for other components to watch for changes.
The next segment from the same video explains etcd and the Raft algorithm in detail.
Day 2 | Kubernetes Architecture In-Depth - ApiServer, etcd, Admssion Controllers, Scheduling
This segment explains how etcd works, its role as a key-value store, and dives into the Raft consensus algorithm that guarantees its consistency.
Watch from 00:33:08 to 00:45:03. Focus on understanding why etcd is a distributed key-value store and the core concepts of the Raft algorithm (leader election, log replication) that make it reliable.
CKA Scenario: The health of etcd is paramount. Corrupt etcd data or loss of quorum in the etcd cluster means the entire Kubernetes control plane goes down. This is why backing up and knowing how to restore etcd is a critical skill for a Kubernetes administrator.
3. kube-scheduler: The Matchmaker
The kube-scheduler has one specific and vital job: it assigns newly created Pods to a suitable Worker Node. It doesn't run the Pod; it only decides which node should run it.
The scheduler continuously watches the API Server for Pods that have no node assigned (spec.nodeName is empty). For each such Pod, it performs a two-step process:
- Filtering: It finds the set of feasible nodes where the Pod could run. It filters out any nodes that don't meet the Pod's requirements (e.g., insufficient CPU or memory, nodes with taints the Pod doesn't tolerate).
- Scoring: It ranks the remaining feasible nodes based on a set of priority functions to find the best one. These functions might prioritize nodes with fewer running Pods, or nodes that already have the required container image cached.
Once the scheduler selects a node, it updates the Pod object via the API Server, setting the spec.nodeName field. The kubelet on that specific node then takes over to actually run the Pod.
Day 2 | Kubernetes Architecture In-Depth - ApiServer, etcd, Admssion Controllers, Scheduling
This short segment explains the role of the kube-scheduler and its two-phase cycle of filtering and scoring nodes.
Watch from 00:45:40 to 00:50:17. Understand the difference between the filtering and scoring phases of the scheduling process.
CKA Scenario: If a Pod is stuck in the Pending state, it's often a scheduling issue. Running kubectl describe pod <pod-name> will show events from the scheduler explaining why it couldn't find a suitable node (e.g., "insufficient cpu").
4. kube-controller-manager: The Watchdog
The kube-controller-manager is a daemon that runs multiple, independent control loops. In Kubernetes, a controller's job is to watch the state of the cluster and make changes to drive the current state towards the desired state.
This concept of a reconciliation loop (observe -> compare -> act) is fundamental to Kubernetes' self-healing nature.
The kube-controller-manager is a single binary that contains many controllers, including:
- Node Controller: Responsible for noticing when nodes go down and marking them as unhealthy.
- Replication Controller / ReplicaSet Controller: Ensures the correct number of Pods are running for a given ReplicaSet. If a Pod dies, this controller creates a new one.
- Deployment Controller: Manages Deployments and orchestrates rolling updates by creating new ReplicaSets.
- Job Controller: Watches for Job objects and ensures the Pods to run those batch tasks are created.
Each controller watches a specific resource through the API Server. When it detects a mismatch between the desired state (e.g., "I should have 3 replicas") and the current state (e.g., "I only have 2"), it takes action by making calls to the API Server (e.g., "create one more Pod").
Day 2 | Kubernetes Architecture In-Depth - ApiServer, etcd, Admssion Controllers, Scheduling
Finally, this segment describes the kube-controller-manager and its core function of running reconciliation loops to maintain the cluster's desired state.
Watch from 00:50:40 to 00:54:59. The key concept here is the 'reconciliation loop'—make sure you understand how controllers constantly work to align the current state with the desired state.
Test your understanding!
You have a Deployment configured to run 3 replicas of your application. You manually delete one of the Pods. What happens next, and which control plane component is primarily responsible?
Show answer
The kube-controller-manager (specifically, the ReplicaSet controller it manages) will detect that there are only 2 Pods running, while the desired state is 3. It will then make a request to the kube-apiserver to create a new Pod. The kube-scheduler will then assign this new Pod to a node, and the kubelet on that node will start it.
Putting It All Together
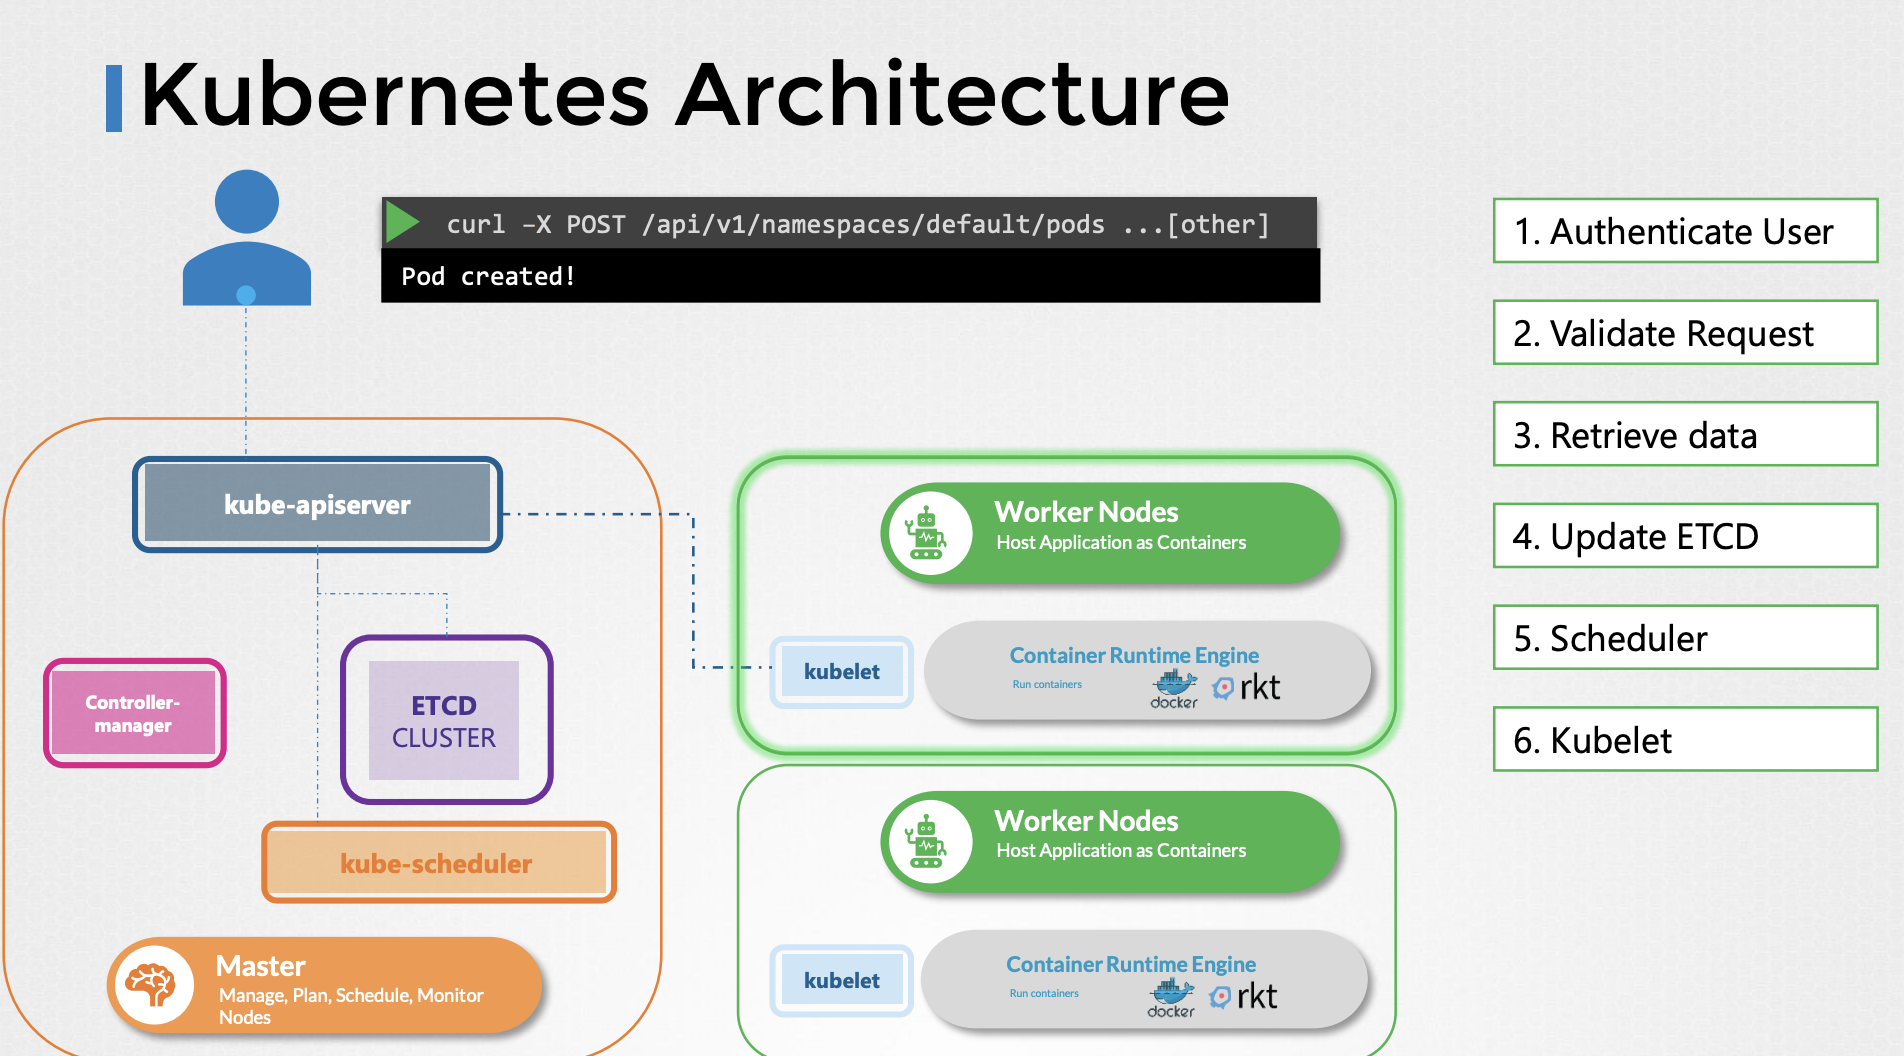
To solidify your understanding, let's trace the lifecycle of creating a Pod. For this, the following article provides a crisp, clear summary of each component's role and a step-by-step walkthrough of a Pod's creation.
Kubernetes Architecture Explained for CKA- Part 1
This article, 'Kubernetes Architecture Explained for CKA', provides a concise, text-based summary of the control plane components and ties them together by walking through the Pod creation lifecycle.
Read the sections '2. Control Plane Components', '4. Pod Creation: The Exact Lifecycle', and '5. Where Is the Controller Manager in This Flow?'. This will reinforce the responsibilities of each component and show you how they interact in a real-world scenario.
Conclusion
Congratulations on completing your first lesson! You've taken a big step towards understanding how Kubernetes works under the hood.
Here are the key takeaways:
- The Control Plane is the decision-making center of the Kubernetes cluster.
- kube-apiserver: The central hub for all communication. It authenticates, authorizes, and validates all requests before persisting them to
etcd. - etcd: The reliable, distributed key-value store that serves as the cluster's single source of truth.
- kube-scheduler: The matchmaker that finds the best node for a Pod based on its requirements and node availability.
- kube-controller-manager: The engine that runs reconciliation loops, constantly working to make the cluster's current state match the desired state you define.
In our next lesson, we will shift our focus from the "brain" to the "muscle" of the cluster: the Worker Node components. You'll learn about kubelet, kube-proxy, and the container runtime, which are the agents responsible for actually running and networking your containers.