Hello! Welcome back to our capstone project.
In the previous lesson, we conducted a thorough site analysis of our 600 m² villa project. We established the importance of an accurate base plan and identified the key landscape features and complexities, such as irregular lawn shapes and trees planted within turf areas.
Today, we will build directly on that analysis to achieve our next learning outcome: to create a detailed hydrozone map for the site. This is arguably the most critical step in designing a water-efficient irrigation system. By grouping plants with similar needs, we ensure that every part of the landscape receives the right amount of water, no more and no less. This process transforms your landscape design into a functional blueprint for the irrigation system.
1. From Site Plan to Hydrozone Map
As a landscape architect, you are already familiar with grouping plants based on aesthetics and function. Hydrozoning applies a similar logic but uses water as the primary organizing principle. A hydrozone is simply an area of the landscape containing plants with similar water, soil, and sun exposure requirements, which can all be irrigated together by a single control valve.
The goal is to move from a general site plan to a map where distinct areas are "bubbled" or outlined based on their irrigation needs.
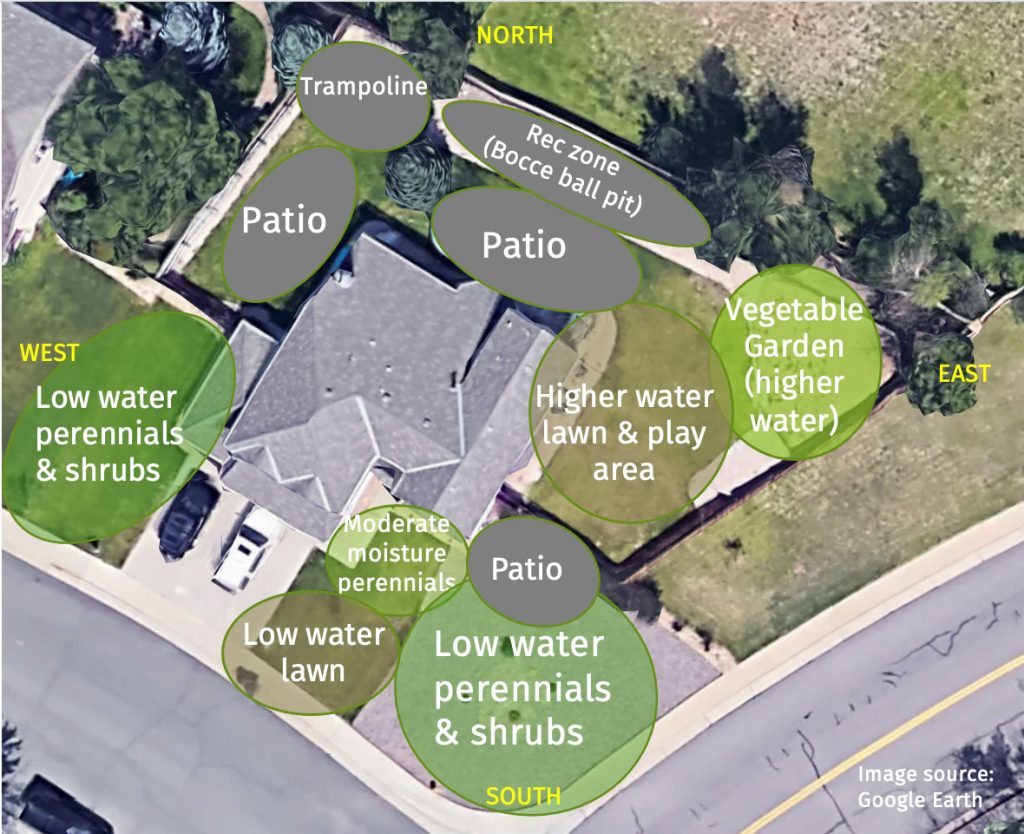
This image provides a clear, practical example of a hydrozoned residential property. Notice how different areas like lawns, perennial beds, and vegetable gardens are defined as separate zones based on their water use.
2. The Principles of Hydrozoning
To correctly define your hydrozones, you must consider several factors for each area of the landscape. These factors, which you started gathering during the site analysis, will determine where you draw your boundary lines.
The Landscape Irrigation Best Management Practices document outlines the key site inventory elements that feed into this process.
Landscape Irrigation Best Management Practices
This document outlines professional standards for irrigation design. We will focus on the section that details the site inventory required to define hydrozones.
Please read Section 2.1, 'Identification', paying close attention to subsection 'c. Hydrozone areas'. This lists the critical factors for analysis: soil type, sun/shade exposure, and plant material types (turf, shrubs, trees, etc.).
Based on this, our key criteria for creating hydrozones are:
- Plant Type: This is the most fundamental grouping. Lawns, shrubs, trees, and flower beds have different root depths and water requirements.
- Irrigation Method: Areas irrigated with sprinklers (like lawns) must be on separate zones from areas using drip irrigation (like planter beds).
- Sun Exposure: An area in full sun will need more water than a similar area in deep shade.
- Water Requirement: Plants can be broadly categorized as having high, medium, or low water needs.
- Site Conditions: Factors like soil type (sand vs. clay) and slope also play a major role, as they affect how water is absorbed and how quickly it runs off.
3. Creating the Hydrozone Map for the Villa Project
Let's apply these principles to our capstone project site plan. We will take a systematic approach to divide the property into logical hydrozones.
Our project site plan. We will now overlay our hydrozone boundaries onto this plan.
Step 1: The First Big Cut (Turf vs. Planting Beds)
The most immediate and important division is between the lawn areas and the non-lawn planting areas.
- Lawn Areas: These will be irrigated with some type of sprinkler system.
- Planting Beds: These are ideal candidates for drip irrigation.
Because sprinklers and drip systems have vastly different application rates and run times, they can never be on the same zone. So, our first action is to draw a boundary around all the lawn areas and separate them from the shrub and tree beds.
Step 2: Sub-dividing by Plant Type and Water Need
Now we look within those initial groupings.
-
Lawn Areas: We have a front lawn and a side lawn. For our design, we'll assume they both receive similar sun exposure and are composed of the same turfgrass. Therefore, we can group them into a single hydrozone category: Lawn (High Water Use). In a real-world scenario, if one was in deep shade and the other in full sun, you would be justified in creating two separate lawn hydrozones.
-
Planting Beds: The plan shows distinct shrub beds and several trees. Shrubs and trees often have different water needs and root depths.
- The beds along the house and property border contain shrubs and flowers. We can group these as Shrub/Flower Beds (Medium Water Use).
- The mature trees, especially those within the lawn, present a classic design challenge. Their water needs may differ from the turf. While dedicated drip rings are an option for high-value specimens, a common residential practice is to allow the lawn sprinklers to also water the trees. For this project, we'll assume the lawn irrigation will suffice but acknowledge this as a key decision point.
Step 3: Drawing and Labeling the Map
Based on this logic, we can define the following hydrozones for our project:
- Hydrozone A: Lawn Areas. This zone includes all turfgrass. It will be characterized by high water use and irrigated with sprinklers.
- Hydrozone B: Shrub & Flower Beds. This includes all the planting beds containing mixed shrubs and perennials. It will be characterized by medium water use and irrigated with drip irrigation.
By drawing these "bubbles" or boundaries on our plan and labeling them, we create our hydrozone map. This map now clearly states that we will need at least two different types of irrigation zones to properly water the landscape.
4. Refining Boundaries for Irrigation Efficiency
Here is where your expertise as a designer intersects with the technical requirements of irrigation. The exact shape of a hydrozone boundary, especially the edge between a lawn and a planting bed, should be influenced by the practical realities of sprinkler performance.
This concept, and the use of "bubble drawings," is explained beautifully in the following guide.
Water Wise Landscape Design - Colorado Master Gardener
The 'Water Wise Landscape Design' guide offers a design-centric approach to hydrozoning. It explains how to use bubble drawings and how to refine landscape shapes for maximum irrigation efficiency.
Please read the following three sections: Step 3a. Define Macro-Use of Space with Hydrozone Bubble Drawings: Focus on the concept of using ovals to brainstorm space allocation. Hydrozoning: Read this subsection to understand the different levels of irrigation (routine, reduced, etc.). Step 3c. Refine Preliminary Design for Efficient Irrigation: This is the most critical part. Pay close attention to Figures 27, 28, and 30, which show how a lawn's curved edge should be adjusted to match the grid-like reality of sprinkler patterns. This directly addresses the 'irregular border' challenge of our project.
The key insight from this reading is that you cannot force sprinklers to follow any imaginable curve perfectly. Sprinklers work best in square or triangular patterns. As shown in Figure 27 from the guide, a slight adjustment to a curve to better match the sprinkler grid can dramatically improve water efficiency by eliminating dry spots and reducing overspray. This is a powerful technique for creating landscapes that are both beautiful and sustainable.
Test your understanding!
Consider our project's front lawn. It has a wide, sweeping curve along the driveway. Based on the reading, if you were to finalize the shape of that lawn edge, what technical consideration should you now be thinking about?
Show answer
You should be thinking about the practical placement of sprinkler heads. The curve should ideally be designed or adjusted so that sprinkler heads, placed in a head-to-head, triangular, or square pattern, can provide even coverage without significant overspray onto the driveway or creating dry spots along the edge. The shape of the curve should serve the grid of the sprinklers, not fight against it.
Conclusion
Congratulations! You have successfully translated a landscape plan into a hydrozone map. This crucial step provides the logic for the entire irrigation system design that will follow.
Key Takeaways:
- A hydrozone map divides the landscape into areas with similar water needs, defined by plant type, sun exposure, and required irrigation method.
- The first and most important division is always between sprinkler-irrigated areas (lawns) and drip-irrigated areas (planting beds).
- For professional, water-efficient design, the final boundaries of hydrozones (like the edge of a lawn) should be refined to accommodate the geometric patterns of sprinkler layouts.
In our next lesson, we will take our newly created hydrozone map and move to the next step: selecting the appropriate irrigation methods and specific components (sprinkler models, drip line types) for each zone. The map you've developed today will be the direct guide for those decisions.