Hello! Welcome to the capstone project for your irrigation design course.
Over the past six modules, you have built a strong foundation in the principles of irrigation design. You've learned everything from site analysis and calculating plant water needs to the detailed hydraulic calculations required to size pipes and check system pressure. Now, it's time to integrate all of that knowledge and apply it to a complete, realistic project.
This lesson marks the beginning of that project. Our goal is to design a full irrigation system for a 600 m² villa with a variety of challenging landscape features. The first, and most critical, step in any design project is a thorough site analysis. An excellent design can only be built on an accurate and detailed understanding of the site itself.
Your learning outcome for today is to analyze a 600 m² villa site plan with complex plantings, such as trees within a lawn and irregular borders. We will cover the essential information you need to gather and how to identify specific landscape features that will influence your design choices later on.
1. The Foundation: Creating an Accurate Plot Plan
As an architect and landscape designer, you are well-versed in the creation of site plans. For irrigation design, this plot plan is the canvas upon which the entire system is built. Every measurement and observation recorded here directly impacts sprinkler placement, pipe sizing, and hydraulic calculations. An error at this stage can lead to costly mistakes and an inefficient system.
The process involves two key phases:
- Gathering Site Data: Taking precise measurements of the property and recording all relevant environmental and technical information.
- Drawing the Base Plan: Transferring this data onto graph paper or into a CAD program to create a scaled drawing that will serve as your design foundation.
To get a good visual sense of this process in action, the following video from K-Rain provides a practical overview.
How to design an irrigation system
This video provides an excellent summary of how to measure a property and what key site information to collect for an irrigation design.
Please watch from the beginning to 3:58. The first part (until 02:32) covers the physical measurement process. The second part highlights other crucial data points to record, such as sun exposure, plant types, and slopes.
2. A Professional's Checklist for Site Analysis
The video provides a good overview. For a more detailed, professional procedure, the Hunter Industries design guide offers a comprehensive checklist. It covers not just what to measure, but also provides techniques for accurately plotting complex shapes and features.
The 'Plot Plans' section of the Hunter Irrigation System Design guide provides a systematic approach to site analysis and drawing preparation. It details the tools and techniques for gathering all the necessary information.
Please read the sections titled 'Plot Plans', 'Sketch the Property', 'Record Site Information', 'Measure the Property', 'Redraw on Graph Paper', and the 'Summary' checklist under 'Step 1'. Focus on the specific types of information required: not just dimensions, but also static pressure, meter size, elevation changes, and techniques for measuring curves and locating objects via triangulation.
Based on these resources, a comprehensive site analysis for irrigation design should capture the following:
- Property Boundaries and Dimensions: All property lines.
- Structures & Hardscapes: The house footprint, driveways, sidewalks, patios, decks, walls, and fences.
- Landscape Features: Locations and perimeters of all lawn areas, planter beds, trees, and large shrubs. Note the type of plants in each area.
- Site Conditions:
- Direction of North.
- Sun/shade patterns throughout the day.
- Soil type (e.g., sand, loam, clay).
- Slopes, grade changes, and drainage patterns.
- Prevailing wind direction and intensity.
- Water Source Information:
- Location of the water meter and proposed Point of Connection (POC).
- Water meter size.
- Static water pressure (in bar), measured at a hose bib.
- Size and material of the service line (from the main to the meter).
3. Analyzing Complex Plantings: The Design Challenge
Your goal for this course includes designing for "complex plantation placements." These are the features that require careful thought and move a design from simple to sophisticated. Let's identify what makes a planting "complex" from an irrigation standpoint.
- Irregular Borders: Curved lawn or garden bed edges are common in landscape architecture. They are a challenge because standard fixed-arc sprinklers (90°, 180°) won't provide perfect coverage. This often necessitates using adjustable-arc nozzles and requires more careful placement to ensure head-to-head coverage without significant overspray.
- Obstacles within a Zone: A beautiful mature tree, a statue, or even a mailbox located within a lawn area will cast a "spray shadow," blocking water and creating a dry spot on the far side. Your design must account for this, either by strategically placing sprinklers or by adding smaller heads to fill in the shadow.
- Mixed Plantings: As you know, a key principle of water-efficient design is hydrozoning. A bed containing drought-tolerant shrubs next to water-loving annual flowers is a classic design challenge. They cannot be on the same valve. Your analysis must identify these different water-use groups.
- Narrow or Small Areas: Long, thin turf strips along a driveway or small, oddly-shaped planter areas are very difficult to irrigate efficiently with standard sprinklers. They are prime candidates for specialized solutions like strip-pattern nozzles or drip irrigation.
4. Our Capstone Project: The Villa Site Plan
For our capstone project, we will use the following site plan. It represents a typical 600 m² villa property that includes several of the complex features we just discussed.
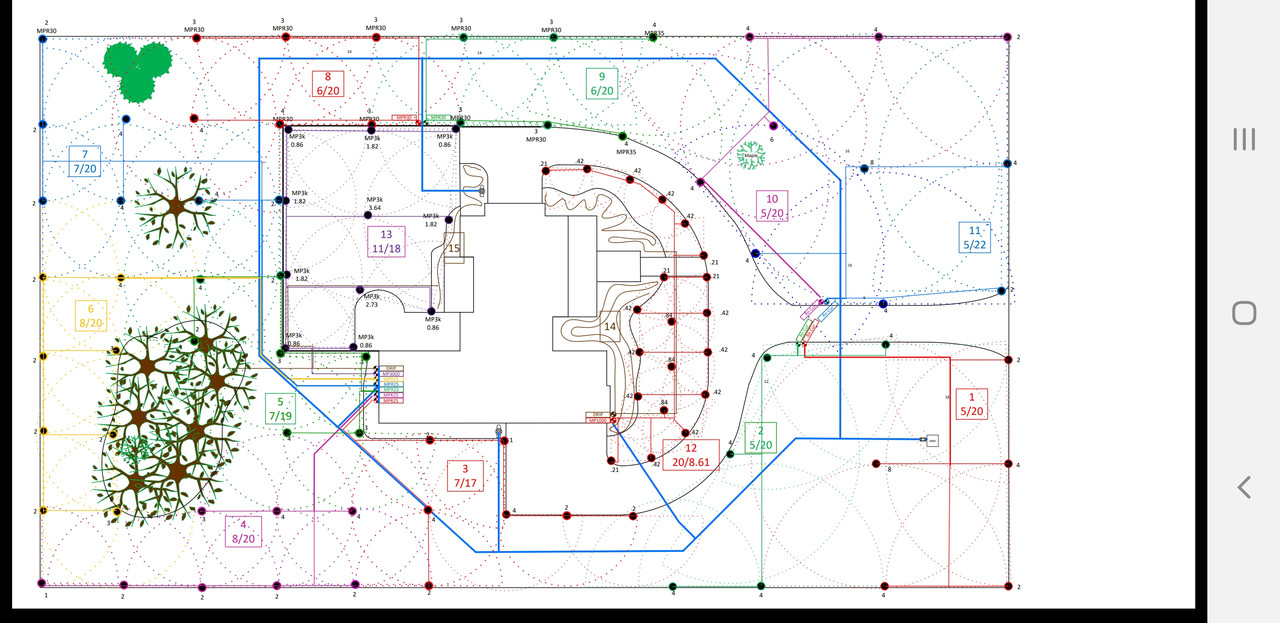
Let's perform a preliminary analysis of this plan together:
- Main Features: We can clearly identify the house, a large front lawn, a side lawn, and several distinct planter beds against the house and along the property boundaries.
- Complex Plantings:
- Irregular Lawn Shapes: Notice the sweeping curves of the lawn areas. Neither the front nor the side lawn is a simple rectangle. This will require careful sprinkler selection and layout.
- Trees within Lawn: There are multiple trees located directly within the turf areas. The design will have to ensure that the sprinkler spray is not blocked by their trunks, which could create dry patches.
- Distinct Planting Beds: We see separate beds for shrubs and trees. This immediately suggests they will need to be on different hydrozones from the lawn, likely using drip irrigation.
- Missing Information: This drawing is a good start, but to create a real design, what else would we need? Based on our checklist, we are missing critical data:
- A scale or dimensions.
- The North direction.
- Location of the water meter and POC.
- Static pressure and meter size.
- Notes on sun/shade, soil, and slope.
For the purpose of our project, we will assume some of this data in later lessons as we need it.
Test your understanding!
Looking at the project site plan (LINK), imagine you want to irrigate the narrow strip of lawn between the house and the walkway on the right side. Why might a standard rotor or large spray head be a poor choice for this specific area?
Show answer
A standard rotor or large spray head would be a poor choice because its spray radius would be too large for the narrow width of the turf. This would result in a significant amount of water being wasted by spraying onto the house and the walkway (overspray). This area is a classic candidate for more specialized solutions like short-radius sprays, MP Rotators with a tight pattern, or side-strip nozzles.
Conclusion
You have now completed the first essential step of our capstone project: site analysis. You understand the critical importance of creating an accurate plot plan and have a comprehensive checklist of the data you need to gather. Most importantly, you can now look at a site plan and identify the specific "complex" features that will require special attention during the design process.
Key Takeaways:
- An accurate, scaled plot plan is the non-negotiable foundation for a successful irrigation design.
- Site analysis for irrigation goes beyond dimensions; it includes water source data (pressure, meter size), environmental factors (sun, soil, wind), and all landscape features.
- Complexities like irregular shapes, in-zone obstacles, and mixed plantings are not problems, but rather design challenges that inform your choices for zoning and equipment.
In our next lesson, we will build directly on today's analysis. You will take this site plan and apply the principle of hydrozoning to create a detailed map of the different irrigation zones. This will be the blueprint for selecting the right equipment for each part of the landscape.