Hello! Welcome back to our villa irrigation design project.
In the last lesson, you made the crucial component selections for our system. We decided on MP Rotators for the lawn's irregular shapes and a combination of inline emitter tubing for dense beds and point-source drippers for scattered plants and trees.
Today, we transition from selecting components to placing them. Our goal is to design the physical layout of the sprinklers and drip lines on the site plan. This is where your architectural skills in spatial arrangement and visualization will be especially valuable. We will translate the theoretical hydrozones into a practical, buildable plan, paying close attention to the "complex plantation placements" that are central to this project.
1. Sprinkler Layout: The Art of Coverage
For our lawn areas (Hydrozone A), we need to place the MP Rotators in a way that ensures every blade of grass receives water. The single most important principle here is head-to-head coverage.
Head-to-Head Coverage: This means that the spray from one sprinkler head must reach the sprinkler head next to it. This overlap is critical for achieving uniform water distribution, especially in windy conditions. Designing without it will result in dry, brown patches between your sprinklers.
Designing a sprinkler layout, especially for an irregular area, is an iterative process of placing, checking, and adjusting. There's no magic formula, but there is a reliable method.
To see this method in action, we'll watch a detailed tutorial. The instructor uses rotors, but the principles of spacing, visualization, and adjustment are identical for the MP Rotators we've chosen.
How to Place Sprinkler Heads in an Irrigation Design
This video from Prof. Mark Valen, 'How to Place Sprinkler Heads in an Irrigation Design', provides an excellent step-by-step demonstration of the layout process for an irregularly shaped lawn. It's a masterclass in the practical, trial-and-error nature of good design.
Watch the following segments carefully, as they walk through the entire design process: Calculating Spacing Options (03:01 - 10:05): See how to determine potential spacing distances based on the area's dimensions and the sprinkler's throw radius. Visualizing Coverage (11:10 - 15:20): Pay close attention to how a compass is used to draw the spray arcs on the plan. This is a fundamental technique for checking coverage and identifying initial dry spots. Adjusting and Adding Heads (16:17 - 21:25): Observe the iterative process of adding 'fill-in' heads to cover the dry spots found in the initial layout. This is key to achieving true head-to-head coverage.
A Systematic Approach to Sprinkler Layout
As the video demonstrates, the process generally follows these steps:
- Place Corner Heads: Start by placing part-circle heads in all corners of the area.
- Place Perimeter Heads: Measure the distance between the corner heads. If the distance is greater than the sprinkler's radius, add heads along the perimeter until you achieve head-to-head spacing all the way around.
- Place Interior Heads: If the area is wider than the sprinkler's throw, add full-circle heads in the middle. A good way to position them is at the intersections of a grid (for square patterns) or where the arcs from the perimeter heads intersect (for triangular patterns).
- Check and Refine: Use a compass to draw the spray arcs from every head. Look for gaps in coverage and add or adjust heads as needed.

For more detailed strategies on handling specific, complex shapes, the Hunter Design Guide is an invaluable reference.
The 'Sprinkler Placement' section of the Hunter Irrigation System Design guide provides excellent text-based solutions for the exact kinds of challenges in our villa project.
Please review the section titled 'Sprinkler Placement'. You don't need to read every word, but focus on the subsections under 'Special Situations', particularly: 'The Curved Border' 'The Irregular Border' 'Obstructions in the Landscape' (This directly addresses how to handle a tree in the middle of a lawn). This will supplement the video with specific tactics for our project's unique features.
Test your understanding!
Imagine one of the trees in our villa project is located in the middle of a large lawn area. Based on the Hunter guide's advice for 'Obstructions', what are two different ways you could adjust your sprinkler layout to prevent a dry spot from forming in the "shadow" of the tree trunk?
Show answer
- Adjust Head Placement: You could move the sprinklers so that the tree trunk is positioned equally between two or more heads, allowing their spray to cover the area behind the trunk from multiple angles.
- Add a Fill-in Head: You could place an additional sprinkler head next to the obstruction, specifically aimed to water the dry spot created by the blocked spray pattern.
2. Drip Irrigation Layout: Precision Watering
For the planting beds and scattered trees (Hydrozone B), our layout goal is different. Instead of broadcasting water, we want to deliver it precisely to the plants' root zones.
Layout for Dense Beds: Inline Emitter Tubing
For the dense shrub and flower beds, we chose inline emitter tubing (dripline). The goal is to create an even grid of moisture throughout the entire soil bed.
The layout is determined by two factors:
- Emitter Spacing: The distance between emitters built into the tubing (e.g., 30 cm, 45 cm).
- Row Spacing: The distance between parallel runs of the tubing.
Both of these are determined by your soil type, as water moves differently through sand, loam, and clay.
DRIP IRRIGATION DESIGN & INSTALLATION GUIDE
The Hunter Drip Irrigation Design Guide provides the essential rules and tables for laying out dripline.
First, review the section 'SOIL TYPE AND WATER MOVEMENT' and look at the 'RECOMMENDED SPACING FOR BASIC SOIL TYPES' table. This shows how soil dictates your layout. Next, read the section titled 'LAYOUT'. Pay attention to the basic principles (maximum length, line spacing) and the diagrams for 'Center-Feed Layout' and 'End-Feed Layout'. These are your two main structural options.
The general approach is to lay the dripline in parallel rows, like running a plow through a field.
- Start along the longest edge.
- Space the rows according to the soil type recommendations (e.g., 45 cm apart for loam).
- For curved beds, you can use fittings to create branches or simply loop the tubing back (a "return") to follow the contour.
Layout for Scattered Plants & Trees: Point-Source Emitters
This is a key part of your goal to handle complex plantings. For the trees within the lawn or isolated shrubs, we will use point-source emitters.
The layout involves running a solid (blank) polyethylene tube to the plant, and then punching in one or more emitters at the base. For larger plants like trees, it's best to create a "drip ring."
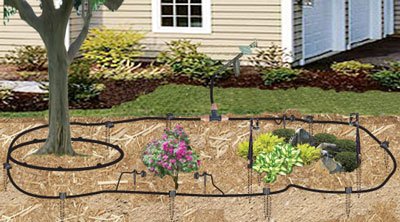
The Hunter Drip Guide provides a specific section on how to handle trees.
DRIP IRRIGATION DESIGN & INSTALLATION GUIDE
Let's look at the specific technique for watering trees with drip irrigation.
Read the short section titled 'Trees'. The text and diagram show how to interrupt the main grid of dripline and install additional rings around the tree's root ball to provide supplemental water.
This technique of "boxing out" or adding rings is fundamental for ensuring larger, high-value plants receive adequate water without having to overwater the entire zone.
Conclusion
You have now learned the core principles and practical methods for creating a physical irrigation layout. This is the blueprint from which the entire system will be built.
Key Takeaways:
- Sprinkler Layout Principle: Head-to-head coverage is non-negotiable for uniform watering. The design process is iterative: place corners, then perimeters, then interior, and refine until all gaps are covered.
- Dripline Layout Principle: For dense beds, lay parallel rows of inline emitter tubing to create an even moisture pattern. The spacing is determined by soil type.
- Point-Source Layout Principle: For scattered plants and trees, run blank tubing to the location and attach individual emitters or create dedicated drip rings.
- Complex Placements: You now have strategies for handling irregular borders (adjusting head placement), obstructions like trees (adding fill-in heads or adjusting spacing), and mixed plantings (using drip rings and targeted emitters).
In our next lesson, we will finalize our zones. We'll take the physical layout you've just designed, count up the components, and group all the sprinklers and drip emitters into logical hydraulic zones, making sure the total flow rate of each zone is within the limits of our water source.