Hello! In our last lesson, you learned how to precisely calculate "minor" pressure losses caused by components like valves, meters, and pipe fittings. We've now accounted for friction inside the pipes and turbulence inside the components.
Today, we will add the third and final piece of the pressure puzzle: elevation. As a landscape architect, you know that almost no site is perfectly flat. Slopes, terraces, and berms are all part of the design. This lesson will teach you how to calculate the pressure changes that occur as water is pushed uphill or flows downhill across the site.
By the end of this lesson, you will be able to calculate the precise pressure gain or loss caused by any change in elevation between your water source and the furthest sprinkler head. This is the last critical skill you need before we can assemble all the pieces to calculate the total pressure required for your system.
1. Water, Weight, and "Head"
At its core, the effect of elevation on pressure is about the weight of water. Imagine a tall, vertical pipe filled with water. The water at the bottom is under pressure from the weight of the entire column of water above it. The taller the column, the greater the weight, and the higher the pressure.
This height is known as head, and it's a fundamental concept in hydraulics. It's a way of expressing pressure as a height of water.
This diagram illustrates how elevation differences (ΔZ, pronounced "delta-zee") are represented in a pipe network. Each node (N) has a specific elevation.
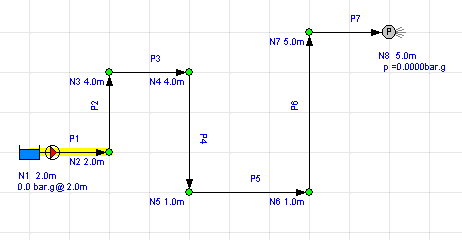
In irrigation design, we need to convert this "head" (a height) into pressure (in bar or PSI).
Irrigation Design Tip: Understanding Basic Hydraulics
The irrigation experts at Rain Bird provide a concise explanation of this relationship. This guide will give you the essential conversion factors you'll need for all your calculations.
Please read the beginning of this document, starting from the top down to the end of the section 'Convert pressure to feet of head or meters of head'. Focus on the key conversion factors it provides.
Key Conversion Factors
As you read in the Rain Bird guide, there are two sets of numbers to remember. While many industry resources in North America use imperial units (PSI, feet), the metric system is simpler and more common globally. We will focus on metric, but it's important to recognize both.
Metric System (m and bar):
- A 10-meter column of water creates approximately 1 bar of pressure.
- To convert meters of head to bar, divide the meters by 10.
- Example: 5 meters of head = 0.5 bar
- To convert bar to meters of head, multiply the bar by 10.
- Example: 3 bar = 30 meters of head
Imperial System (ft and PSI):
- A 1-foot column of water creates 0.433 PSI of pressure.
- To create 1 PSI of pressure, you need a 2.31-foot column of water.
These conversion factors are constant. They do not change with the size of the pipe or the amount of water flowing. It's purely a relationship between height and pressure.
2. Uphill vs. Downhill: Pressure Loss and Gain
The rule for elevation is straightforward and intuitive: gravity either helps you or works against you.
- Going Uphill: When you pump water to a higher elevation, you are fighting against gravity. This requires energy, which results in a pressure loss.
- Going Downhill: When water flows to a lower elevation, gravity is helping it along. This adds energy to the system, resulting in a pressure gain.
The crucial point is that this pressure change depends only on the vertical difference in elevation, not the total length of the pipe used to get there.
This training manual from Hunter provides excellent diagrams and clear examples of calculating pressure changes for both uphill and downhill scenarios. It clearly distinguishes this from static vs. dynamic pressure.
Read the sections 'Factors affecting static pressure' (with Figures 6 and 7), 'Factors Affecting Dynamic Pressure' (just the first point), and the summary definition for 'Static Pressure'. Notice how it emphasizes that elevation change is the only factor and that it affects both static and dynamic pressure in the same way.
Calculating Elevation-Based Pressure Change
Let's apply the rule with a practical example for a villa garden.
Scenario:
- The water meter is at the front of the property, at an elevation of 100.0 m.
- The static pressure available at the meter is 4.5 bar.
- The furthest sprinkler head in a backyard lawn zone is at an elevation of 102.5 m.
Calculation:
-
Find the elevation difference (ΔZ):
The positive value means we are going uphill. -
Convert elevation change to pressure change:
-
Calculate the final pressure (before friction):
So, just by going up 2.5 meters, you have lost 0.25 bar of pressure. This is before accounting for any friction loss in the pipes or components, which we'll combine in the next lesson.
What if the sprinkler was in a sunken garden at an elevation of 98.0 m?
- ΔZ: (downhill)
- Pressure Gain:
- Final Pressure:
Test your understanding!
A water source for a villa irrigation system provides 5.0 bar of static pressure at street level (elevation 25.0 m).
A drip irrigation zone for a raised planter bed is located at an elevation of 26.5 m. What is the static pressure at the inlet to this zone, considering only the effect of elevation?
Show answer
-
Calculate Elevation Difference (ΔZ):
-
Calculate Pressure Loss:
-
Calculate Remaining Pressure:
3. A Complete Static Pressure Calculation Example
Now, let's look at a more complex example that traces pressure changes through an entire system. This will help you see how these calculations are applied step-by-step in a real-world scenario.
Irrigation Design Tip: Understanding Basic Hydraulics
The Rain Bird document we looked at earlier contains a fully worked-out example of calculating static pressure at various points in a residential system. Study this example carefully to see how pressure losses from elevation gains are subtracted sequentially.
Find the section titled 'EXAMPLE' (with Figure 3). Follow the calculations from the city water main (Point A) all the way to the hose valve (Point G). Pay close attention to how each vertical rise results in a subtraction from the available pressure.
This example solidifies the principle that every meter you go up costs you pressure, and every meter you go down gives you pressure back. In your final hydraulic calculations, you will sum up all the elevation changes along the path to find the total pressure loss or gain.
Conclusion
Congratulations, you have now mastered the final component of hydraulic analysis! You can now confidently look at a topographical site plan, identify the elevation changes, and quantify their impact on your irrigation system's pressure.
Key Takeaways:
- Pressure in an irrigation system is affected by three factors: pipe friction, component losses, and elevation changes.
- An increase in elevation (going uphill) causes a pressure loss. A decrease in elevation (going downhill) causes a pressure gain.
- The key conversion to remember is that a 10-meter change in vertical height corresponds to a 1-bar change in pressure.
- This pressure change depends only on the vertical elevation difference, not the length or size of the pipe.
In our next lesson, we will put everything together. You will learn to calculate the Total Dynamic Head (TDH) for an irrigation zone by combining pipe friction loss, component losses, and elevation changes. The TDH is the single most important number in hydraulic design—it tells you the total pressure your water source must provide to make your system work as designed.