Hello! Let's get started with today's lesson.
In our last session, you successfully created a remote repository on GitHub and pushed your first project to it. Your my-first-repo is now live on your GitHub profile, which is a fantastic milestone. However, if a potential employer were to look at it right now, they would just see a list of files. They wouldn't know what the project is, why you built it, or what it does.
Today, we'll fix that. We are going to create a professional "front page" for your project called a README file. This is arguably one of the most important files in any repository because it's the first thing people see. A good README can make a simple project look impressive and professional, which is crucial for your goal of landing a development job.
By the end of this 60-minute lesson, you will be able to write a clear README.md file for a project using Markdown syntax.
What is a README and Why Does It Matter?
A README file is a summary and instruction manual for your code. It answers the critical questions of what, why, and how for anyone visiting your project. For your job search, a well-written README demonstrates your communication skills and attention to detail—qualities that employers value highly.
Let's start by understanding the essential components of a good README.
How to create a good README.md file
The article 'How to create a good README.md file' by Julia on DEV Community is a great resource that explains the purpose of a README and what information to include. It's written from the perspective of someone who knows this can help you get a job.
Please read the first few sections of the article, starting from the top down to the heading 'How to style a readme?'. Focus on understanding the answers to these two questions: Why is a README file so important for a developer's career? What are the key sections you should include in your README (Description, Tech stack, etc.)?
As the article mentions, a good structure for a README includes:
- A description of the project.
- The tech stack used (languages, frameworks, etc.).
- Features of the application.
- Instructions on how to run the project.
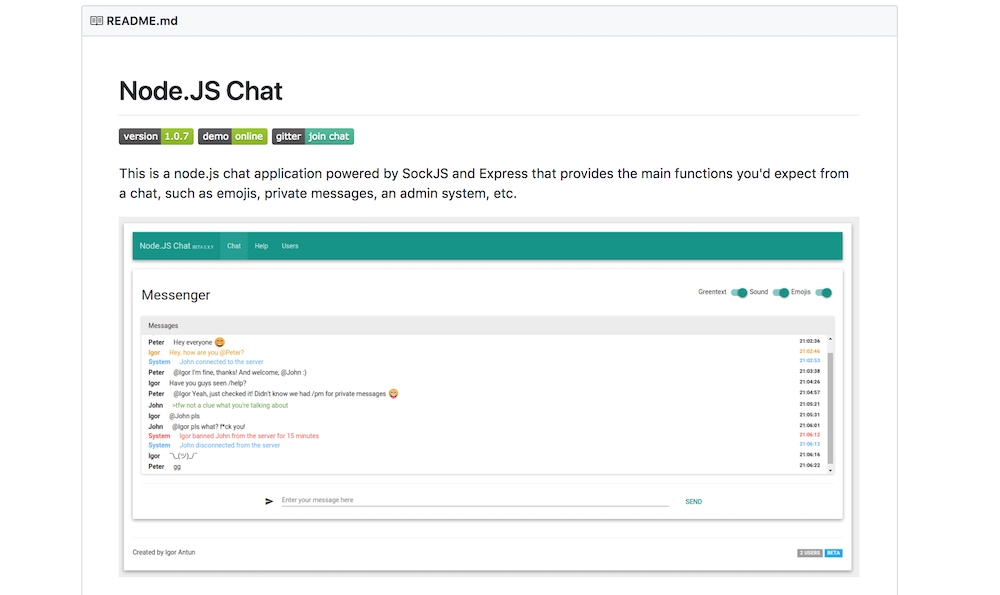
Here is an example of what a well-structured README looks like on GitHub. Notice how it uses headings, bold text, and even an image to present the information clearly.
The Formatting Language: Introduction to Markdown
The article mentioned that README files have a .md extension. This stands for Markdown, which is a simple way to format plain text that gets converted into HTML. Instead of writing complex HTML tags, you use simple symbols like # for headings and * for bold or italic text.
You already have some experience with HTML, so you can think of Markdown as a shorthand for writing formatted content. It's much faster and easier to read.
Since you prefer hands-on practice, let's learn Markdown with a quick interactive tutorial.
The Markdown Tutorial is a fantastic, interactive way to learn the syntax by trying it out directly in your browser. It's much more effective than just reading about it.
Go to the tutorial website and click the 'Let’s get started!' link. Please complete the first four lessons: Emphasis (Bold and Italic) Headers Links Lists These four lessons will give you the core skills needed to write 90% of any README you'll ever need. As you complete the exercises, pay attention to how the simple text you write on the left is rendered as formatted text on the right.
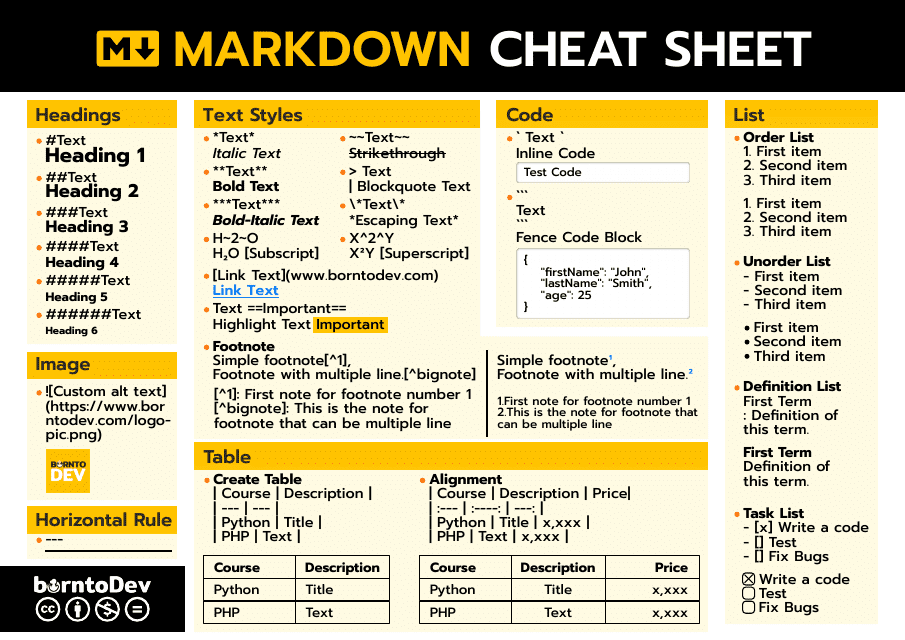
To help you in the future, developers often use "cheat sheets" as a quick reference. Here is a very comprehensive one for Markdown. You don't need to memorize it; just know that it's a resource you can come back to anytime you forget how to format something.
Your Turn: Create and Push a README
Now, let's apply what you've learned. You will create a README.md file for the my-first-repo project you pushed to GitHub in the last lesson.
-
Create the file: In VS Code, inside your
my-first-repoproject folder, create a new file namedREADME.md. The name is important—GitHub automatically recognizes and displays files with this name. -
Add content: Open the new
README.mdfile and use the Markdown syntax you just practiced to create the content. Use the structure we discussed earlier. Here is a template you can copy and paste into your file, then fill in the details for your project.# My First Repo ## Description This is the first project I have built as part of my journey to become a full-stack developer. It is a simple webpage created to practice setting up a professional developer workflow using Git and GitHub. ## Tech Stack * HTML ## Features * Displays a "Hello World" heading on a simple white background. ## How to Run To run this project, simply download the `index.html` file and open it in any web browser. -
Save and commit the file: Save the
README.mdfile in VS Code. Now, use the Git commands you know to track this new file and commit it to your local repository. Open the terminal in VS Code and run:# Add the new README.md file to the staging area git add README.md # Commit the staged file with a descriptive message git commit -m "docs: Add README.md file"A quick professional tip: It's common practice to prefix commit messages with a type, like
feat:for a new feature,fix:for a bug fix, ordocs:for documentation changes. This makes your commit history very easy to read. -
Push to GitHub: Finally, push your new commit to your remote repository on GitHub.
git push(Remember from last lesson? Because we used the
-uflag the first time, you only need to rungit pushnow.)
Once the push is complete, go to your my-first-repo repository on GitHub and refresh the page. You should now see your beautifully formatted README displayed right on the project's homepage!
Conclusion
Great work today! You have taken a huge step in making your work presentable and professional. You now have a project on GitHub that clearly explains what it is and what you've learned, which is exactly what hiring managers want to see.
Here’s a recap of what we covered:
- A README.md file is the front page of your project on GitHub.
- A good README explains the what, why, and how of your project. Key sections include a description, tech stack, features, and running instructions.
- READMEs are written in Markdown, a simple syntax for text formatting.
- You can create a README locally and use the standard
git add,git commit, andgit pushworkflow to add it to your remote repository.
This lesson concludes our first module on the "Developer's Toolkit." You've set up your editor, learned the fundamentals of Git and GitHub, and made your first project look professional. You now have the foundational workflow that you will use for every single project you build.
In our next lesson, we will begin Module 2: Modern JavaScript Essentials. We'll dive back into code and start learning the modern syntax (let, const, arrow functions) that is essential for building the powerful, interactive applications that companies are looking for.