Hello! Welcome to the final lesson in our module on "Production-Grade Dockerfiles."
In our previous lesson, we explored the importance of signal handling and using an init system like tini to create robust containers that shut down gracefully. This was a crucial step in ensuring your containerized applications are stable and reliable in production.
Today, we'll wrap up this module by examining two of the most frequently used, and often confused, instructions in a Dockerfile: COPY and ADD. Your goal for this lesson is to learn how to use them appropriately based on specific use cases. While they might seem interchangeable at first glance, understanding their distinct functionalities is key to building secure, predictable, and maintainable Docker images.
As a DevOps Engineer, you know that clarity and predictability in your build process are paramount. This lesson will equip you with the knowledge to make deliberate choices between COPY and ADD, avoiding common pitfalls and adhering to best practices.
1. The Core Functionality: What Do COPY and ADD Do?
At a basic level, both instructions serve to get files from your local machine into your Docker image.
COPY: This instruction has one primary purpose: to copy files or directories from a source on the host machine (the build context) to a destination in the container's filesystem. Its syntax is straightforward:COPY <src>... <dest>.ADD: This instruction is a superset ofCOPY. It can do everythingCOPYdoes, but it has two additional, "magical" features:- URL Fetching: If the
<src>is a URL,ADDwill download the file and copy it to the<dest>. - Automatic Extraction: If the
<src>is a local tar archive (in a recognized format likegzip,bzip2, orxz),ADDwill automatically unpack it into the destination directory.
- URL Fetching: If the
To see a basic demonstration of these two commands in action, you can watch this short video.
Dockerfile creation Tutorial - Dockerfile Instructions Explained with example!
The following video from Cloud Champ provides a clear, practical demonstration of how COPY works and then introduces the extra capabilities of ADD, including fetching a file from a remote S3 bucket.
Watch the segment from 17:59 to 20:32. First, you'll see a standard COPY operation. Then, the video demonstrates ADD's ability to download a file from a URL.
2. A Side-by-Side Comparison
Given that ADD can do more, a natural question is, "Why not just use ADD all the time?" The answer lies in predictability and transparency. The "magic" features of ADD can sometimes lead to unexpected behavior.
This table provides a great visual summary of the key differences:
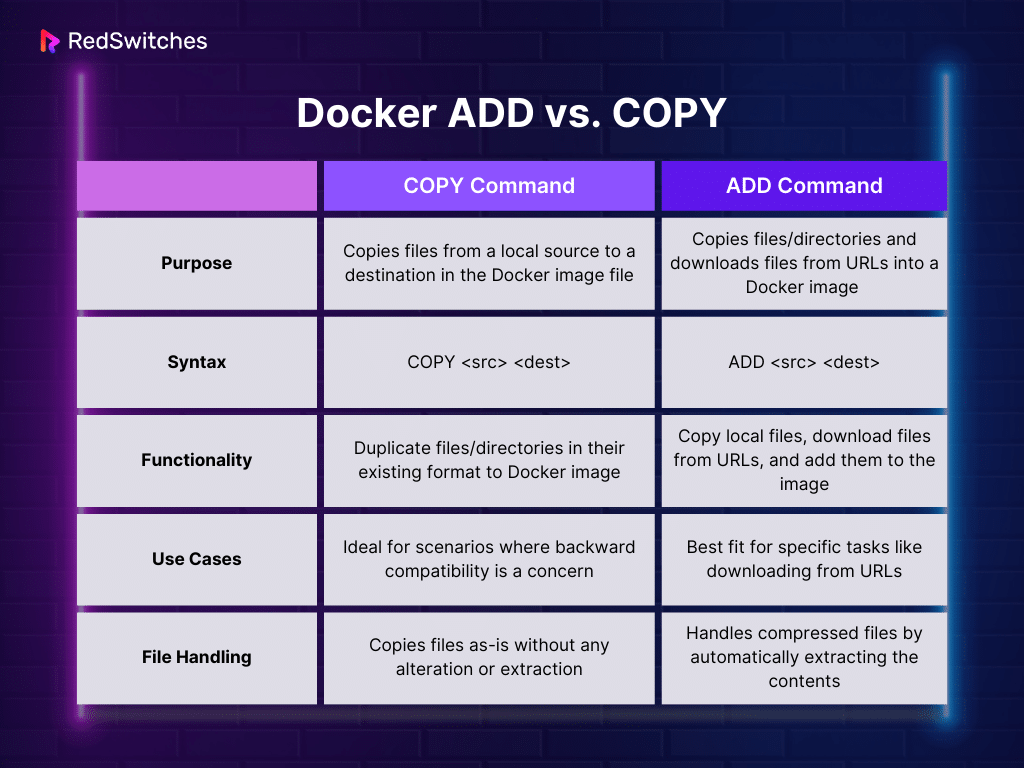
To summarize the key points from the table and our discussion so far:
COPYis transparent. It only copies local files. There's no ambiguity.ADDhas added complexity. Its behavior changes depending on whether the source is a local file, a local archive, or a remote URL.
3. The Best Practice: Prefer COPY
The official Docker recommendation and widely accepted best practice is to always prefer COPY over ADD unless you specifically need ADD's automatic tar extraction feature.
Let's dig into why this is the recommended approach.
Building best practices: ADD or COPY
The official Docker documentation provides the definitive guide on this topic. It explains why COPY is more transparent and when ADD might still be appropriate.
Please read the section titled 'ADD or COPY'. Pay close attention to the reasoning for using COPY in most scenarios and the specific, narrow use case presented for ADD.
Why COPY is More Transparent and Predictable
As the documentation suggests, transparency is the main driver. With COPY, you know exactly what will happen: files are copied. With ADD, the outcome depends on the file's content.
For example, ADD my-archive.tar.gz /app/ might:
- Copy the file
my-archive.tar.gzinto/app/. - Or, extract the contents of
my-archive.tar.gzinto/app/.
Docker decides this based on the file's content, not its name. If the archive is corrupted or in an unrecognized format, Docker will silently copy the file instead of extracting it, which can lead to hard-to-debug build failures down the line.
Shall I Use ADD or COPY in the Dockerfile—What's the Difference?
This article from Gcore provides a great explanation of this unpredictability and reinforces the best practices.
Read the sections 'Why COPY is preferred' and 'The best practice'. The author clearly explains how ADD's behavior can make your build pipeline unpredictable.
The Security and Caching Pitfalls of ADD with URLs
While using ADD to download files from a URL seems convenient, it's generally discouraged for two main reasons:
- Security: You are adding a file from an external source directly into your image layer without verification. If the remote source is compromised, you could be introducing malware into your image. While
ADDdoes support a--checksumflag, it's often overlooked. - Image Bloat & Cache Inefficiency: You cannot delete the downloaded file in the same layer. A more efficient method is to download, extract, and clean up all within a single
RUNinstruction. This creates a smaller final image layer.
The recommended alternative is to use RUN with tools like curl or wget. This approach is more explicit, secure, and efficient.
Here's the recommended pattern:
RUN apt-get update && apt-get install -y wget && \
    wget -O /tmp/my-tool.tar.gz https://example.com/my-tool-v1.2.tar.gz && \
    # Optional but recommended: verify checksum
    echo "CHECKSUM_HERE /tmp/my-tool.tar.gz" | sha256sum -c - && \
    tar -xvf /tmp/my-tool.tar.gz -C /usr/local/bin && \
    rm /tmp/my-tool.tar.gz && \
    # Clean up the package manager cache
    rm -rf /var/lib/apt/lists/*
This multi-step RUN command gives you full control, allows for verification, and cleans up after itself, all within a single image layer.
4. So, When Should You Use ADD?
The primary valid use case for ADD is its original intention: to add a local tar file from the build context and have it automatically extracted into the image. This is common when you need to unpack a pre-built application or toolchain into your image.
For example: ADD my-app-build.tar.gz /opt/
Even here, you could use COPY my-app-build.tar.gz /tmp/ followed by a RUN tar -xvf /tmp/my-app-build.tar.gz ..., but using ADD is more concise for this specific task.
Test your understanding!
You are writing a Dockerfile for a Python application. You need to perform the following steps:
- Copy your local application source code from the
./srcdirectory to/appin the image. - Download the
tinistatic binary fromhttps://github.com/krallin/tini/releases/download/v0.19.0/tini-staticand place it at/usr/local/bin/tini.
Based on best practices, which instructions (COPY, ADD, or RUN) would you use for each step? Write the two corresponding Dockerfile lines.
Show answer
Based on best practices, you should use COPY for the local source code and RUN with a download tool for the remote binary.
# Step 1: Use COPY for local files. It's transparent and predictable.
COPY ./src /app

# Step 2: Use RUN with curl/wget for remote files. This is more secure and explicit.
# It also allows for setting permissions in the same layer.
RUN curl -L -o /usr/local/bin/tini https://github.com/krallin/tini/releases/download/v0.19.0/tini-static && \
    chmod +x /usr/local/bin/tini
Using ADD for the second step (ADD https://... /usr/local/bin/tini) would work, but it's less transparent and considered a less robust practice than using RUN with curl or wget.
Conclusion
Congratulations on completing the "Production-Grade Dockerfiles" module! You've covered a lot of ground, from optimizing build caches and creating lean multi-stage builds to securing your containers and ensuring they run robustly.
Today, you learned the final piece of this puzzle: the subtle but important difference between COPY and ADD.
Key Takeaways:
COPYis for one thing: copying files and directories from the build context. It is transparent and predictable.ADDcan also copy local files, but adds functionality for downloading from URLs and auto-extracting local tar archives.- Best Practice: Always default to
COPY. Its simplicity makes your Dockerfiles easier to read, understand, and maintain. - Use
ADDonly when you specifically need its auto-extraction feature for a local tarball. - For downloading remote files, the most robust and secure pattern is to use
RUNwithcurlorwget, which allows for checksum verification and cleanup in a single layer.
You are now equipped with the foundational skills to write Dockerfiles that are not just functional but also efficient, secure, and ready for production environments.
In our next module, "Advanced Image and Runtime Management," we'll take the production-ready image you now know how to build and learn how to tag it effectively and push it to a container registry like Docker Hub, making it available for deployment.