Hello! Welcome back to our series on Production-Grade Dockerfiles.
In our previous lesson, we focused on cleaning up the input to our build process by using .dockerignore to create a lean build context. Today, we'll focus on optimizing the build process itself. Our goal is to leverage Docker's build cache effectively by strategically ordering Dockerfile instructions. Mastering this will significantly speed up your image builds, a critical factor for efficient CI/CD pipelines and a faster development feedback loop.
1. The Building Blocks: Image Layers and Caching
To understand build optimization, we first need to understand how Docker constructs images. A Docker image is not a monolithic entity; it's a stack of read-only layers. Each instruction in a Dockerfile (like FROM, COPY, RUN) creates a new layer.
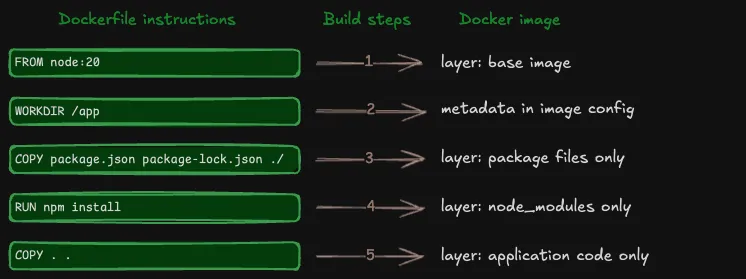
Docker is efficient and tries to avoid redoing work. It achieves this through caching. When you build an image, Docker caches the result of each step (each layer). If you build the same Dockerfile again, and nothing has changed, Docker can reuse the cached layers, making the build almost instantaneous.
The following video provides an excellent overview of what image layers are and how Docker's caching mechanism works at a high level.
Top 8 Docker Best Practices for using Docker in Production
Watch this segment from 'Top 8 Docker Best Practices' by TechWorld with Nana. It clearly explains the concepts of image layers, caching, and how reordering instructions can lead to much faster builds.
Watch from 04:30 to 09:35. Focus on how each command creates a layer and how changing one layer forces subsequent layers to be rebuilt.
2. The Chain Reaction: Cache Invalidation
The video you just watched introduced the most critical concept for this lesson: cache invalidation.
When the Docker builder processes your Dockerfile, it checks each instruction to see if it can use a cached layer from a previous build. If it finds an instruction that has changed, or if the files related to that instruction (e.g., files in a COPY command) have changed, the cache is "invalidated."
From that point forward, Docker must re-execute that instruction and every subsequent instruction, rebuilding all downstream layers from scratch.

To get a more detailed look at the mechanics behind the build cache and invalidation, the following article is an excellent resource.
The ultimate guide to Docker build cache
Let's read a section from 'The ultimate guide to Docker build cache' by Depot. This will solidify your understanding of how the cache works and what triggers invalidation.
Read the sections 'Understanding Docker build cache' and 'Cache invalidation in-depth'. Pay special attention to how invalidation for COPY instructions (based on file checksums) differs from RUN instructions (based on the command string).
3. The Golden Rule of Ordering Instructions
Understanding cache invalidation leads us to the single most effective strategy for speeding up Docker builds:
Order your Dockerfile instructions from least to most frequently changed.
Think about a typical development workflow:
- Least frequent changes: The base image you use, or system-level dependencies installed with a package manager (
apt-get,apk). - Infrequent changes: Your application's language-specific dependencies (e.g.,
package.jsonin Node.js,requirements.txtin Python). - Most frequent changes: Your application's source code.
An unoptimized Dockerfile might copy all source code first and then install dependencies. This is inefficient because every single code change will invalidate the cache for the slow dependency installation step.
Unoptimized (Slow):
WORKDIR /app
COPY . .            # Any code change invalidates the cache here
RUN npm install     # This runs on every single code change!
Optimized (Fast):
WORKDIR /app
COPY package*.json ./  # Step 1: Copy only dependency manifests
RUN npm install        # Step 2: Install dependencies. Cached if manifests don't change.
COPY . .               # Step 3: Copy source code. Changes here won't affect previous layers.
In the optimized version, as long as package.json and package-lock.json don't change, the npm install layer is reused from the cache. Builds become dramatically faster.
The following article provides a fantastic, data-backed analysis of this exact optimization and shows how the principle applies to various languages, which is highly relevant in a multi-stack DevOps environment.
Optimize your Dockerfile for 5x faster builds
This article, 'Optimize your Dockerfile for 5x faster builds,' demonstrates the massive impact of reordering instructions with concrete build time improvements.
Please read the section 'Order instructions to maximize cache reuse'. Note the build time improvements shown and how the same principle is applied to Python, Go, and Ruby. This is a pattern you can use everywhere.
Test your understanding!
You are given the following Dockerfile for a basic Python Flask application. How would you reorder it to maximize cache efficiency during development, when app.py is changing frequently but requirements.txt is not?
Current Dockerfile:
FROM python:3.9-slim

WORKDIR /usr/src/app

COPY . .

RUN pip install --no-cache-dir -r requirements.txt

CMD [ "python", "./app.py" ]
Show answer
The optimized Dockerfile separates the dependency installation from the source code copying.
Optimized Dockerfile:
FROM python:3.9-slim

WORKDIR /usr/src/app

# 1. Copy only the requirements file first.
COPY requirements.txt .

# 2. Install dependencies. This layer will be cached as long as requirements.txt doesn't change.
RUN pip install --no-cache-dir -r requirements.txt

# 3. Copy the rest of the application code. Changes to app.py will only invalidate this layer and subsequent ones.
COPY . .

CMD [ "python", "./app.py" ]
4. Caching Nuances: RUN vs. COPY
As you read earlier, it's important to remember that Docker's cache evaluation depends on the instruction:
COPYandADD: Docker calculates a checksum of the file(s) being copied. Any change to the file contents or metadata (like permissions) will invalidate the cache.RUN: Docker looks only at the command string itself. It does not check the state of the outside world.
This leads to a common "gotcha." Consider this line:RUN apt-get update
If you rebuild your image a week later, Docker will see the exact same command string and use the cached layer from a week ago, meaning you won't get the latest security patches. This is a scenario where you might want to intentionally "bust" the cache. Common techniques include passing a changing build argument or simply building with the --no-cache flag when you need to ensure freshness.
Conclusion
In this lesson, we moved from optimizing the build context to optimizing the build process itself. You learned how to harness the power of Docker's build cache to create faster, more efficient build pipelines.
Here are the key takeaways:
- Docker images are composed of layers, and each instruction in a Dockerfile creates a new layer.
- Docker caches these layers to speed up subsequent builds.
- Cache invalidation is a chain reaction: when a layer is rebuilt, all subsequent layers are also rebuilt.
- The most critical optimization is to order instructions from least to most frequently changed, typically by installing dependencies before copying source code.
- Different instructions (
RUN,COPY) have different cache validation logic, which is important to understand for avoiding common pitfalls.
You now have two fundamental tools for creating production-grade Dockerfiles: a lean build context (.dockerignore) and an efficiently ordered set of instructions.
In our next lesson, we will explore multi-stage builds. This powerful feature is the next logical step, allowing us to separate build-time dependencies from runtime dependencies to create exceptionally small and secure final images, while also providing even more advanced caching opportunities.