Hello! Welcome to the sixth lesson in our module on "Production-Grade Dockerfiles."
In our previous lesson, we focused on runtime reliability by implementing the HEALTHCHECK instruction. Today, we're continuing our journey towards secure, production-ready containers by tackling a fundamental security principle: running containers as a non-root user.
By default, Docker runs containers as the root user. This is convenient but dangerous. If an attacker compromises your application, they gain root privileges inside the container, giving them full control over the container's environment, filesystem, and processes. This violates the principle of least privilege.
In this lesson, you will learn how to use the USER instruction to create and run your container as a dedicated, unprivileged user. This simple change drastically reduces the potential attack surface and is a non-negotiable step for any production workload. Given your background in DevOps and interest in cybersecurity, you'll immediately see how this fits into a broader defense-in-depth strategy.
1. The Risk of Running as Root
Before we fix the problem, let's see it in action. A container running as root can do anything inside its namespace—install packages, modify files, and more. This gives an attacker who finds a vulnerability in your application a powerful foothold.
Docker security best practices| How to secure your container.
This short video demonstrates the problem clearly. Watch how a container running as the default root user has unrestricted permissions, allowing for arbitrary software installation—a significant security risk.
Watch the segment from 01:46 to 03:05. Notice how the user is 'root' and can easily run apt update and install new packages like nmap.
This ability to modify the container environment at runtime is precisely what we want to prevent.
2. The Solution: Create and Use a Non-Root User
The solution involves two main steps within your Dockerfile:
- Create a user and group: Use a
RUNinstruction with standard Linux commands likeuseraddoradduser. - Switch to the new user: Use the
USERinstruction to specify that all subsequent instructions (and the final running container) should execute as this new user.
To get a comprehensive overview of the best practices for this, we'll turn to the official Docker blog.
Understanding the Docker USER Instruction
This article from the official Docker blog, 'Understanding the Docker USER Instruction', provides an excellent guide on the topic. It covers the 'why' and the 'how', along with crucial best practices.
Please read the introduction, the 'UID/GID: A refresher' section, the 'Best practices' section, and the 'Example' section. Pay close attention to the Dockerfile examples that create and switch to a custom user.
Now, let's see a practical demonstration of this fix and its effect.
Docker security best practices| How to secure your container.
The same video we watched earlier also shows the solution. It demonstrates how to add a user and then confirms that the new, unprivileged user cannot perform administrative tasks.
Watch the segment from 04:09 to 07:22. Observe the use of groupadd and useradd in the Dockerfile, followed by the USER instruction. Critically, notice how attempts to create directories or install software now fail with 'permission denied'.
This before-and-after clearly illustrates the security benefit. Here is a simple visual summary of what this looks like in a Dockerfile.
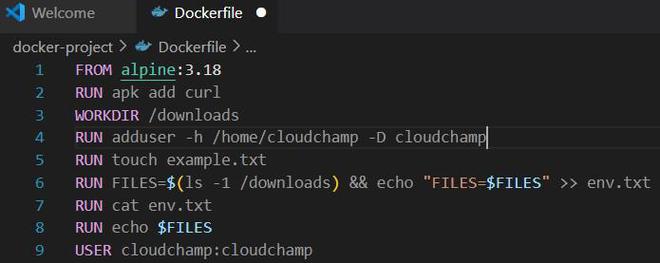
3. Best Practices for User Management
As highlighted in the Docker blog post, simply adding a user is just the start. For production-grade files, consider these practices:
- Specify User by UID/GID: Instead of
USER myuser, prefer using the numeric ID, likeUSER 1001:1001. Usernames can sometimes conflict or be inconsistent across different base images, but UIDs and GIDs are more reliable. - Manage File Permissions: When you switch to a new user, that user must have permission to read/write to the necessary directories (like your application's working directory). You often need to pair user creation with
chown. For example:# Create app directory RUN mkdir /app # Create a non-root user and group RUN addgroup -S appgroup && adduser -S appuser -G appgroup # Give the new user ownership of the app directory RUN chown -R appuser:appgroup /app # Switch to the new user USER appuser # Set working directory WORKDIR /app COPY . . CMD [ "node", "server.js" ] - Temporary Root for Privileged Operations: It's a common and valid pattern to perform administrative tasks as
rootbefore switching to your application user.# Start as root FROM ubuntu:22.04 # Perform privileged operations RUN apt-get update && apt-get install -y curl # Now, create and switch to the non-root user RUN useradd -m myapp USER myapp # Subsequent instructions run as myapp CMD ["/bin/bash"]
4. An Advanced Pattern: Handling File Permissions in Development
Here's a scenario every DevOps engineer encounters: a developer is using a bind mount to sync code from their host machine into a running container. If the container process (running as UID 1001) creates a file in that volume, the file on the host machine is now owned by user 1001. If the developer's host user is UID 1000, they'll get permission errors trying to edit that file.
We can solve this elegantly by combining the USER instruction with the ARG instruction you learned about in a previous lesson.
Running Docker Containers as a Non-root User with a Custom UID / GID
This blog post, 'Running Docker Containers as a Non-root User with a Custom UID / GID', details a professional pattern to solve the volume permission problem. It's a fantastic real-world application of several Dockerfile concepts.
Read the section 'Custom UID / GID in Your Docker Related Files' and its three subsections. This will show you how to: (1) use ARG in the Dockerfile to accept a UID/GID, (2) pass these ARGs from a docker-compose.yml file, and (3) define them in an .env file for easy configuration.
This pattern makes your Docker setup much more portable and developer-friendly by allowing each user to build the image with their own UID/GID, ensuring seamless file ownership across the container-host boundary.
Test your understanding!
You are creating a Dockerfile for a Python application. For security and developer convenience, you need to implement a non-root user with a configurable UID/GID.
Your task is to write the Dockerfile instructions that:
- Define build arguments
APP_UIDandAPP_GID, both defaulting to1001. - Create a group named
appgroupwith the providedAPP_GID. - Create a user named
appuserwith the providedAPP_UID, belonging to theappgroup. The user should have a home directory. - Switch to the
appuser.
Hint: On an Alpine base, you might use addgroup -g "${APP_GID}" appgroup && adduser -u "${APP_UID}" -G appgroup -h /home/appuser -D appuser.
Show answer
# Define build arguments with defaults
ARG APP_UID=1001
ARG APP_GID=1001

# Create a group and user with the specified IDs.
# The -D flag means 'don't assign a password'.
# The -S flag means 'create a system user'.
RUN addgroup -S -g ${APP_GID} appgroup && \
    adduser -S -u ${APP_UID} -G appgroup appuser

# Switch to the created user
USER appuser
This snippet correctly uses ARG to make the IDs configurable and then applies them during user creation before finally switching the context with USER.
Conclusion
You've now mastered a critical security practice for containerization. By moving away from the default root user, you apply the principle of least privilege to significantly harden your Docker images against potential exploits.
Key Takeaways:
- Running containers as
rootis a major security risk. Always create and use a dedicated non-root user. - The process is a two-step:
RUN useradd/adduserto create the user, thenUSERto switch to it. - Remember to manage file permissions with
chownso your application user can access its files and directories. - For advanced use cases, especially in development, parameterize the UID and GID using
ARGto solve file ownership issues with volumes.
In our next lesson, we will address another subtle but important aspect of production containers: signal handling and the role of an init system. Now that we have a secure process running as the right user, we need to ensure it can start and, more importantly, stop gracefully.