Hello! In our previous lesson, we successfully automated pushing our versioned Docker images to various container registries. Our CI pipeline is now a reliable factory for producing and publishing images. But before an image is shipped, we must ask a critical question: "Is it secure?"
This lesson addresses the learning outcome: Implement a security gate in a CI/CD job to fail builds based on vulnerability scan results. We're going to integrate an automated security check into our pipeline that acts as a gatekeeper, preventing images with known vulnerabilities from ever reaching a registry or being deployed. This practice, often called "shifting security left," is a cornerstone of modern DevSecOps.
What is a Security Gate?
In a CI/CD pipeline, a security gate is an automated step that enforces a security policy. If the policy is violated, the pipeline is stopped. For our purposes, the policy will be:
"The pipeline must fail if the Docker image contains vulnerabilities of CRITICAL or HIGH severity."
Vulnerability scanners can enforce this by returning a non-zero exit code when they find vulnerabilities that meet or exceed a specified threshold. Since CI/CD systems like GitHub Actions treat a non-zero exit code from any step as a failure, this simple mechanism effectively "closes the gate" and stops the build.
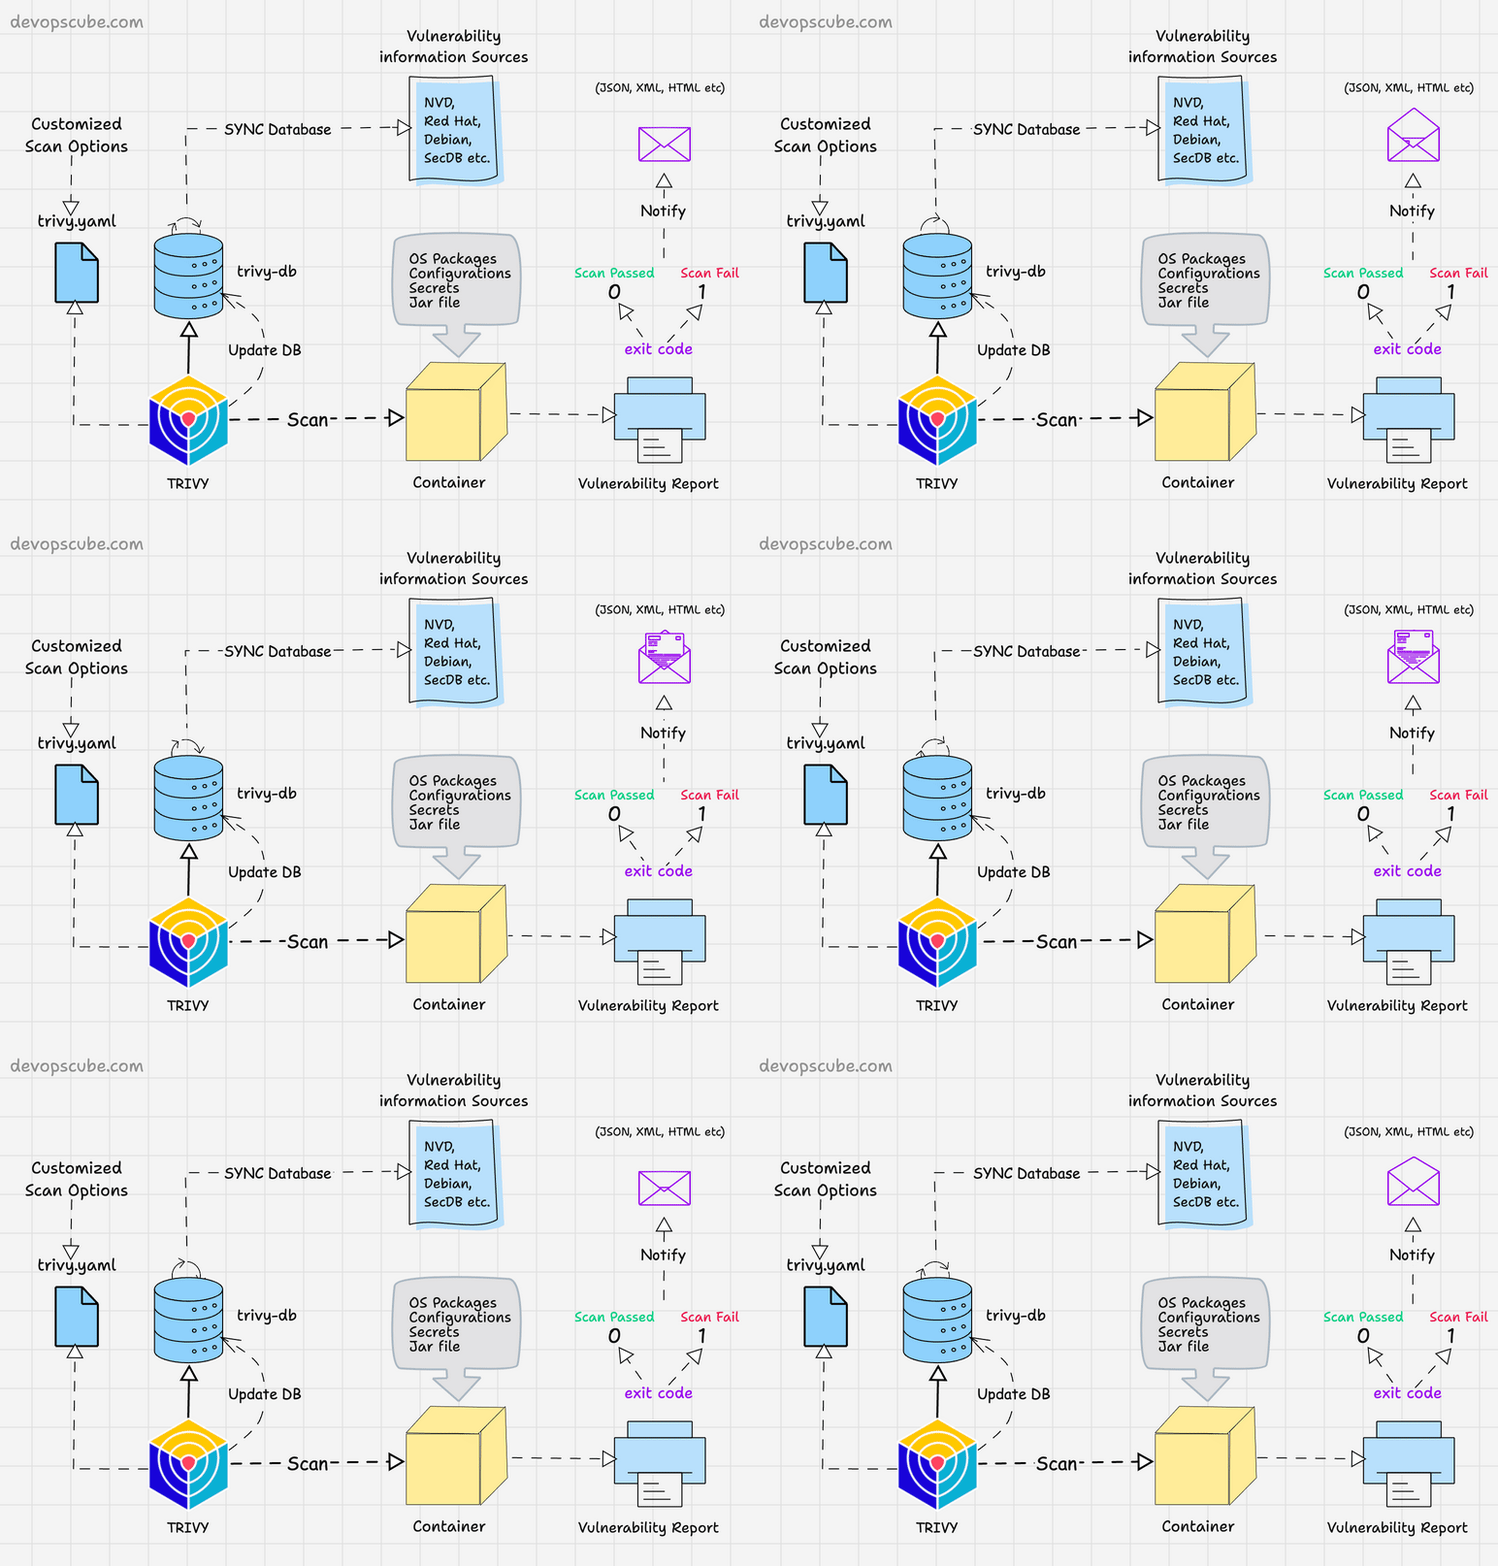
Let's see how to implement this using a couple of popular tools.
Implementing a Security Gate with Docker Scout
Docker Scout is a set of software supply chain features integrated directly into Docker. It replaces the older docker scan command and provides powerful tools for analyzing image contents and vulnerabilities right from your command line.
To get started, let's explore what Docker Scout is and how it works.
Find Vulnerabilities Fast! New Docker CLI Command: Docker Scout
This video from DevOps Directive offers a concise introduction to Docker Scout, explaining what it is and how to use its basic commands to scan an image for Common Vulnerabilities and Exposures (CVEs).
Watch the first 4 minutes and 44 seconds of the video. Focus on the docker scout cves command and the structure of its output, which includes vulnerability severity levels (Low, Medium, High, Critical).
The real power comes from integrating this scan into our automated workflow. We will now watch a detailed walkthrough that shows how to add docker scout to a CI script to create a security gate.
How to Create a DevSecOps CI/CD Pipeline
This video from DevOps Journey provides an excellent, practical demonstration of building a DevSecOps pipeline. It not only shows how to implement a security gate with Docker Scout but also how to remediate the discovered vulnerabilities.
Please watch from 16:36 to 32:27. This is the core of our lesson. Pay close attention to: Scanning the image with docker scout cves and interpreting the results. Implementing the gate by adding the --only-severity and --exit-code flags to the command in the CI script. Observing the pipeline fail when critical vulnerabilities are found. Remediating the issue by switching to a more secure, minimal base image (from Chainguard). Re-running the pipeline and seeing it succeed and proceed.
Integrating Docker Scout into GitHub Actions
Based on the video, let's see how to add the security gate to our build-and-push job in the GitHub Actions workflow. The scan should happen right after the image is built but before it's pushed.
jobs:
  build-and-scan:
    runs-on: ubuntu-latest
    steps:
      - name: Checkout code
        uses: actions/checkout@v4

      # You would still have your login steps if pushing
      - name: Login to Docker Hub
        uses: docker/login-action@v3
        with:
          username: ${{ secrets.DOCKERHUB_USERNAME }}
          password: ${{ secrets.DOCKERHUB_TOKEN }}

      - name: Build the Docker image
        id: build
        run: |
          IMAGE_TAG="myapp:insecure"
          docker build -t $IMAGE_TAG .
          echo "IMAGE_TAG=${IMAGE_TAG}" >> $GITHUB_OUTPUT

      # The Security Gate
      - name: Scan image for vulnerabilities
        run: |
          docker scout cves ${{ steps.build.outputs.IMAGE_TAG }} \
            --exit-code \
            --only-severity critical,high

      # This step will only run if the scan above passes (exit code 0)
      - name: Push the Docker image
        run: |
          echo "Vulnerability scan passed. Pushing image..."
          # In a real workflow, this would be your docker/build-push-action step
          # docker push ${{ steps.build.outputs.IMAGE_TAG }}
The key part is the Scan image for vulnerabilities step.
--exit-code: This flag tells Docker Scout to exit with a non-zero status code if vulnerabilities are found that match the filter criteria.--only-severity critical,high: This is our policy. We are instructing the gate to only considercriticalandhighseverity vulnerabilities.
If the scan finds a CRITICAL or HIGH vulnerability, this step will fail, and the Push the Docker image step will never be reached.
Implementing a Security Gate with Trivy
While Docker Scout is convenient, Trivy by Aqua Security is an extremely popular, open-source, and versatile scanner that is widely used in many CI/CD systems. It's an excellent tool to have in your DevOps toolkit.
The article below provides several examples of integrating different scanners into a CI/CD pipeline. We'll focus on its Trivy examples.
How to Implement Docker Security Scanning in CI/CD
The article 'How to Implement Docker Security Scanning in CI/CD' from OneUptime provides practical code snippets for integrating various scanners into different CI systems. It's a great reference for common patterns.
Read the section 'Trivy Integration', focusing on the 'GitHub Actions with Trivy' and 'Trivy with Exit Code' examples. Notice the use of the aquasecurity/trivy-action@master and its parameters like exit-code and severity.
Using the official trivy-action for GitHub Actions, our security gate step becomes very clear and declarative.
      # Build step remains the same...
      - name: Build the Docker image
        id: build
        run: |
          IMAGE_TAG="myapp:insecure"
          docker build -t $IMAGE_TAG .
          echo "IMAGE_TAG=${IMAGE_TAG}" >> $GITHUB_OUTPUT

      # The Security Gate using Trivy
      - name: Run Trivy Vulnerability Scanner
        uses: aquasecurity/trivy-action@master
        with:
          image-ref: ${{ steps.build.outputs.IMAGE_TAG }}
          format: 'table'
          # Set the policy: fail on CRITICAL or HIGH severities
          exit-code: '1'
          severity: 'CRITICAL,HIGH'
          # Optional: Don't fail for vulnerabilities that don't have a fix yet
          ignore-unfixed: true
This configuration achieves the exact same outcome as the Docker Scout example. The trivy-action will scan the image specified in image-ref. If it finds vulnerabilities matching the severity list, it will exit with code 1, failing the workflow. The ignore-unfixed: true parameter is a common and practical setting to avoid failing builds for vulnerabilities that you cannot yet patch.
Test your understanding!
Your team has decided on a new, stricter security policy: builds should be blocked if they have any CRITICAL vulnerabilities, but only generate a warning (i.e., not fail the build) for HIGH severity ones. How would you modify the Trivy GitHub Action snippet to implement this two-tiered policy?
Show answer
You would need two separate steps for the Trivy scan.
      # First, scan for CRITICAL vulnerabilities and fail the build if found.
      - name: Scan for Critical Vulnerabilities
        uses: aquasecurity/trivy-action@master
        with:
          image-ref: ${{ steps.build.outputs.IMAGE_TAG }}
          format: 'table'
          exit-code: '1' # Fail the build
          severity: 'CRITICAL'
          ignore-unfixed: true

      # Second, scan for HIGH vulnerabilities but do NOT fail the build.
      # The output will still appear in the logs as a warning.
      - name: Scan for High Vulnerabilities (Warning only)
        uses: aquasecurity/trivy-action@master
        with:
          image-ref: ${{ steps.build.outputs.IMAGE_TAG }}
          format: 'table'
          exit-code: '0' # Do not fail the build
          severity: 'HIGH'
          ignore-unfixed: true
By setting exit-code: '0' for the HIGH severity scan, you ensure the action's output is logged, but the workflow continues.
Beyond the Gate: SBOMs and Reporting
Failing a build is the primary function of a security gate, but modern scanners do more. A crucial artifact they can produce is a Software Bill of Materials (SBOM).
An SBOM is a detailed inventory of all components, libraries, and dependencies included in your software. After security incidents like the Log4j vulnerability, having an SBOM became critical for organizations to quickly identify if they were affected. Generating an SBOM should be a standard part of your build process.
Both Docker Scout and Trivy can generate SBOMs easily.
With Docker Scout:
docker scout sbom myapp:latest > sbom.json
With Trivy:
trivy image --format cyclonedx --output sbom.json myapp:latest
You can add this command as another step in your pipeline to generate the SBOM and then upload it as a build artifact for compliance and future analysis.
Conclusion
You have now learned how to fortify your CI/CD pipeline by embedding an automated security gate. This is a fundamental practice in DevSecOps that ensures a baseline of security for every image you produce.
Key Takeaways:
- Shift Left: By scanning for vulnerabilities before pushing an image, you catch security issues early, reducing risk and remediation costs.
- Security as Code: A security gate is defined directly in your CI/CD configuration (e.g.,
workflow.yaml), making your security policy version-controlled, transparent, and automated. - Policy Enforcement via Exit Codes: The simple mechanism of using non-zero exit codes is the standard way for tools like Docker Scout and Trivy to signal failure and stop a pipeline.
- Remediation is Key: The most common way to fix vulnerabilities found in a Docker image is to update the base image or specific OS packages to patched versions. Using minimal, hardened base images (like Alpine, distroless, or those from Chainguard) is a proactive strategy to reduce the attack surface from the start.
- Generate SBOMs: Always generate a Software Bill of Materials (SBOM) as a build artifact for inventory, compliance, and future security analysis.
In this and previous lessons, we've been running Docker commands inside our CI/CD jobs. But how does the CI runner itself get access to a Docker environment to execute these commands? In our next lesson, we will explore this crucial implementation detail by addressing the learning outcome: Compare the trade-offs of Docker-in-Docker (DinD) vs. socket mounting for CI/CD builds. This topic has significant security and performance implications that every DevOps professional should understand.