Hello! In our last session, we fortified our CI/CD pipeline by integrating a dedicated testing stage, ensuring that our Docker image is only built if all tests pass. This was a massive step towards a production-ready workflow.
However, our pipeline still has a significant weakness: it pushes every successful build using the same latest tag. This practice, while convenient for local development, is risky in a professional environment as it makes it impossible to track which version of the code is running and makes reliable rollbacks a nightmare.
Today, we'll fix that. This lesson directly addresses the learning outcome: Tag and version images based on CI/CD workflow triggers (e.g., git tags, branches). We will explore robust versioning strategies and automate the tagging process within our GitHub Actions workflow. For a DevOps Engineer, mastering automated versioning is fundamental for creating traceable, auditable, and reliable deployment pipelines.
The Problem with latest and The Power of Immutable Tags
The core issue with the :latest tag is that it's mutable—it can point to different images over time. If you deploy myapp:latest today, it might be a completely different image from the one deployed yesterday, even though the tag is the same. This violates the principle of immutability and creates several problems:
- Traceability: You can't easily determine which specific Git commit is running in production.
- Reproducibility: You can't reliably pull the exact same image that caused an issue for debugging.
- Rollbacks: You can't roll back to a previous "latest" version because that tag has been overwritten.
To solve this, we use immutable tags. These are tags that, once created, should never be overwritten. They point to one specific version of your image forever.
The following resource clearly distinguishes between good and bad tagging practices.
This article from DeployU provides a crisp explanation of why mutable tags are problematic and introduces several immutable tagging strategies. It's a great starting point for understanding professional-grade versioning.
Read the section 'Step 1: Image Tagging Strategy' to see examples of bad (mutable) vs. good (immutable) tags. Then, read the 'Practice Question' at the end of the page, which summarizes why the 'latest' tag is problematic.
As the article shows, good immutable tags often include:
- Semantic Versioning:
1.2.3 - Git Commit SHA:
sha-abc1234 - Branch or Pull Request Identifier:
pr-123
Let's explore these strategies, starting with the most common one for production releases: Semantic Versioning.
Understanding Semantic Versioning (SemVer)
Semantic Versioning (SemVer) is a widely adopted standard that communicates the nature of changes in a release through a MAJOR.MINOR.PATCH versioning scheme.
MAJORversion is incremented for incompatible API changes (breaking changes).MINORversion is incremented when you add functionality in a backward-compatible manner.PATCHversion is incremented when you make backward-compatible bug fixes.
In a CI/CD context, the act of creating a Git tag (e.g., git tag -a v1.2.3 -m "Release version 1.2.3") is often the trigger that signals a new release. The CI pipeline then uses this Git tag to version the corresponding Docker image.
Version and Automate ⚡️ Releases like a Pro - Walkthrough and Demo
This video from Julie Ng provides an excellent conceptual walkthrough of versioning, including the thought process behind choosing a version number based on SemVer.
Watch the first part of the video (00:00 - 03:50). Focus on: The introduction to versioning and the concept of a changelog. The explanation of Semantic Versioning and how to decide whether to bump the MAJOR, MINOR, or PATCH version based on the nature of the code changes.
A Strategy for Automated Tagging
A robust CI/CD pipeline should automatically apply different tags based on the event that triggered it. This gives every image a meaningful, traceable context. Here's a common strategy:
| Trigger | Tag Pattern | Use Case |
|---|---|---|
Push to main branch |
sha-<short-sha> |
Development/integration builds, traceable to a specific commit. |
Push to a feature branch (feat/new-api) |
feat-new-api |
Previewing changes from a specific feature branch. |
| Open a pull request (e.g., #123) | pr-123 |
Creating a temporary preview environment for a PR. |
Create a Git tag (e.g., v1.2.3) |
1.2.3, 1.2, 1 |
A production release. Multiple tags allow users to pin to a MAJOR, MINOR, or specific PATCH version. |
The following diagram illustrates how version tags fit into a typical Git branching model, marking specific commits on the main branch as formal releases.
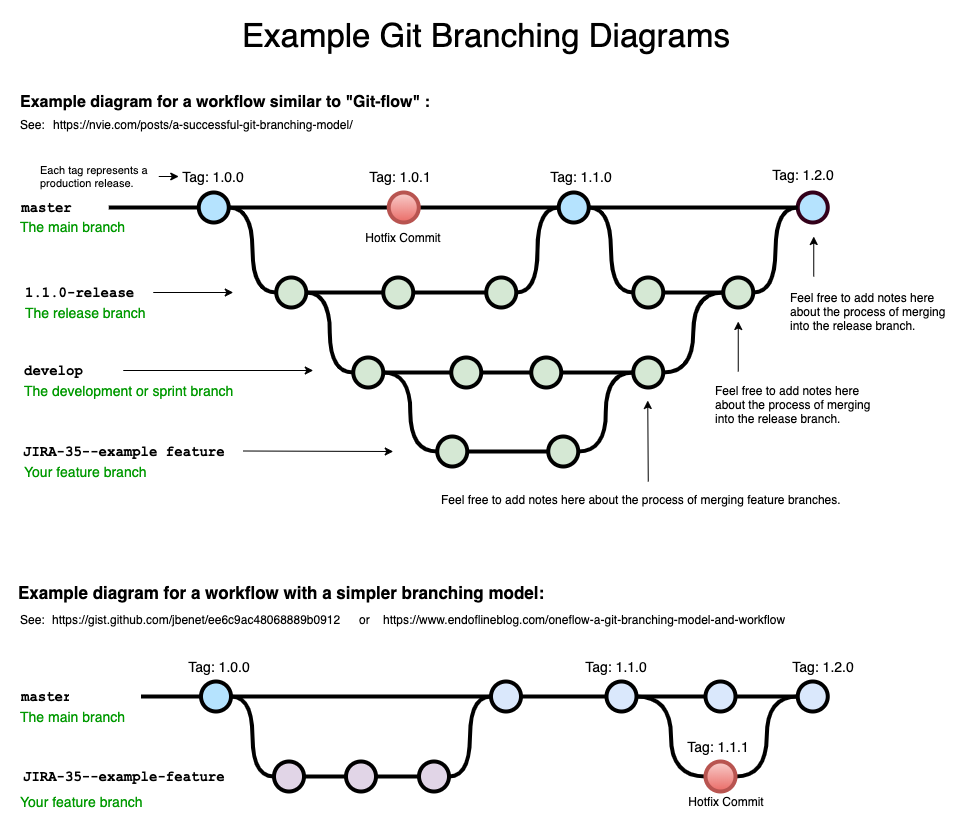
This table from the DeployU article provides a great summary.
Let's revisit the DeployU article to see a concise summary of this tagging strategy.
Review the 'Tagging Strategy Summary' table. It provides a clear mapping between CI/CD triggers and their recommended tag patterns.
Implementing Automated Tagging in GitHub Actions
Now for the practical part. How do we implement this in our GitHub Actions workflow? Manually constructing these tags would be complex and error-prone. Fortunately, the Docker ecosystem provides a powerful tool for this: the docker/metadata-action.
This action inspects the GitHub event that triggered the workflow (e.g., a push, a tag) and automatically generates a set of appropriate tags and labels for your image.
Manage tags and labels with GitHub Actions
The official Docker documentation provides the canonical guide for using the docker/metadata-action. This is the key to implementing our strategy.
Read the introduction and then carefully examine the example ci.yml workflow. Pay close attention to the tags block within the docker/metadata-action step. See how different type entries (like semver, ref, sha) are used to generate tags based on the event.
Let's integrate this into the docker-publish.yml workflow we've been building.
- Add a
metastep usingdocker/metadata-actionbefore thebuild-and-pushstep. - Configure the
tagsto generate tags for branches, pull requests, semantic versions from Git tags, and the commit SHA. - Update the
build-and-pushstep to use the output of themetastep (${{ steps.meta.outputs.tags }}) instead of a hardcoded tag.
Here is the updated build-and-push job from our workflow:
  build-and-push:
    needs: test
    runs-on: ubuntu-latest
    steps:
      - name: Checkout code
        uses: actions/checkout@v4

      # This new step generates tags and labels automatically
      - name: Docker meta
        id: meta
        uses: docker/metadata-action@v5
        with:
          images: your-dockerhub-username/my-app # Replace with your image name
          tags: |
            # tag with git branch name for branch pushes
            type=ref,event=branch
            # tag with PR number for PR events
            type=ref,event=pr
            # tag with commit SHA
            type=sha
            # tag with semantic version for git tags
            type=semver,pattern={{version}}
            type=semver,pattern={{major}}.{{minor}}

      - name: Set up Docker Buildx
        uses: docker/setup-buildx-action@v3

      - name: Login to Docker Hub
        uses: docker/login-action@v3
        with:
          username: ${{ secrets.DOCKERHUB_USERNAME }}
          password: ${{ secrets.DOCKERHUB_TOKEN }}

      - name: Build and push with cache and tags
        uses: docker/build-push-action@v5
        with:
          context: .
          push: true
          # Use the tags generated in the 'meta' step
          tags: ${{ steps.meta.outputs.tags }}
          labels: ${{ steps.meta.outputs.labels }}
          platforms: linux/amd64,linux/arm64
          cache-from: type=registry,ref=your-dockerhub-username/my-app:buildcache
          cache-to: type=registry,ref=your-dockerhub-username/my-app:buildcache,mode=max
With this configuration:
- A push to the
mainbranch will create an image tagged withmainandsha-abcdef. - Creating a Git tag
v2.1.0and pushing it will create images tagged2.1.0and2.1.
Test your understanding!
Given the YAML configuration above for the docker/metadata-action, what Docker tags would be generated if you were to create and push a Git tag named v3.5.2?
Show answer
The pipeline would generate two tags based on the semver types:
your-dockerhub-username/my-app:3.5.2(frompattern={{version}})your-dockerhub-username/my-app:3.5(frompattern={{major}}.{{minor}})
It would not generate a SHA tag or branch tag, because the docker/metadata-action correctly identifies the trigger as a tag event and applies only the relevant rules.
Conclusion
Congratulations! You have now replaced the fragile latest tag with a robust, automated versioning strategy. This is a critical step in professionalizing your CI/CD pipeline.
Key Takeaways:
- Embrace Immutability: Avoid the mutable
:latesttag in favor of immutable tags like SemVer (1.2.3), Git SHAs (sha-abcde), and branch names to ensure traceability and enable reliable rollbacks. - Map Triggers to Tags: Define a clear strategy that maps CI/CD events (push to main, create Git tag, open PR) to specific, meaningful tag patterns.
- Automate with
docker/metadata-action: Use this powerful GitHub Action to automatically generate tags based on the workflow trigger, eliminating manual effort and errors. - Integrate into the Pipeline: Pipe the output of the metadata action directly into your
docker/build-push-actionto tag and push your image in one seamless flow.
In our next lesson, we will focus on automating the push of images to a container registry as a distinct part of a deployment pipeline. We'll discuss conditional pushing—for example, only pushing release-tagged images to a production registry—and how this automated push can trigger subsequent deployment steps.