Welcome back! In our previous lesson, we toured the Visual Basic Editor (VBE) and configured it into a productive workspace. You now know how to navigate its key windows and understand their purpose. This familiarity with the VBE is the foundation we'll build upon today.
Our focus now shifts from observing recorded code to creating our own. You will write your first Sub procedure from scratch, which is the fundamental building block for almost all automation in Excel. This lesson is a major step toward your goal of developing custom solutions for clients, as it moves you from being a macro user to a macro author. By the end of our session, you will be able to write a simple, multi-step macro to automate a sequence of actions.
1. The Anatomy of a Sub Procedure
In VBA, a Sub Procedure (often shortened to Sub) is a named block of code that performs a series of actions. Think of it as a recipe: it has a name, a list of ingredients (data), and a sequence of steps to follow. When you "run" the macro, Excel follows those steps in order, from top to bottom.
Every Sub procedure follows a simple, required structure:
Sub ProcedureName()
    ' Code goes here...
End Sub
Let's break this down:
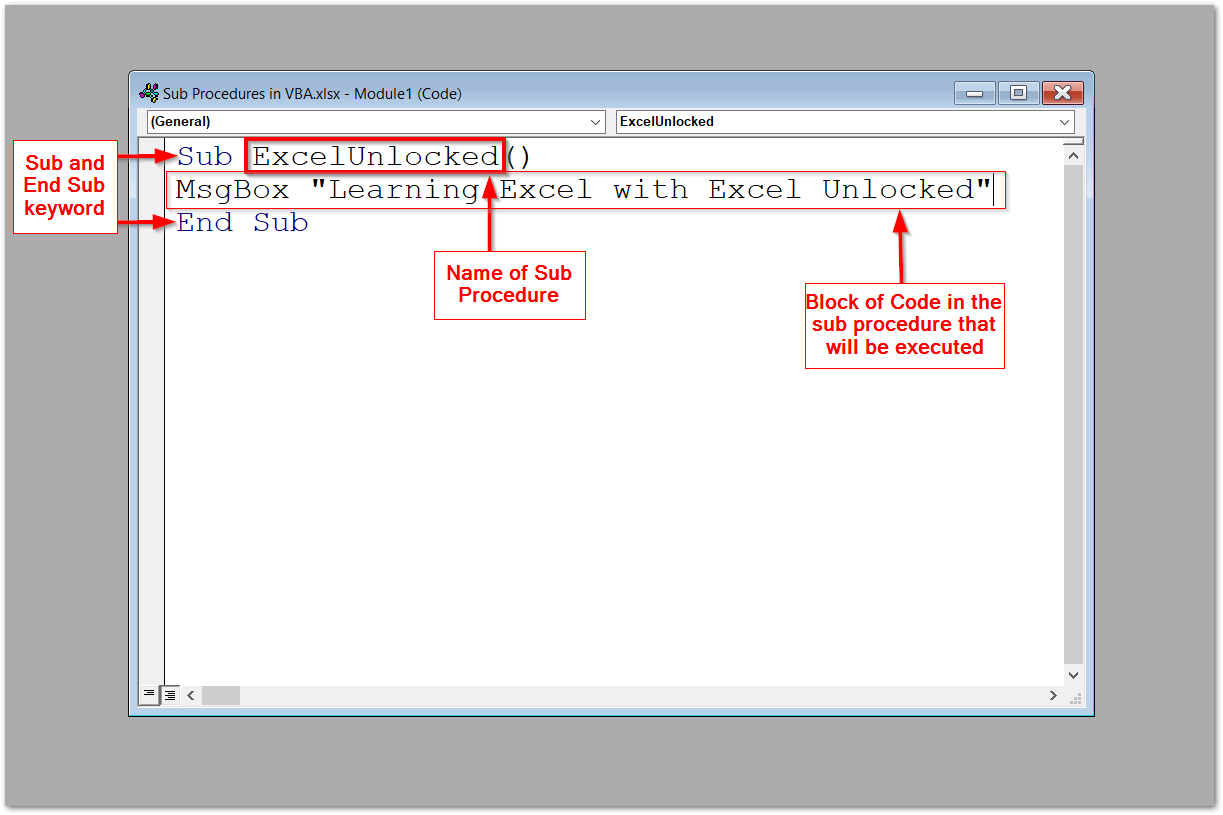
Sub: This keyword signals the beginning of a new Sub Procedure.ProcedureName: This is the name you give your macro. It must start with a letter and cannot contain spaces or certain special characters. A common practice is to use PascalCase (e.g.,FormatReportHeader) or use underscores (e.g.,format_report_header).(): These parentheses are required. For now, we'll leave them empty, but in later lessons, you'll learn how to pass information into a procedure using them.- Code Block: The indented lines between
SubandEnd Subare the instructions you want Excel to execute. End Sub: This keyword marks the end of the procedure.
The image below, from Excel Unlocked, clearly labels these essential parts.
For a quick video recap of what a subroutine is, please watch the following clip.
Excel Macros & VBA - Tutorial for Beginners
The video "Excel Macros & VBA - Tutorial for Beginners" by Kevin Stratvert provides a clear, concise explanation of the Sub structure.
Watch the short segment from this explanation of subroutines. The key takeaway is that your macro's code is packaged as a unit between the Sub and End Sub lines.
2. Writing Your First Procedure
Now it's time to write your own code. We'll create a simple procedure that performs a few distinct actions in a sequence. This hands-on practice is the best way to understand how these instructions come together.
Follow these steps:
- Open Excel and press
Alt+F11to go to the VBE. - In the Project Explorer, find your current workbook.
- Right-click on your project, and choose Insert > Module. A new, blank module will appear.
- In the code window for the new module, type the following line and press Enter:
Sub CreateAndFormatCell() - Notice that the VBE automatically adds the
End Subline for you. Your cursor will be positioned on an indented line between the two. This is where you'll write your code.
Now, let's add a sequence of instructions. We will write a procedure that:
- Selects cell
C5. - Enters the text "Status: OK".
- Makes the font bold.
- Changes the background color of the cell to light green.
Type the following code between the Sub and End Sub lines:
' 1. Selects cell C5
Range("C5").Select

' 2. Enters text into the active cell
ActiveCell.Value = "Status: OK"

' 3. Makes the font bold
ActiveCell.Font.Bold = True

' 4. Changes the interior color
ActiveCell.Interior.Color = RGB(204, 255, 204) 'Light Green
Your complete procedure should look like this:
Sub CreateAndFormatCell()
    ' 1. Selects cell C5
    Range("C5").Select

    ' 2. Enters text into the active cell
    ActiveCell.Value = "Status: OK"

    ' 3. Makes the font bold
    ActiveCell.Font.Bold = True

    ' 4. Changes the interior color
    ActiveCell.Interior.Color = RGB(204, 255, 204) 'Light Green
End Sub
Notice the lines starting with a single quote ('). These are comments. VBA ignores them completely. They are there for you and other humans to understand what the code does. It's a critical habit to comment your code clearly.
3. Running and Testing Your Procedure
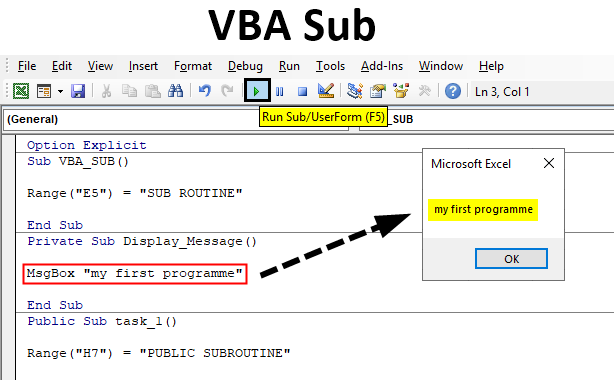
With your cursor anywhere inside the CreateAndFormatCell procedure, you can run it in two easy ways:
- Press the
F5key. - Click the green "Play" button in the VBE toolbar.
Now, switch back to your Excel sheet. You should see that cell C5 now contains the formatted text. Congratulations, you've just written and executed your first macro from scratch!
4. Building a Practical Formatting Macro
The previous example demonstrated the mechanics. Now, let's create something more practical that you might use in a real-world freelancing project: a macro that creates and formats a title for a report.
This macro will perform the following sequence of actions:
- Select the range
A1:E1. - Merge these cells into a single cell.
- Enter the title "Annual Performance Review".
- Horizontally align the text to the center.
- Make the font bold and increase its size to 14.
- Apply a blue background color to the cell.
In the same module, below your first procedure, type the following code:
Sub FormatReportTitle()
    ' Define the range for the title
    Dim titleRange As Range
    Set titleRange = Range("A1:E1")

    ' Use a With block to perform several actions on the same range
    With titleRange
        .Merge
        .Value = "Annual Performance Review"
        .HorizontalAlignment = xlCenter
        .Font.Bold = True
        .Font.Size = 14
        .Interior.Color = RGB(173, 216, 230) 'Light Blue
    End With
End Sub
A Quick Note on the Code:
- You'll see
With titleRange ... End With. This is a convenient VBA structure. It tells Excel that all the commands starting with a dot (.) should be applied totitleRange. It makes the code cleaner and more efficient than repeatingRange("A1:E1")on every line. DimandSetare used for variables, which we will cover in detail in our next lesson. For now, just know that this is a robust way to refer to the range we want to work with.
Go ahead and run this FormatReportTitle macro using the F5 key. You will see a professional-looking title instantly appear on your worksheet. You have just automated a six-step formatting sequence!
To explore more examples of simple, one-line actions that you can combine into powerful sequences, the following resource is excellent. You don't need to memorize them all, but reading through them will help you recognize the patterns of how VBA interacts with Excel.
Lesson 3 : Writing Your Own VBA Code - 35 Examples
This article from ListenData.com provides a fantastic list of simple, practical VBA code snippets. These are the building blocks you will use to construct your own procedures.
Focus on the section titled "35 Examples". Read through examples 1 through 9 to see basic cell manipulation and copy/paste operations. Then, look at examples 10 and 11 for clearing data. Finally, review the examples for worksheet and workbook manipulation, from 22 to 29. Pay attention to the Object.Action or Object.Property = Value syntax.
Conclusion
In this lesson, you made the pivotal leap from editing recorded macros to authoring your own. You now understand the structure of a Sub procedure and can write a sequence of commands to automate tasks, moving you closer to your goal of building sophisticated Excel solutions.
Key Takeaways:
- A
Subprocedure is a block of code starting withSub ProcedureName()and ending withEnd Sub. - VBA executes the code within a
Subsequentially, from the first line to the last. - You can write your own procedures in a module within the VBE to automate any sequence of actions.
- Using comments (
') makes your code readable and maintainable. - Simple actions can be combined to create powerful and practical automation scripts.
In our procedures today, we acted directly on cells and wrote text like "Annual Performance Review". To create more flexible and dynamic code, we need a way to store and manage data while a macro is running. In our next lesson, we will explore variables, the fundamental concept of using named placeholders to hold information in your code.