Welcome to your next lesson on Excel formulas. In our last session, we established the foundations of conditional logic with the IF, AND, OR, and NOT functions. You learned how to create formulas that choose between two different outcomes, like "Pass" or "Fail." But what happens when you need to handle more than two possibilities? For instance, assigning a grade of A, B, C, D, or F based on a score requires a more advanced approach.
This lesson will equip you with the tools to manage these multi-condition scenarios. We will explore two powerful techniques: constructing nested IF statements, the traditional method for handling complex logic, and using the modern IFS function, which offers a more streamlined and readable solution. Mastering these will be a significant step toward building the sophisticated financial models and data analysis tools you aim to create as a freelancer.
The Classic Approach: Nested IF Statements
When you have more than two outcomes, you can "nest" one IF function inside another. The concept is straightforward: if the first condition isn't met, instead of giving a final answer, you ask another question with a second IF function. This creates a chain of decisions.
A nested IF is typically placed in the value_if_false argument of the parent IF function. The structure looks like this:
=IF(condition1, value_if_true1, IF(condition2, value_if_true2, value_if_false2))
Let's imagine you're grading students.
- A score > 249 is "Excellent".
- A score > 200 is "Good".
- A score > 150 is "Satisfactory".
- Anything else is "Poor".
Here's how you would build the formula:
=IF(B2>249, "Excellent", IF(B2>200, "Good", IF(B2>150, "Satisfactory", "Poor")))
Notice the chain:
- Excel first checks if
B2is greater than 249. IfTRUE, it returns "Excellent" and stops. - If
FALSE, it moves to the nextIFand checks ifB2is greater than 200. IfTRUE, it returns "Good" and stops. - If
FALSE, it moves to the finalIFand checks ifB2is greater than 150. - If that is
TRUE, it returns "Satisfactory." IfFALSE, it returns the final value, "Poor."
This sequential evaluation means the order of your conditions is crucial. You must start with the most restrictive condition (the highest score) and work your way down.
The image below shows this exact formula in action.
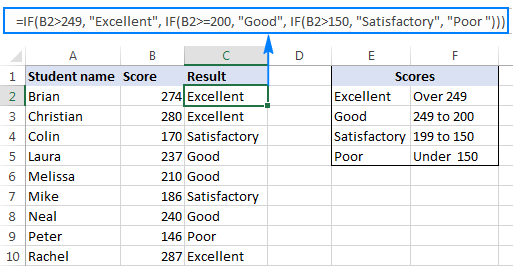
While powerful, nested IFs can become difficult to read and manage, especially with many conditions. You might hear developers joke about the "staircase of parentheses" at the end of a complex formula.
To see how to build one from scratch, let's watch a practical demonstration.
IF Function Excel With Multiple Conditions | Nested IF, IFS Function | IF with 2 or More Conditions
This video by Chester Tugwell demonstrates how to build a nested IF statement to evaluate sales performance against multiple benchmarks.
Watch the first part of the video, from the beginning to the end of the nested IF section. Pay close attention to how the formula is constructed step-by-step and the instructor's explanation of why the order of the tests matters.
The Modern Solution: The IFS Function
To address the readability challenges of nested IFs, modern versions of Excel (2019 and later, including Microsoft 365) introduced the IFS function. It allows you to test multiple conditions without nesting, resulting in a "flat" and much cleaner formula.
The syntax is a simple series of test-value pairs:
=IFS(condition1, value1, condition2, value2, ...)
Let's rewrite our grading formula using IFS:
=IFS(B2>249, "Excellent", B2>200, "Good", B2>150, "Satisfactory", B2<=150, "Poor")
The logic is the same: Excel checks each condition in order and returns the value for the first one that evaluates to TRUE.
Now, watch the next segment of the same video to see this function applied to the same problem.
IF Function Excel With Multiple Conditions | Nested IF, IFS Function | IF with 2 or More Conditions
The instructor now solves the same sales performance problem using the IFS function, providing a direct comparison.
Watch the segment from the start of the IFS explanation. Note the simpler structure and how a "catch-all" condition is created at the end.
As highlighted in the video, IFS has one crucial difference from a nested IF: it doesn't have a final value_if_false argument. If none of your conditions are met, IFS will return an #N/A error.
To avoid this, you can create a default or "catch-all" value by making the final logical test simply TRUE. Since TRUE is always true, Excel will return the corresponding value if none of the preceding conditions were met.
Our grading formula becomes more robust like this:
=IFS(B2>249, "Excellent", B2>200, "Good", B2>150, "Satisfactory", TRUE, "Poor")
This is the standard and recommended way to create a default case with IFS.
Practical Application and Comparison
Given your preference for hands-on learning, let's look at more practical examples and directly compare these two approaches.
IFS() Excel: Learn to Simplify Multiple Conditions - DataCamp
This article from DataCamp provides several excellent, real-world examples of the IFS function.
Please read the section "Examples of the IFS() in Action." Focus on these two examples that are highly relevant to data analysis and financial modeling: Grade assignment: This reinforces the grading logic we've been discussing. Apply discount tiers: This is a classic business scenario where you might offer different discounts based on purchase volume.
Now that you've seen both methods in action, the following infographic provides a fantastic summary comparing them side-by-side.

As the infographic points out:
- Readability:
IFSis the clear winner. Its flat structure is easier to write, debug, and understand. - Compatibility: Nested
IFworks in all versions of Excel.IFSis only available in modern versions. For freelance work, this is a key consideration if your clients use older software. - Default Value: Nested
IFhas a natural "else" value.IFSrequires theTRUEcondition to create a default.
For a final, concise summary, review the direct comparison in the following article.
How to Use the IF Function in Excel - Xelplus - Leila Gharani
This XelPlus article directly contrasts the syntax for a grading formula using both methods.
Read the section from the beginning of the IFS section to see the two approaches written out one after the other. This clearly illustrates the readability advantage of the IFS function.
Conclusion
You have now expanded your logical toolkit to handle complex, multi-outcome scenarios. This is a critical skill for developing sophisticated spreadsheets that can automate decision-making processes.
Here are the main takeaways:
- Nested IFs are the traditional method for handling multiple conditions by placing
IFfunctions inside one another. They are universally compatible but can become difficult to read. - The
IFSfunction is a modern, more readable alternative that evaluates a list of conditions in order. It is available in Excel 2019+ and Microsoft 365. - The order of conditions is critical for both methods, as Excel stops at the first
TRUEresult. - To create a default or "catch-all" value with
IFS, useTRUEas your final logical test.
In this lesson, we focused on returning specific values based on conditions. In our next session, we will build on this by learning how to perform calculations—like sums and counts—that are themselves based on conditions. This will introduce you to the powerful SUMIF, COUNTIF, SUMIFS, and COUNTIFS functions, cornerstones of data summarization in Excel.