In our last lesson, we focused on proactive data quality by using Data Validation to control what users can enter into your spreadsheets. This is about preventing errors before they happen. Now, we'll tackle the other side of the coin: cleaning up data that is already messy.
This lesson addresses a common data integrity issue: duplicate records. You will learn how to find and remove these redundant entries from your datasets. For a freelancer building reports or tools, duplicate data is a critical flaw. It can lead to inflated totals, incorrect counts, and ultimately, unreliable analysis that undermines a client's trust. We will cover several methods, from a quick, built-in tool to more advanced, dynamic techniques that will become essential as you handle more complex projects.
First, Find Your Duplicates
Before deleting anything, it's crucial to identify and review the duplicates. Sometimes, what appears to be a duplicate is actually a distinct record with a coincidental similarity, or a data entry error that needs correcting rather than outright deletion. Hasty removal can lead to data loss.
A great first step is to use Conditional Formatting to visually highlight duplicate values. This is a non-destructive way to see the extent of the problem.
Let's start by watching a short video that clearly defines what constitutes a duplicate record and then demonstrates two essential methods: using the built-in Remove Duplicates tool and the modern UNIQUE function.
Three EASY Ways to Find and Remove Duplicates in Excel
The video "Three EASY Ways to Find and Remove Duplicates in Excel" by Leila Gharani on YouTube is an excellent resource. We'll watch a short segment to set the stage.
Watch the first part of the video from the introduction. The presenter does a great job of explaining how to define a "duplicate" in the context of a dataset—is it a duplicate if just one cell matches, or does the entire row have to be identical?
Now that we understand the concept, let's see how to apply conditional formatting to highlight these duplicates.
How to Remove Duplicates in Microsoft Excel
This short video, "How to Remove Duplicates in Microsoft Excel" by Cody Baldwin, gets straight to the point.
Watch the first segment from highlighting duplicates. This will show you how to use Conditional Formatting to make duplicate rows stand out visually before you take any further action.
The Remove Duplicates Tool: A Quick Cleanup
Once you've identified the duplicates, Excel's built-in Remove Duplicates tool is the most direct way to delete them. This tool permanently alters your data, so a critical best practice is to always work on a copy of your worksheet or create a backup of your file before proceeding. Losing client data because of a mistake is a scenario you must always avoid.
The Remove Duplicates tool is found on the Data tab in the Data Tools group.
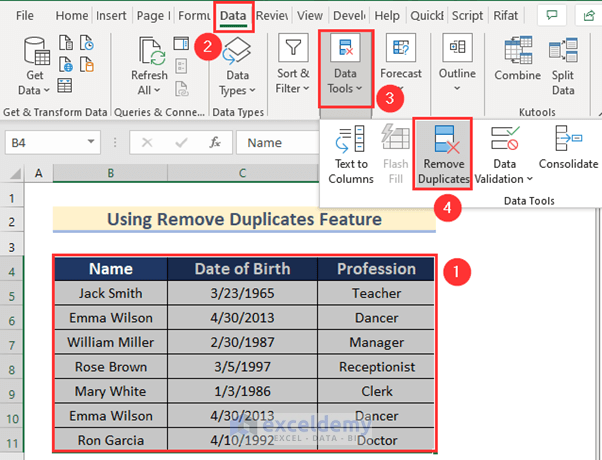
This tool can be used in two main ways:
- Check all columns: This will remove rows that are 100% identical across every single column you've selected.
- Check specific columns: This is more common. You can tell Excel to remove rows based on a duplicate value in one or more key columns (like an
EmailorTransaction IDcolumn), even if other columns in that row have different data.
The following video demonstrates both of these scenarios clearly.
How to Remove Duplicates in Microsoft Excel
We'll return to Cody Baldwin's video to see the Remove Duplicates tool in action.
Please watch the rest of the video: Removing full duplicates: This part shows how to remove rows where every column's value matches. Removing based on one column: This demonstrates the more nuanced approach of removing duplicates based on a single key, like an employee ID.
For a text-based guide that you can refer back to, the article below from the Journal of Accountancy provides a clear, step-by-step walkthrough.
Identify and delete duplicates in Excel - Journal of Accountancy
This article provides a professional context for handling duplicates.
Please read the section titled Remove Duplicates. It walks through the same process shown in the video, reinforcing how to use the dialog box to select specific columns.
Advanced Methods: UNIQUE Function and Power Query
While the Remove Duplicates tool is fast, it's a one-time, destructive action. For building reusable tools or reports, you'll often want a non-destructive, dynamic solution.
The UNIQUE Function (Microsoft 365)
If you use Microsoft 365, the UNIQUE function is a fantastic, modern alternative. Instead of deleting rows from your original data, it generates a new list containing only the unique records. The best part is that this new list is dynamic: if you add, remove, or change data in the source table, the unique list updates automatically.
Three EASY Ways to Find and Remove Duplicates in Excel
Let's go back to Leila Gharani's video, which has an excellent demonstration of the UNIQUE function.
Watch the segment on Method 2. Pay close attention to how the list generated by the UNIQUE function automatically updates when a new row is added to the source table. This dynamic behavior is its key advantage.
Power Query
For handling large datasets or automating a data cleaning process that you'll perform regularly, Power Query is the most robust tool. As you requested in our initial discussion, we will be covering Power Query in-depth later, but it's important to see its role in de-duplication now.
One critical difference to be aware of: Power Query is case-sensitive, whereas the Remove Duplicates tool and the UNIQUE function are not. For example, Power Query would see "Bridge" and "bridge" as two different, unique values. The video below explains this nuance and how to handle it—a professional touch that prevents subtle errors.
Three EASY Ways to Find and Remove Duplicates in Excel
The final method in Leila Gharani's video uses Power Query.
Watch the section on Power Query. Note the initial result where a case-sensitive duplicate is missed. Then, observe the extra step she adds—transforming the text to the same case before removing duplicates—to solve the problem. Finally, see how the resulting table is refreshed to update with new data.
Choosing the Right Method
You now have several tools for this task. Knowing which one to use in which situation is key to working efficiently. The article "How to Extract Duplicates in Excel" provides an excellent summary.
How to Extract Duplicates in Excel - ONLC
This article gives practical advice on when to use each method we've discussed.
Please read the sections titled Choosing the Right Method and Best Practices. This will help you build a mental framework for deciding on the best approach for a given task.
Conclusion
In this lesson, you've learned how to find and remove duplicate records, a fundamental skill for ensuring the integrity of your data. This is a crucial step in any data analysis workflow and a hallmark of a professional, reliable spreadsheet.
Here are your key takeaways:
- Identify before removing: Use Conditional Formatting to visually inspect duplicates before taking destructive action.
- The
Remove DuplicatesTool: A quick, built-in feature for permanent removal. Remember to always work on a copy of your data. - The
UNIQUEFunction: A modern, dynamic, and non-destructive alternative that creates a new, automatically updating list of unique records. - Power Query: The most powerful and repeatable method, ideal for large datasets and automated workflows, but be mindful of its case-sensitivity.
In our next lesson, we will continue our journey through data cleaning by learning to use Text to Columns and Flash Fill. Now that you know how to clean up redundant rows, we'll focus on how to split, reformat, and clean up the data within the cells themselves.