Welcome to the next stage of your VBA journey. In our last lesson, you discovered how to make your code run automatically using events, responding to actions like cell changes or opening a workbook. This was a crucial step in moving from writing simple macros to building intelligent, interactive applications.
Today, we will build directly on that foundation by exploring UserForms. These are custom dialog boxes that you can design and build, providing a professional and user-friendly interface for your applications. For a freelancer, mastering UserForms is essential; it's the difference between delivering a spreadsheet and delivering a polished, custom-built tool.
This lesson will guide you through the process of designing and creating your first UserForm. You will learn how to add and arrange the most common controls—labels, text boxes, combo boxes, and buttons—and how to configure their essential properties to prepare them for the VBA code we'll add in the next lesson.
1. The Anatomy of a UserForm
Before we start building, let's understand what a UserForm is. Think of the built-in dialogs you use in Excel all the time, like the "Format Cells" window. It has tabs, dropdowns, text boxes, and OK/Cancel buttons. A UserForm allows you to create your own version of this, tailored to any task you can imagine—from data entry and custom calculators to complex report generators.
To work with UserForms, you'll become familiar with three key components in the Visual Basic Editor (VBE):
- The UserForm Window: The visual canvas where you'll design your form's layout.
- The Toolbox: A floating palette containing all the different controls you can add to your form.
- The Properties Window: The panel where you configure the appearance and behavior of the selected form or control.
Let's watch a short video that walks through creating a blank UserForm and introduces these three components.
Excel UserForm Course 1 - Your First UserForm
The video "Excel UserForm Course 1" from TeachExcel provides a clear and direct introduction to getting started.
Please watch the first two minutes of the video: Inserting a UserForm (getting started): Observe how to open the VBE and insert a new, blank UserForm. Key Windows (Toolbox and Properties): Pay close attention to the introduction of the Toolbox and the Properties window. These are the primary tools you'll use for design.
As you saw, creating the form itself is simple: open the VBE (Alt+F11) and choose Insert > UserForm. This gives you a blank canvas and opens the Toolbox, ready for you to start designing.
2. Building Your First Data Entry Form
Your goal is to build tools for clients, so let's create a practical UserForm for a common freelance task: adding a new client record. Our form will be simple, designed to capture a client's name, their contact email, and the type of project.
Step 1: Naming the Form and Controls
The single most important habit to develop when working with UserForms is to give every element a logical name. When you start writing code, you will refer to your controls by their names (e.g., txtClientName, cmdSubmit). Default names like TextBox1 and CommandButton1 quickly become confusing.
A standard convention is to use a three-letter prefix to identify the control's type. This makes your code much easier to read and maintain.
This guide from TechMentors provides an excellent summary of common controls and their recommended naming prefixes.
Please review the table of controls under the heading Add controls to the UserForm. Familiarize yourself with the prefixes for Label (lbl), TextBox (txt), ComboBox (cbo), and CommandButton (cmd). Also, read the section on naming conventions that follows.
With these conventions in mind, let's start building.
Step 2: Adding and Configuring Controls
We will now build the visual layout of our "New Client" form. A crucial concept to grasp is the difference between a control's (Name) property and its Caption property:
(Name): The internal name you use to refer to the control in your VBA code. It follows thetxtClientNameconvention.Caption: The visible text that the user sees on the form (e.g., the text on a label or a button).
The following video demonstrates how to add labels, text boxes, and buttons, and how to set their properties.
Excel UserForm Course 1 - Your First UserForm
We'll continue with the "Excel UserForm Course 1" video to see the process in action.
Watch these segments to see how controls are added and configured: Naming the Form (form properties): Learn how to change the (Name) and Caption of the UserForm itself. Adding Labels & Text Boxes (adding controls): See how to add labels and text boxes from the Toolbox and set their (Name) and Caption properties. Adding Command Buttons (adding buttons): Observe how "Submit" and "Cancel" buttons are created and named.
Your Turn: Build the "New Client" Form
Now, apply what you've learned. Follow these steps to build your form.
-
Insert a UserForm in a new Excel workbook.
-
Select the UserForm itself. In the Properties window:
- Set
(Name)tofrmNewClient. - Set
CaptiontoAdd New Client.
- Set
-
Using the Toolbox, add controls to your form. For each control, select it and set its properties as specified below. You can resize and drag the controls to arrange them neatly.
Control Type (Name)PropertyCaptionPropertyPurpose Label lblNameClient Name:Identifies the client name text box. TextBox txtClientName(N/A) For user to enter the client's name. Label lblEmailContact Email:Identifies the email text box. TextBox txtEmail(N/A) For user to enter the email address. Label lblProjectTypeProject Type:Identifies the project type dropdown. ComboBox cboProjectType(N/A) For user to select a project type. CommandButton cmdSubmitSubmitThe button to save the new client. CommandButton cmdCancelCancelThe button to close the form.
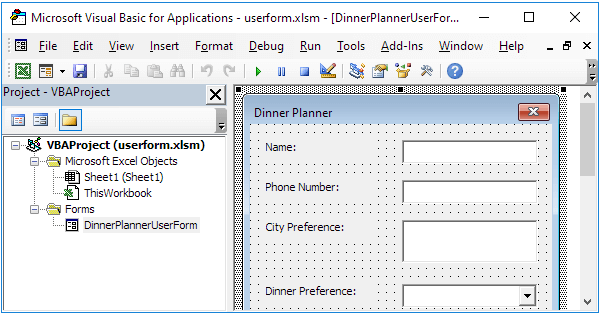
Your final design should look something like this:
3. Populating the Combo Box
Our form is designed, but the "Project Type" combo box is empty. A dropdown list is useless without options. We need to populate it with a list of choices when the form loads.
This is a perfect application of the UserForm_Initialize event, which runs automatically just before the form is shown to the user. Inside this event, we can use the AddItem method to programmatically add items to our combo box.
How to Create a UserForm Like a Pro
The video "How to Create a UserForm Like a Pro" from Excel Macro Mastery demonstrates how to use the Initialize event.
Watch the segment from the initialize event. The instructor shows how to access the UserForm_Initialize event and uses it to fill a combo box.
Now, let's add the code to populate your cboProjectType combo box.
- Right-click on your
frmNewClientUserForm in the Project Explorer and select View Code. (Or, just double-click an empty area of the form). - At the top of the code window, use the left dropdown to select UserForm.
- Use the right dropdown to select Initialize. VBA will create the
Private Sub UserForm_Initialize()procedure for you. - Inside this procedure, add the following code:
Private Sub UserForm_Initialize()

    ' Add items to the Project Type combo box
    With Me.cboProjectType
        .AddItem "Data Analysis"
        .AddItem "Financial Modeling"
        .AddItem "VBA Automation"
        .AddItem "Dashboard Build"
    End With

End Sub
The With block is a convenient way to perform multiple actions on the same object (Me.cboProjectType) without repeating its name. Me is a special keyword in a form's code module that refers to the form itself.
To test it, click anywhere on your UserForm in the VBE and press F5 (or the "Run" button). Your form will appear, and if you click the dropdown for "Project Type," you will see the list of options you just added.
Conclusion
Congratulations! You have successfully designed and created your first UserForm. You learned how to insert a form, add essential controls from the Toolbox, and configure their properties. Most importantly, you've adopted the crucial practice of using standardized naming conventions, which will be invaluable as your projects grow in complexity. You also connected back to our previous lesson by using the Initialize event to populate a control, making your form dynamic from the moment it appears.
Key Takeaways:
- UserForms provide a professional interface for user interaction in Excel.
- Design involves three main windows: the UserForm, the Toolbox, and the Properties window.
- Using a consistent naming convention (e.g.,
txt,lbl,cbo,cmd) is critical for writing clear and maintainable code. - The
(Name)property is for your code, while theCaptionproperty is for the user. - The
UserForm_Initializeevent is the ideal place to run setup code, such as populating combo boxes using theAddItemmethod.
Right now, your form is just a visual shell. Clicking the "Submit" and "Cancel" buttons does nothing. In our next lesson, we will bring this form to life by writing the VBA code to handle button clicks, validate the user's input, and transfer the data from the form into a worksheet.