Introduction
Hello! In our previous lesson, we compared the Stage-Gate, Design Thinking, and Lean Startup methodologies, establishing that the best approach often involves blending these frameworks to suit a project's specific level of uncertainty. You learned how to select a model based on your knowledge of the users and the product category.
This lesson builds directly on that foundation. Our goal is to map the key phases and decision points of a comprehensive industrial design process, from discovery to launch. We will move from the "why" to the "what and when," creating a detailed, chronological map of the product development journey. This will provide the structured overview you're seeking, connecting high-level strategic phases with the granular, engineering-focused validation steps that are critical in hardware development.
We'll see how a product evolves from a vague idea, through various prototyping and testing stages, until it's ready for mass production and hits the market.
The Overall Structure: A Phased and Gated Process
To bring order to the complexity of product development, many companies use a phased model. The Stage-Gate process, which we discussed previously, provides an excellent high-level "skeleton" for this journey. It breaks the process into distinct stages of work, separated by gates where key decisions are made.
To see what these stages look like in a typical industrial context, please review the breakdown provided by Stage-Gate International.
Discovery-To-Launch Process | Stage-Gate International
This article, 'Discovery-To-Launch Process', outlines the standard stages in a formal product innovation process. It will serve as our high-level map for this lesson.
Please read the section titled 'The Stages', which starts with 'Stage 0 – Discovery' and ends with 'Stage 5 – Launch'. As you read, notice how each stage is designed to gather more information and reduce risk before committing more resources.
As you can see, the process is a funnel, not a tunnel. It starts wide and progressively filters out ideas, focusing resources on the most promising projects. The main stages are:
- Discovery (Stage 0): Idea generation.
- Scope (Stage 1): Preliminary, low-cost investigation.
- Business Case (Stage 2): Detailed investigation and planning.
- Develop (Stage 3): The actual design and engineering work.
- Test and Validate (Stage 4): Verifying the product and production process.
- Launch (Stage 5): Commercialization and market entry.
Now, let's zoom in and see what activities happen within these stages.
From Discovery to a Defined Concept
The early stages—Discovery, Scope, and Business Case—are often called the "fuzzy front end" because the path forward is still unclear. The goal here is to move from a vague opportunity to a concrete, well-defined product concept. This is where the principles of Design Thinking are most powerful.
The "Double Diamond" model offers a great way to visualize the divergent and convergent thinking required here. Watch this segment from a product designer to see how it works in practice.
How I Brought My First Product to Market – Idea to Launch
In his video 'How I Brought My First Product to Market', Matthew Encina provides a clear, real-world example of using the Double Diamond framework to go from a problem to a product concept.
Watch from the introduction of the Double Diamond (00:52) through the 'Develop' phase (up to 04:46). Pay attention to how the team moves through these four steps: Discover: Exploring the problem (user interviews, observation). Define: Narrowing down to a specific design challenge. Develop: Brainstorming and prototyping potential solutions. Deliver (in this context, the refined concept): Settling on a final concept to move forward with.
At the end of this front-end process, you don't just have an idea; you have a business case. You've answered critical questions:
- Who is the user and what is their problem? (Desirability)
- What is our proposed solution and how will it work? (Feasibility)
- Is there a market for this and can we make money? (Viability)
The key output is a set of initial requirements and a Proof-of-Concept (POC). A POC isn't a finished product; its sole purpose is to prove that the core technology or idea is feasible, often using off-the-shelf components like Arduino or Raspberry Pi.
The Core Hardware Development & Validation Process
Once the concept is approved at the Business Case gate, the project moves into the Develop (Stage 3) and Test and Validate (Stage 4) stages. For a mechanical engineer, this is where the most intensive work occurs. This part of the journey is defined by a series of structured prototyping and testing cycles specifically for hardware. The industry-standard terms for these are EVT, DVT, and PVT.
This article from EnCata provides an excellent breakdown of these crucial phases. The accompanying image gives a fantastic visual summary of the entire hardware lifecycle.
Hardware product development stages: POC – EVT – DVT - EnCata
The article 'Hardware product development stages: POC – EVT – DVT – PVT explained' defines the key validation milestones for any physical product. Understanding this terminology is essential for communicating with manufacturing partners and managing a hardware project.
Please read the sections titled 'The EVT (engineering validation testing) phase', 'The DVT (Design Validation Testing) phase', and 'The PVT or Production Validation Testing'. Focus on the Objective, Prototype Quantities, and Deliverables for each phase.
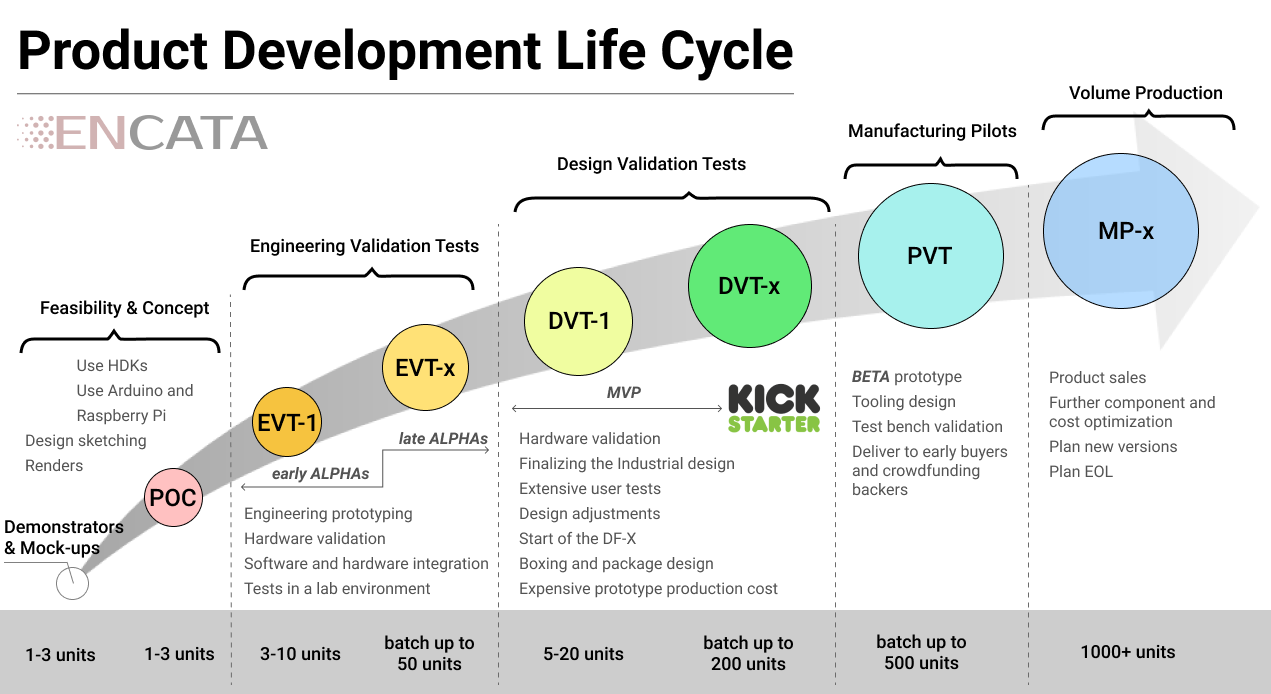
Let's integrate this with a practical, mechanical engineering perspective. Watch the following segments from the "How Mechanical Engineers Design Products" video, which describe the same process using slightly different language.
How Mechanical Engineers Design Products
This video from Engineering Gone Wild walks through the design process from a mechanical engineer's viewpoint. It provides practical insights that map directly onto the formal EVT and DVT stages.
Please watch the following two sections: High-Level Design (05:04 - 07:06): This corresponds to the EVT phase. Notice the focus on layout, basic functionality, and creating a proof-of-concept with simpler manufacturing methods (3D printing, CNC). Detailed Design (09:11 - 14:49): This corresponds to the DVT phase. Pay close attention to the emphasis on finalizing materials, adding detailed features (ribs, bosses), and the critical importance of getting Design for Manufacturing (DFM) feedback from vendors early and often.
Here’s a summary of how these phases fit together:
-
Engineering Validation Testing (EVT)
- Goal: To verify that all the electronics and core functional parts work as intended. These are "works-like" prototypes.
- Focus: Core functionality, system integration, basic analysis. The enclosure is often 3D printed or roughly machined and doesn't represent the final look and feel.
- Key Decision (Gate): Does the product meet its fundamental functional requirements?
-
Design Validation Testing (DVT)
- Goal: To create a prototype that is both "works-like" and "looks-like" the final product, and to validate the design against a wider range of tests (e.g., environmental, drop tests, certification pre-scans).
- Focus: Finalizing part design for manufacturing (DFM), material selection, assembly processes (DFA), and cosmetic finishing. This is where you test with production-intent materials and processes where possible. The output of this stage is often considered the Minimum Viable Product (MVP).
- Key Decision (Gate): Is the design ready to be tooled for mass production? Have all major risks been addressed?
-
Production Validation Testing (PVT)
- Goal: To validate the manufacturing process itself. This is the first official production run, typically using the final tooling and assembly lines.
- Focus: Fine-tuning the assembly line, checking production yields, and confirming quality control processes. The units produced here are sometimes called "golden samples" and may go to key customers for final beta testing.
- Key Decision (Gate): Are we ready to "flip the switch" on mass production?
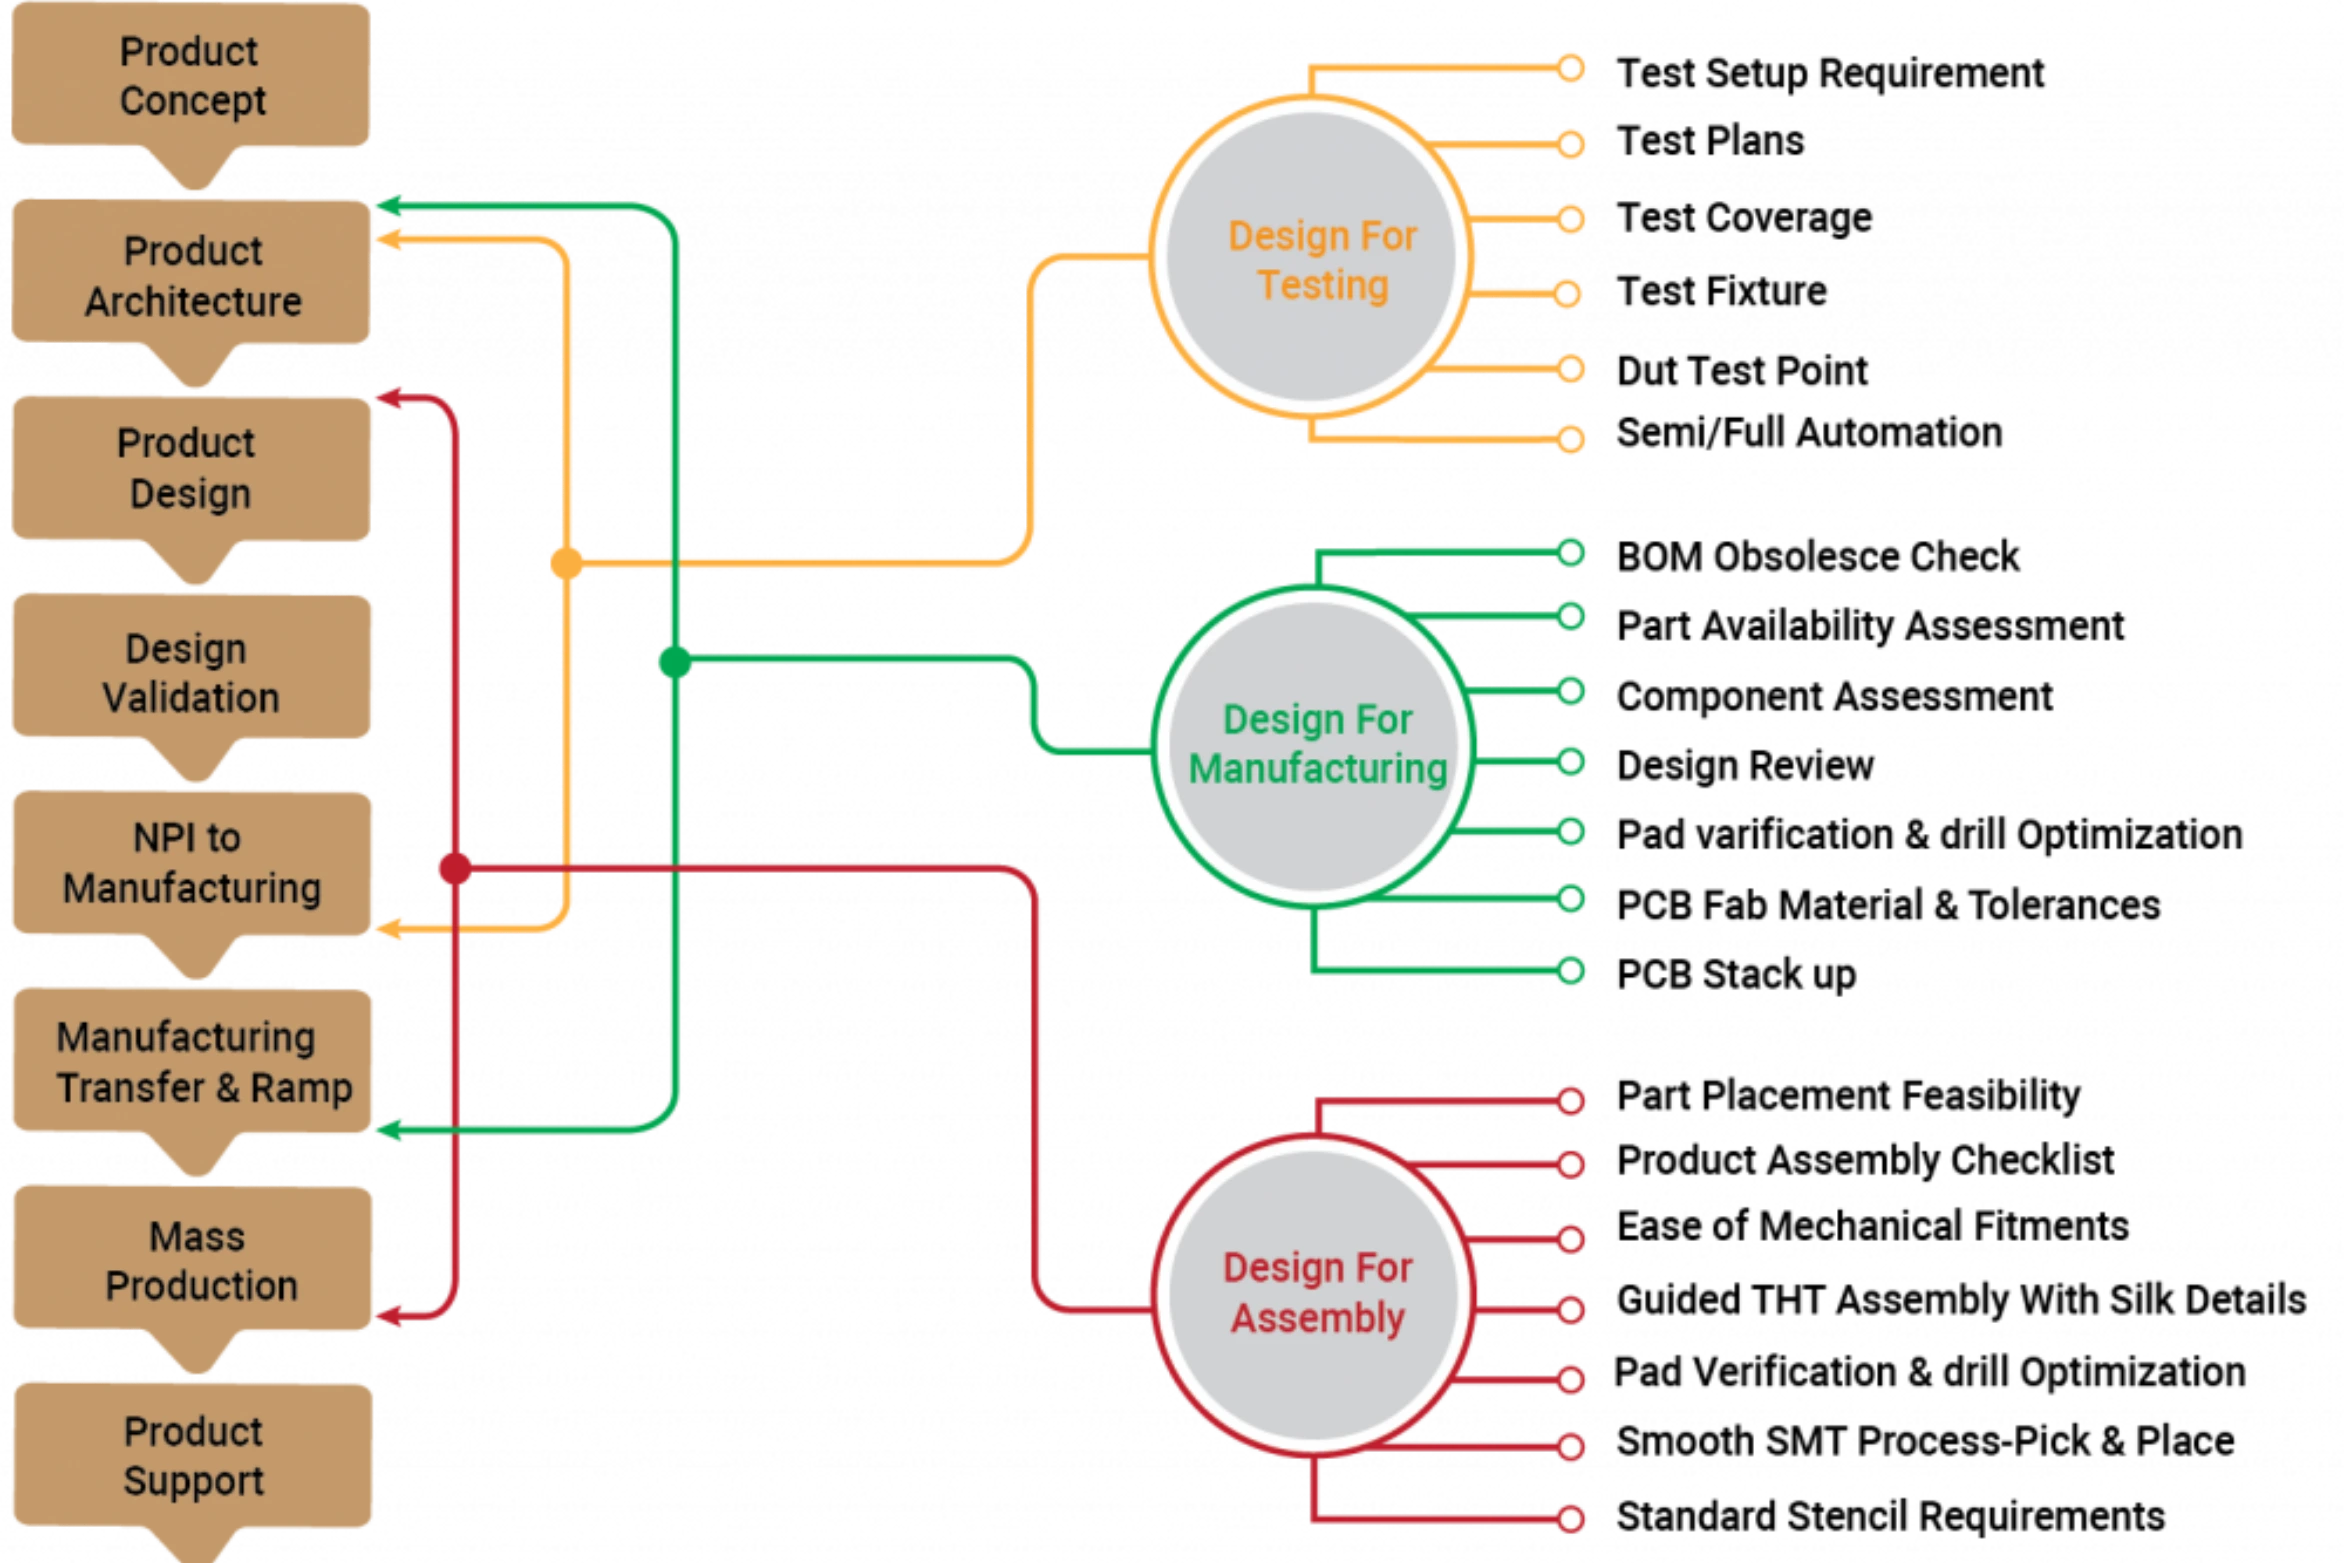
Throughout this process, "Design for X" (DFX) principles are not an afterthought but an integral part of the design refinement, as shown in the diagram below.
From Launch to End-of-Life
Following a successful PVT, the project moves to Stage 5: Launch. This involves scaling up to Mass Production (MP), as described in the EnCata article. This phase is less about design and more about supply chain management, marketing, sales, and logistics.
However, the designer's job isn't quite done. Post-launch activities include:
- Monitoring field returns and quality issues.
- Gathering customer feedback for the next version.
- Planning for End-of-Life (EOL), which involves considering how the product will be disposed of, disassembled, or recycled—a key component of sustainable design.
Conclusion
You now have a comprehensive map of the industrial design process, from the initial spark of an idea to the final product launch and beyond. We've seen how high-level strategic frameworks like Stage-Gate provide the skeleton, while more detailed models like the Double Diamond and the EVT/DVT/PVT cycle provide the muscle and sinew for the fuzzy front-end and core engineering phases, respectively.
Key Takeaways:
- Product development is a structured process designed to manage risk and build value incrementally.
- The "fuzzy front end" uses methods like Design Thinking to explore the problem and define a valuable solution concept.
- The core of hardware development is a sequence of validation builds: EVT (validating function), DVT (validating the final design and manufacturability), and PVT (validating the production process).
- Decision points, or "gates," are critical for ensuring projects meet technical and business goals before more resources are invested.
- DFM and DFA are not final checks; they are principles that must be integrated throughout the detailed design phase.
In our next lesson, we will focus on a critical document that is created during the early "Scope" and "Business Case" stages: the Product Design Brief. You will learn how to write a preliminary brief that captures the project's vision, scope, and success criteria, setting the foundation for the entire development journey we've just mapped out.