Hello! Welcome to your next lesson in the Containerization with Docker module.
In our last session, we established the "why" behind containers, contrasting their lightweight, OS-level virtualization with the heavyweight, hardware-level virtualization of VMs. You learned that containers are efficient, fast, and portable, making them a cornerstone of modern DevOps.
Today, we transition from theory to practice. You'll get your hands on the tools and see just how easy it is to get a complex application running in a consistent, isolated environment.
Today's Learning Outcome: By the end of this lesson, you will be able to install Docker and run containers from Docker Hub images.
We will cover:
- The core components of the Docker ecosystem.
- Installing the Docker Engine on your system.
- Running your first containers, from a simple "hello-world" to a functional Nginx web server.
Let's get started.
1. The Docker Ecosystem: Key Components
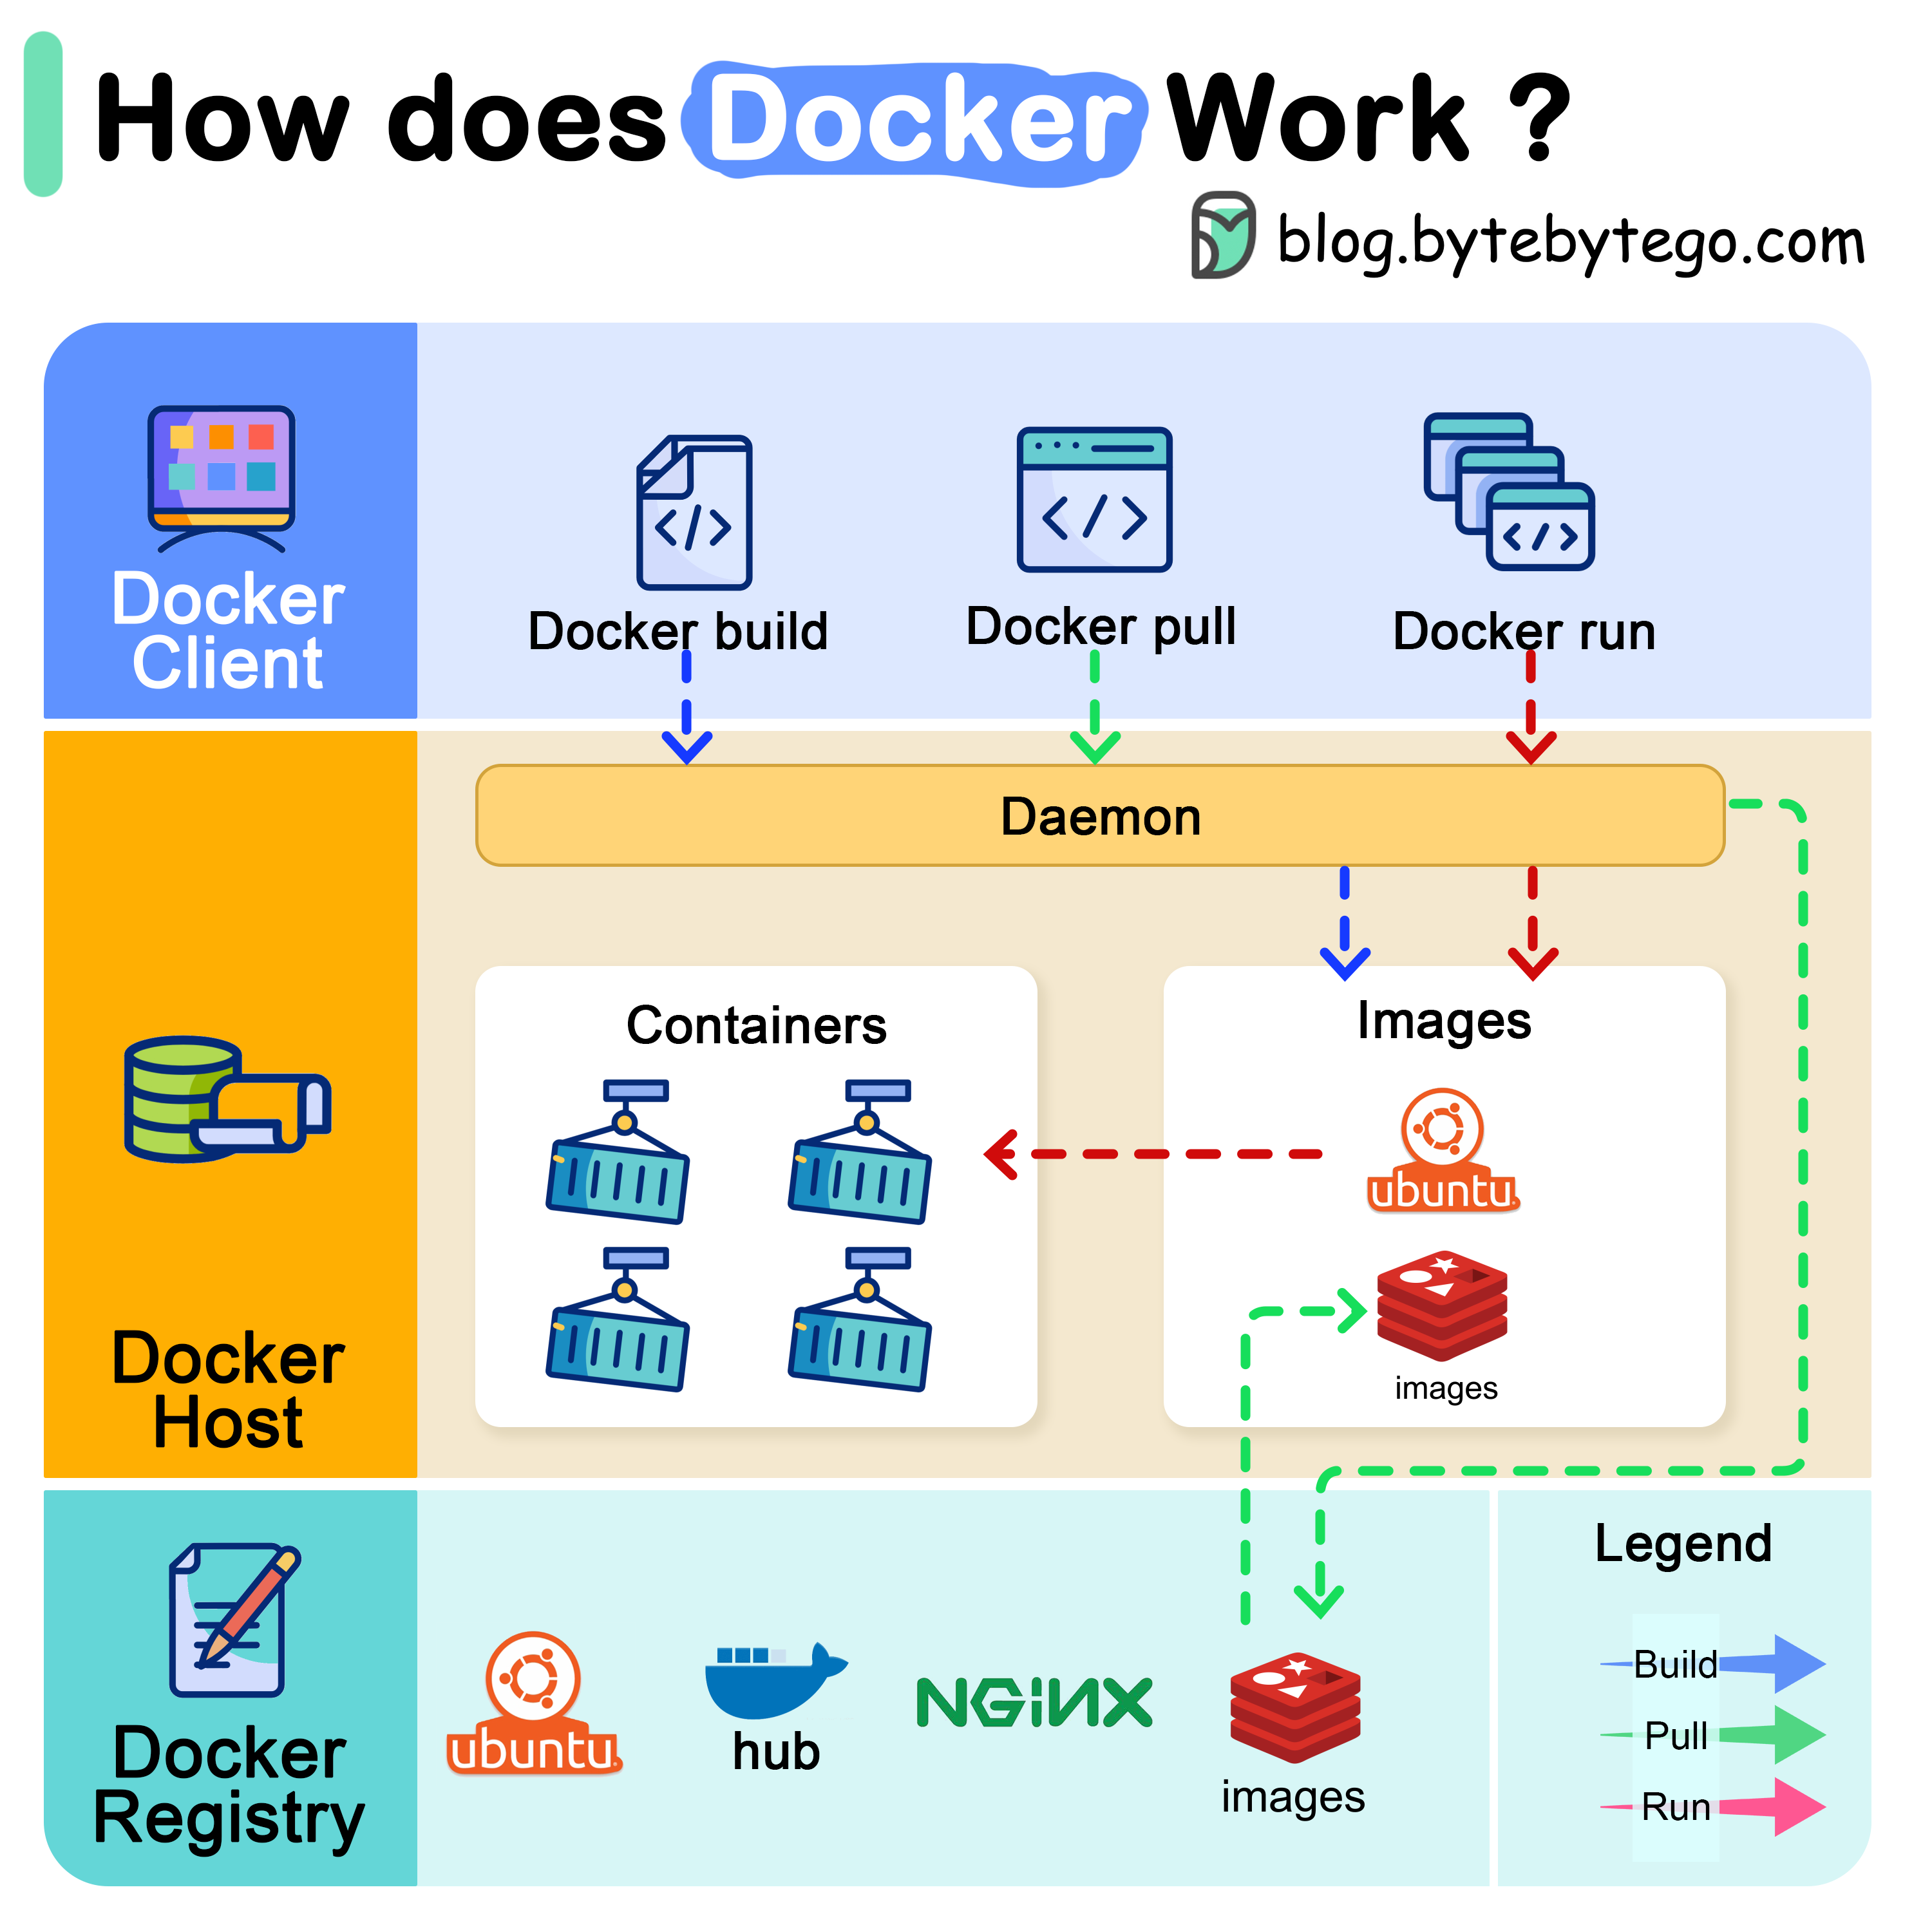
Before we type our first command, it's essential to understand the main parts of the Docker platform that work together.
- Docker Engine: This is the core of Docker. It's a background service (also called a daemon) that runs on your host machine. It's responsible for building, running, and managing your containers.
- Docker Client (CLI): This is the command-line tool you'll use to interact with the Docker Engine. When you type a command like
docker run, the client sends instructions to the daemon. - Docker Image: An image is a read-only template containing everything needed to run an application: the code, a runtime, libraries, environment variables, and configuration files. You can think of it as a blueprint or a recipe.
- Docker Container: A container is a runnable, live instance of an image. If an image is the blueprint, a container is the actual house built from it. You can create, start, stop, move, and delete containers.
- Docker Hub: A cloud-based registry service where you can find and share container images. It's the default public registry that Docker uses, hosting thousands of official and community-built images. Think of it as GitHub, but for Docker images.
The diagram below provides a great high-level overview of how these pieces fit together.
2. Installing Docker
The first practical step is to install the Docker Engine on your machine. The process varies slightly depending on your operating system. For most development work on a personal computer, you will install Docker Desktop, which bundles the Docker Engine, the client CLI, and a helpful graphical user interface. On a Linux server, you would typically install Docker Engine directly.
Docker for Beginners: A Practical Guide to Containers
The following guide from DataCamp provides clear, step-by-step installation instructions for Windows, macOS, and Linux. Please follow the guide for your specific operating system.
Please read the section titled 'Installing Docker'. Follow the steps corresponding to your operating system (Windows, macOS, or Linux). After installation, be sure to run the verification command (docker --version) in your terminal or PowerShell to confirm that it was successful.
Important Note for Linux Users:
By default, Docker commands require root privileges. To run docker commands without sudo every time, you should add your user to the docker group. This is a standard post-installation step. You can do this with the following command:
sudo usermod -aG docker ${USER}
After running this command, you will need to log out and log back in for the group membership to be reapplied.
3. Running Your First Containers
With Docker installed, you're ready for the most satisfying part: running a container. The docker run command is your primary tool for this. It tells the Docker Engine to create and start a container from a specified image. If the image doesn't exist on your machine, Docker will automatically download (or "pull") it from Docker Hub.
The Classic: hello-world
The hello-world image is a tiny container designed specifically to test that your Docker installation is working correctly.
In your terminal, run the following command:
docker run hello-world
You should see output similar to this:
Unable to find image 'hello-world:latest' locally
latest: Pulling from library/hello-world
...
Status: Downloaded newer image for hello-world:latest

Hello from Docker!
This message shows that your installation appears to be working correctly.
...
Let's break down what just happened:
- The Docker client told the Docker Engine to run a container from the
hello-worldimage. - The engine checked for a local image named
hello-world. It didn't find one. - The engine then connected to Docker Hub and pulled the
hello-world:latestimage. - Once downloaded, the engine created a new container from that image.
- The container executed its command, which printed the "Hello from Docker!" message to your terminal, and then it exited.
A Real-World Example: Nginx Web Server
Running "hello-world" is a great start, but let's run something more practical. Nginx is a very popular, high-performance web server. With Docker, you can have it up and running with a single command, without installing anything directly on your host OS.
Docker for Beginners: A Practical Guide to Containers
The same DataCamp guide walks through running an Nginx container. This is a fantastic example of Docker's power.
Read the section 'Running Your First Docker Container'. Focus on the Nginx example. Execute the docker run command provided, and then verify that the web server is running by visiting http://localhost:8080 in your browser.
The command you ran was likely:docker run -d -p 8080:80 nginx
Let's dissect this command:
docker run: The command to create and start a container.-d: This stands for detached mode. It runs the container in the background and prints the container ID. Without this, your terminal would be attached to the container's logs.-p 8080:80: This is for port mapping. It maps port8080on your host machine to port80inside the container. Nginx listens on port 80 by default, so this mapping makes it accessible from your host's browser vialocalhost:8080.nginx: The name of the image to use from Docker Hub.
By running this one line, you've downloaded and launched a fully functional web server in an isolated environment. This is the core value proposition of Docker for a DevOps workflow: fast, reproducible, and portable application deployment.
Test your understanding!
You want to run a container with the official Python image and have it start an interactive shell (bash) so you can execute commands inside it. The image is named python. Based on what you've learned, which docker run flags might you need to add to docker run python ... to achieve this? (Hint: Think about how you've interacted with programs in your terminal before).
Show answer
You would use the -it flags.
-i(interactive) keeps STDIN open, allowing you to type into the container.-t(tty) allocates a pseudo-TTY, which gives you a proper terminal interface.
The full command would be: docker run -it python bash. This will pull the Python image and drop you directly into a bash shell running inside the container.
4. Finding Images on Docker Hub
How did we know to use hello-world or nginx? These are official images available on Docker Hub. You can search for images directly from the command line or by browsing the Docker Hub website.
The official Docker documentation provides a quickstart guide that explains how to find images using the Docker Hub website, Docker Desktop, and the command line.
Read 'Step 1: Find an image in Docker Hub's library'. You don't need to follow all the steps, but pay attention to the different ways you can search for images. Try searching for an image you might use, like ubuntu or redis, using the docker search command in your terminal.
For example, to search for images related to the Redis in-memory database, you could run:
docker search redis
This will return a list of public images, with official images usually listed at the top and marked as [OK] under the OFFICIAL column. Using official images is highly recommended for security and stability.
Conclusion
Congratulations! You have successfully moved from theory to practice by installing Docker and running your first containers. This is a fundamental skill for any DevOps engineer and the first major step in mastering containerization.
Key Takeaways:
- The Docker ecosystem consists of the Docker Engine (daemon), a client (CLI), images (blueprints), and containers (running instances).
- Docker Hub is the central public registry for finding and sharing images.
- The
docker runcommand is used to create and start containers. It automatically pulls images from Docker Hub if they are not present locally. - Command-line flags like
-d(detached) and-p(port mapping) are crucial for running services like web servers.
Next Up: Managing Container Lifecycle
You've now created a running Nginx container. In the next lesson, "Manage container lifecycle using docker run, stop, start, and rm commands," we will explore how to manage this container. You will learn how to view its status, stop it, restart it, and clean it up once you're finished.