Hello! Welcome to your sixth lesson in the "Collaboration with GitHub" module.
In our last lesson, we contrasted two major branching strategies: the highly structured GitFlow and the lean, fast-paced GitHub Flow. You learned the theoretical foundations and the contexts where each shines. Today, we transition from theory to practice.
This lesson is entirely focused on implementing the GitHub Flow. We will walk through a complete feature-based development cycle, from creating a branch to merging your changes into the main codebase. Mastering this workflow is a critical, practical skill for any DevOps professional, as it's the engine that drives modern continuous delivery and deployment pipelines.
1. The GitHub Flow: A Quick Recap
Before we dive in, let's refresh our memory of the GitHub Flow's core principles. Its elegance lies in its simplicity, revolving around a single rule: the main branch must always be deployable.
This workflow is visualized beautifully in the following diagram:
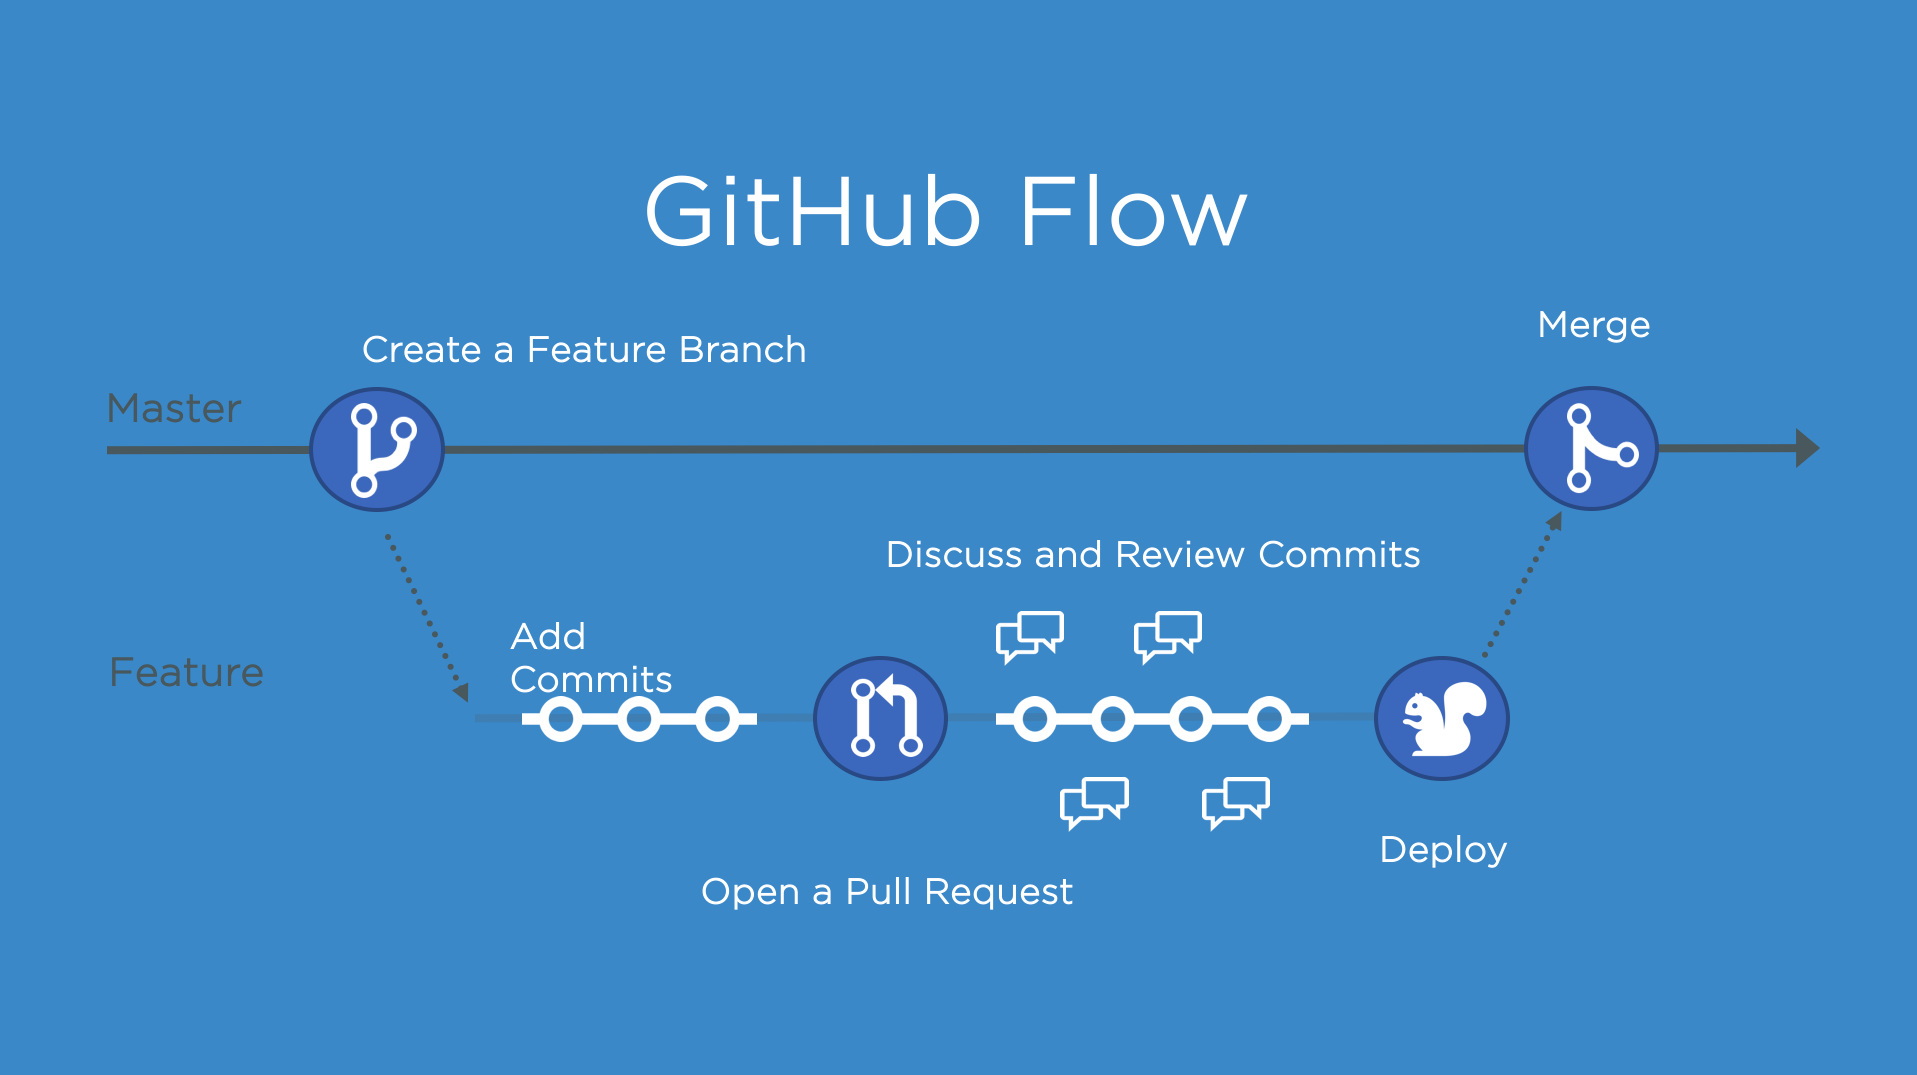
To get a clear, step-by-step overview of this process, let's start with a concise guide.
The Complete Guide to GitHub Flow: A Practical Tutorial for ...
The article 'The Complete Guide to GitHub Flow' by Yodgorbek Komilov provides an excellent, high-level summary of the entire workflow. It breaks it down into six clear steps with corresponding Git commands.
Read the article from the beginning down to the 'Deploy (if applicable)' section. Focus on understanding the sequence of the six main steps. Don't worry about memorizing every command yet; we will practice them next.
2. Hands-On: Implementing the GitHub Flow
Now, let's walk through this entire process with a detailed, practical example. We will simulate adding a new feature to a project. The following video provides a comprehensive demonstration that we will break down step-by-step.
Git Branching and Merging - Detailed Tutorial
This video, 'Git Branching and Merging - Detailed Tutorial' from SuperSimpleDev, offers an excellent, practical walkthrough of what it calls the 'feature branch workflow,' which is essentially the GitHub Flow.
We will be watching from 27:29 to 40:17. I'll guide you through specific segments below, so you can focus on one part of the flow at a time.
Step 1: Create a Feature Branch
The first rule of GitHub Flow is to never work directly on main. All new work, whether it's a feature or a bug fix, begins on a new branch created from the latest version of main.
Your task:
- On your local machine, ensure you are on the
mainbranch and have the latest changes:git checkout main git pull origin main - Create a new, descriptively named branch. A common convention is to use prefixes like
feature/orbugfix/.
Thegit checkout -b feature/add-user-login-bflag both creates the new branch and switches to it in one command.
Step 2: Make and Commit Changes
With your new branch created, you can now start working on the feature. Make changes to the code, add new files, and commit your work in small, logical chunks.
Your task:
- Create a new file or modify an existing one to simulate adding the feature.
- Stage and commit your changes with a clear message.
(Note: Using prefixes like# Make your code changes... git add . git commit -m "feat: Add initial structure for user login page"feat:,fix:, ordocs:in commit messages is a common practice known as Conventional Commits, which we'll explore more later.)
Step 3: Push Your Branch to GitHub
Your commits are still only on your local machine. To share your work and initiate collaboration, you need to push your new branch to the remote repository on GitHub.
Your task:
git push origin feature/add-user-login
The first time you push a new branch, you may need to set the upstream link: git push --set-upstream origin feature/add-user-login.
Step 4: Open a Pull Request (PR)
A Pull Request is the heart of collaboration on GitHub. It's a formal proposal to merge your changes from your feature branch into the main branch. It allows teammates to review your code, see the exact changes (the "diff"), and provide feedback.
After pushing your branch, GitHub will often display a prompt to create a PR. You can also do this manually from the "Pull requests" tab in your repository.
Step 5: The Code Review Process
This is where the team collaboration happens. Reviewers can comment on specific lines of code, ask questions, and suggest improvements.
For a closer look at the review process itself, the next video offers a great perspective.
A typical GitHub workflow // what to expect
The video 'A typical GitHub workflow' from Kahan Data Solutions provides a fantastic look at the review part of the cycle, showing how to request reviewers and interact with comments and suggestions.
Watch from 04:34 to 07:33. Pay close attention to how a reviewer is requested, how they can view the file changes, and how they can leave comments or even suggest specific code changes directly in the PR.
If your reviewers request changes, you simply make more commits on your local feature branch and push them. The Pull Request will update automatically.
Step 6: Merge the Pull Request
Once the PR has been reviewed, approved, and any automated checks (like tests or builds) have passed, it's ready to be merged. Merging incorporates the changes from your feature branch into the main branch.
After merging, it's good practice to delete the feature branch from the remote repository to keep things clean. GitHub provides a button for this right after the merge.
Step 7: Clean Up Locally
The final step is to sync your local repository. Your local main branch is now out of date.
Your task:
- Switch back to your local
mainbranch. - Pull the latest changes from the remote, which now include the feature you just merged.
- Delete your local feature branch, as it's no longer needed.
git checkout main
git pull origin main
git branch -d feature/add-user-login
Test your understanding!
You've just been assigned a task to fix a bug in the site's navigation bar. Using the GitHub Flow, what are the first three git commands you should run on your local machine before you even start writing code? Assume you're currently in the project directory but not necessarily on the main branch.
Show answer
git checkout main- To switch to the main branch.git pull origin main- To ensure your localmainis up-to-date with the remote repository.git checkout -b fix/navbar-bug- To create and switch to a new, descriptively named branch for your work.
3. Handling Merge Conflicts in the Workflow
The process is smooth when you're the only one working, but in a real team, other developers are merging their own PRs into main. This can lead to merge conflicts if your feature branch and the main branch have conflicting changes to the same lines of a file.
GitHub will prevent you from merging a PR with conflicts. Let's see how to resolve this common scenario.
Git Branching and Merging - Detailed Tutorial
Let's return to the SuperSimpleDev video, which has an excellent section on handling merge conflicts within this workflow.
Watch from 40:17 to 53:36. The video simulates a conflict and demonstrates the professional way to resolve it locally. Focus on the key steps: updating your local main, merging main into your feature branch, resolving the conflict, and then pushing the resolution.
To summarize the local resolution process demonstrated in the video:
- Update your local
mainbranch:git checkout main git pull origin main - Switch back to your feature branch:
git checkout feature/your-feature-branch - Merge
maininto your feature branch: This brings the conflicting changes into your branch, allowing you to resolve them locally.git merge main - Resolve the conflict: Git will mark the conflicting files. Open them in your editor, remove the conflict markers (
<<<<<<<,=======,>>>>>>>), and edit the file to be the correct final version. - Commit the resolution:
git add . git commit -m "fix: Resolve merge conflict from main" - Push the resolved branch:
git push origin feature/your-feature-branch
Your Pull Request on GitHub will now be conflict-free and ready for a final review and merge.
Conclusion
You have now walked through the entire GitHub Flow, a cornerstone of modern software development and DevOps. This practical, branch-based workflow enables teams to collaborate efficiently, maintain code quality through reviews, and deploy changes rapidly and safely.
Key Takeaways:
- The GitHub Flow is a simple, powerful workflow centered on the rule that
mainis always deployable. - The lifecycle of a feature is: create a branch, add commits, push the branch, open a Pull Request, participate in a code review, merge the PR, and sync your local repository.
- Pull Requests are the central hub for collaboration, discussion, and quality control.
- Merge conflicts are a normal part of teamwork. Resolving them locally by merging
maininto your feature branch is a key professional skill.
In our next lesson, we will build upon this by learning how to use Git tags to mark release versions and important milestones. This is often the final step after a series of features have been merged, allowing you to create a clear, versioned history of your project.